I recently had a french drain installed. This Home Depot video provides an overview of what is involved.
How to Install a French Drain | The Home Depot
I figured I might as well collect the associated manuals/documents. The pump was manufactured by the Zoeller Pump Company (zoellerpumps.com). The site allows you to search for the pump number. Entering 267 points me to the Model 267 Sewage Pump. There are plenty of associated resources:
When searching for products online, I often peruse the careers page of the manufacturers to get a feel for what types of roles people in various industries have. The Careers – Zoeller Pump Company page lists a CNC Operator/Machinist position that prefers 1 year of experience as a CNC machinist and these other requirements.
Specific Job Duties:
Operate CNC Lathes/Vertical Milling Machines.
Perform set-ups and offset adjustments as required.
Ensure specifications and tolerances are met.
Skills Required:
Minimum of 2 years’ experience required.
Ability to use calipers, indicators, micrometers, etc.
Ability to read & interpret prints.
Must be a self-starter with the ability to lift up to 50 pounds, bend, twist, reach without problems, and be able to stand for long periods of time.
Making a pump like this looks like an interesting project! I’m definitely short on the CNC machining side of things (for now). The Zoeller Company – YouTube channel is a good resource for learning about pumps. Here is their product comparison.
Entry-Level Pumps VS Core Product Line Comparison
Learning about this stuff can be quite the rabbit hole, but I’m happy to be scratching the surface in these spaces.
One of the security podcasts I listened to mentioned using tcpdump to analyze traffic. It looks like a tool you need to build for yourself since is no download page. Build instructions are well documented at tcpdump/doc/README.windows.md. This post is a summary of all the instructions required, including for installation of the Npcap: Windows Packet Capture Library & Driver. First get the Npcap SDK:
cd /c/repos
git clone https://github.com/the-tcpdump-group/tcpdump
cd tcpdump
mkdir build
Run these commands from the Developer command prompt:
cd \repos\tcpdump\build
cmake "-DPCAP_ROOT=C:\software\npcap" -G "Visual Studio 16 2019" -A x64 C:\repos\tcpdump
msbuild /m /nologo /p:Configuration=Debug tcpdump.sln
This takes only 40 seconds on my desktop. Next, run the Npcap 1.79 installer to ensure that launching tcpdump does not fail with this error: “The code execution cannot proceed because wpcap.dll was not found. Reinstalling the program may fix this problem.” We can now run tcpdump:
cd Debug
tcpdump.exe
When tcpdump starts up, it indicates that it is listening on a given device.
C:\repos\tcpdump\build\Debug> tcpdump.exe
tcpdump.exe: verbose output suppressed, use -v[v]... for full protocol decode
listening on \Device\NPF_{SOME-GUID}, link-type EN10MB (Ethernet), snapshot length 262144 bytes
Interestingly, the repo does not have much (any?) documentation on how to use tcpdump. However, there are links to tutorials and numerous other resources at Home | TCPDUMP & LIBPCAP. As per the repo:
Richard Stevens gives an excellent treatment of the Internet protocols in his book “TCP/IP Illustrated, Volume 1”. If you want to learn more about tcpdump and how to interpret its output, pick up this book.
The earlier test tcpdump did not display any traffic on my desktop. Following an introduction to using tcpdump at the Linux command line | Opensource.com, list the available devices using tcpdump -D then select one of them and pass it as the --interface argument. This allows me to find the device that with network traffic.
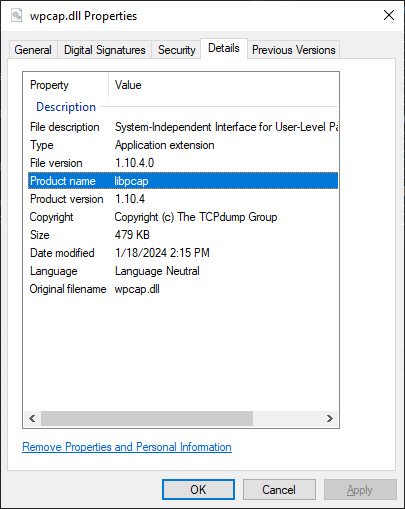
How does tcpdump -D generate the list of network devices? The main function of the application detects the -D option then calls the show_devices_and_exit function, which in turn retrieves the devices by calling the pcap_findalldevs function. Stepping into this call reveals that it is in C:\Windows\System32\wpcap.dll. As shown in the properties of wpcap.dll below, it is part of the libpcap product. This explains why tcpdump fails to start if the Npcap installer is not executed (when “wpcap.dll was not found”). I’m interested in the actual enumeration of network devices but that appears to be part of libpcap, specifically pcap.c. I’ll save that exploration for another day.
One of the cool things about modern day life is that there is always someone out there that has made a video about how to do any task around the house. One of the most useful to me was about weed eater string replacement.
I also have a Ryobi chainsaw. The next video was very helpful, especially the tip about using just a little oil because it leaks! Definitely saw that for myself. The warning about not having any sagging on the chain at the bottom is one I could have used before I recently got my chain off the bar while cutting a fallen branch!
Ryobi 40v Brushless Li-ion 14″ Chainsaw
I searched for “replace ryobi chainsaw chain” on YouTube. This video looks like what I’ll need to fix my chain. I don’t have time for that one this weekend – I certainly want to take my time with this fix, ensure everything is right before powering that chainsaw again.
How to replace a chain on a chainsaw – Another part of our Ryobi 40V 14′ electric chainsaw review
My first Ryobi machine was actually the 20″ Ryobi 40V brushless push mower (I got all this Ryobi equipment from Home Depot, partially for the battery reusability across tools). After moving from a smaller city lot, I decided that mowing over an acre might need something a bit speedier so I bought a used 7-speed Troy-Bilt Pony riding lawn mower. Used a YouTube video to get the gist of how to run it: I think it was this one.
Troy-Bilt Pony 42” Riding Lawn Mower
Confession time: I needed to look up the proper way to use and store this fuel container :-O. Better be safe than blow up in my pride. Typed “midwest can” into the YouTube search and the first suggestion is “midwest can gas can instructions“. Apparently there are models and all sorts of fancy features? Anyway, here’s what the company has to say:
Model 4240 Quick-Flow Spout Introduction and Assembly
Only time will tell whether any more tools will be needed at my place.
My wife joined a local drill team last year and we bought our first horse this year. As a total newbie to the world of horses, I have started picking up a few things. After some basic instruction on Mothers’ day, I thought I might as well compile a list of YouTube videos touching on the topics that she has taught me about so far. One of them is the existence of a “shedding blade.” The blade in the video below looks like something I can make in SolidWorks :D. Nerdy? Perhaps, but still…
Curry Comb
While brushing the horse, she pointed out the flank as one of the sensitive areas. So why not learn the parts of a horse?
What are the Different Parts of a Horse?
The discussion about sensitive parts of the horse naturally transitioned to how to stay safe around the horse, e.g. how to avoid getting kicked. The next video explains this in detail.
How to stay SAFE around your Horse! Tips + things to avoid
Next, I was tasked with walking our horse around the property. And the first mistake I made was in wrapping the lead rope around my hand! Don’t want to get dragged or stepped on. Here is a video with tips on the proper way to lead a horse.
How To Lead A Horse (The RIGHT Way)
I don’t recall exactly how the topic of horse gaits came up, but I found some videos describing them.
HORSE GAITS PART 01 – WALK CYCLE ANALYSIS
HORSE GAITS PART 02 – TROT CYCLE ANALYSIS
HORSE GAITS PART 03 – CANTER CYCLE ANALYSIS
HORSE GAITS PART 04 – GALLOP CYCLE ANALYSIS
Overall, it has been quite interesting learning about this area from the periphery.
The post on Processors & Microfabrication was a brief but helpful refresher on the current state of the art in microfabrication. I have found some (more current) interesting videos on chipmaking this past week. After reviewing an introduction to manufacturing, I found myself wondering which area of manufacturing would be interesting to me (one of the chapters had a question like that). It hit me that fabs are the only manufacturing industry that seem really intriguing at this point (perhaps based on my background in computer science). Therefore, I have been trying to get up to speed with what’s happening in semiconductor manufacturing.
The first video on chipmaking in TX gave me a good sense of how many companies are in this space. Learning that the integrated circuit was invented at Texas Instruments leaves me surprised at how little I know about the history of chips. Some of the companies manufacturing chips in TX are Samsung, Texas Instruments, Infineon, Global Wafers, NXP, and Applied Materials. TI mentions their Power management solutions as part of the vast reach of their products. The video highlights the importance of space, power, and water.
The next video is yet another overview of semiconductor manufacturing. One of the key takeaways for me is that Taiwan leads not just in logic (CPUs, GPUs, etc) but also in memory, courtesy of Micron! 25% of Micron employees are in Taiwan, producing 65% of Micron’s DRAM!
Inside Micron Taiwan’s Semiconductor Factory | Taiwan’s Mega Factories Ep.1
Featured next is Harley Davidson. I have never really paid attention to these bikes or how they are made so this was quite interesting (especially the in-house road tests)!
How It’s Made: Harley Davidson
Another company highlighted is Union Carbide, which I had never heard of before. It features a production technician at a plant making Butanol in St. Charles LA. This area definitely fell into the unknown unknowns for me.
The History of Union Carbide in Kanawha County, WV
The course links to this video about some biofuel research focused on butanol. Doesn’t seem particularly interesting to me but to each their own.
Last company is American Licorice Company plant in Alsip, IL. The Our Story page mentions that they’re now in Indiana. Yet another product whose origins I never before stopped to ponder.
There is also a link to Mike Rowe’s talk on learning from dirty jobs. I’m only now realizing how big of an advocate of vocational jobs Mike is but then again, I didn’t really watch much of his show so it’s not surprising I’m late to the party.
Learning from dirty jobs | Mike Rowe
Finally, there is a discussion about safety practices and personal protective equipment (PPE).
Personal Protective Equipment (PPE): An Overview of the Basics | Your ACSA Safety Training
I wasn’t sure what to expect from such a course, but it has certainly been educational given that I now see Doritos and my first thought is how was this made and packaged and what does the supply chain look like?
I was recently trying to build the Prime95 Mersenne search software in Visual Studio 2022 when I got error messages about missing a gmp.h dependency.
1>C:\repos\gimps\p95v3019b13.source\common.h(23,10): error C1083: Cannot open include file: 'gmp.h': No such file or directory
...
This got me started trying to figure out how to build the GMP sources on Windows. It was easy to do in the MSYS MINGW64 shell. Use these steps:
cd /c/repos/gmp
curl -Lo gmp-6.3.0.tar.xz https://gmplib.org/download/gmp/gmp-6.3.0.tar.xz
unxz --keep gmp-6.3.0.tar.xz
tar xf gmp-6.3.0.tar
cd gmp-6.3.0
./configure
make
Such distractions aside, there is a link to download gmp-6.3.0.tar.xz:
cd /c/repos/gmp

curl -Lo gmp-6.3.0.tar.xz https://gmplib.org/download/gmp/gmp-6.3.0.tar.xz

file gmp-6.3.0.tar.xz
The file command outputs gmp-6.3.0.tar.xz: XZ compressed data, checksum CRC64. Thisrepresents XZ data compression, which is unfamiliar to me (haven’t run into this often). The unxz command can be used to decompress the file with the --keep option to avoid removing the source file.
unxz --keep gmp-6.3.0.tar.xz
tar xf gmp-6.3.0.tar

# Search for gmp.h
cd gmp-6.3.0
find . -name "gmp.h"
On an MS-DOS system DJGPP can be used to build GMP, and on an MS Windows system Cygwin, DJGPP and MINGW can be used. All three are excellent ports of GCC and the various GNU tools.
Trying building it in the MSYS MINGW64 Shell. The end of the ./configure output is shown below. The host type and install prefix are different from the Cygwin environment’s.
config.status: linking mpn/x86_64/k8/gmp-mparam.h to gmp-mparam.h
config.status: executing libtool commands
configure: summary of build options:

  Version:           GNU MP 6.3.0
  Host type:         x86_64-w64-mingw32
  ABI:               64
  Install prefix:    /mingw64
  Compiler:          gcc
  Static libraries:  yes
  Shared libraries:  no
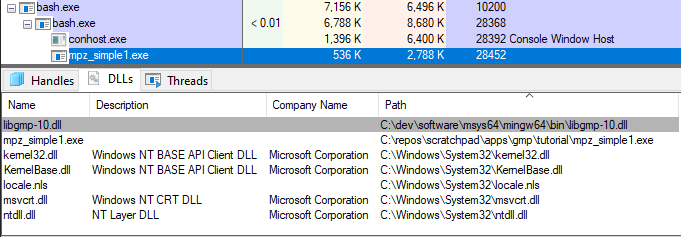
The make command succeeds in the MSYS MINGW64 Shell, running for 4 minutes. I can ignore Cygwin for now. Let’s try the Tutorial on GMP (colorado.edu). Copy the example into a file called mpz_simple1.c then use the command from the tutorial to compile it. Interestingly, I don’t need the -I and -L arguments from the tutorial. The gmp library must already be installed.
cd /c/repos/scratchpad/apps/gmp/tutorial
gcc -o mpz_simple1 mpz_simple1.c -lgmp
To see how gmp.h and the libraries are found, run these commands:
Poking around in file explorer shows 2022-01-05 timestamps for gmp.h and libgmp.*. Looks like these were indeed installed with MSYS. How do I automatically output the timestamps for each result of find? bash – How to loop through file names returned by find? – Stack Overflow suggests this command:
find . -name "*gmp*" | while IFS= read -r file; do ls -l $file; done
At this point, all we have seen is how to build GMP in the MSYS MINGW64 shell. We have also verified that we can build a sample GMP program, the Tutorial on GMP (colorado.edu). The Cygwin and Visual Studio environments can be investigated another time.
I have been trying to branch out of computer science/software and learn more about how things are made in the “real world”. Here are some videos that I have watched as part of an online intro to manufacturing course I’m slowly working through. The key idea in the first video is that not everybody needs to get a 4-year degree. Don’t overlook manufacturing when picking a career path.
Path To Careers – The Truth About Manufacturing Careers
The Path to Careers video above features people from these companies:
The “future of manufacturing” video below might be a bit dated now. I’m not sure how many of its predictions hold as of today.
The Future of Manufacturing
There is also a discussion of the services industry in manufacturing, which is great because it really opens my eyes to how I’ve never really thought much about this sector.
The Evolution of Manufacturing Services Industry
Another video to stimulate some thinking about supply chains:
What Toilet Paper Can Teach Us About Supply Chains | Willy Shih | TEDxBeaconStreet
To build and run the JMH benchmark, ensure Maven is installed (the mvn command should be available in the shell). On Ubuntu, this is as easy as running sudo apt install maven then setting up JMH using the steps below.
git clone https://github.com/swesonga/benchmarks
cd benchmarks
cd java/jmh
./setup_jmh_jdk_micros.sh
./run_jmh_jdk_micros.sh Parallel 1 2 10 5 5
The setup_jmh_jdk_micros.sh script builds the JMH JDK microbenchmarks and the run_jmh_jdk_micros.sh run the benchmark. Someone recently asked why there are 2 java processes shown in top when the run_jmh_jdk_micros.sh script runs given that it launches only 1 java process. I learned from this site how to use top to see java processes only: run top, type ‘o’, then type ‘COMMAND=java’ and press ENTER. This is the resulting output from the top command:
top - 22:15:21 up  8:15,  1 user,  load average: 1.73, 0.66, 0.30
Tasks: 330 total,   1 running, 329 sleeping,   0 stopped,   0 zombie
%Cpu(s): 20.9 us,  0.6 sy,  0.0 ni, 78.3 id,  0.0 wa,  0.0 hi,  0.2 si,  0.0 st
MiB Mem :  15415.5 total,   5837.9 free,   5436.0 used,   4141.6 buff/cache
MiB Swap:   2048.0 total,   2048.0 free,      0.0 used.   9568.6 avail Mem

    PID USER      PR  NI    VIRT    RES    SHR S  %CPU  %MEM     TIME+ COMMAND
  22007 saint     20   0 5009436   1.1g  22464 S 345.3   7.2   1:02.74 java
  21927 saint     20   0 5607592   1.1g  23100 S   0.3   7.2   0:01.08 java
Sure enough, there are 2 java processes, each with 1.1g RES. This can also be confirmed by running the ps -aux | grep java command.
Notice that one of the processes has an IP address and what is most likely a port number. Without knowing anything else, this would suggest a client/server model in use. To better understand why there are 2 java processes, let us see look at how the run script launches Java. It passes flags like -f 1 to the benchmark jar file. What parses these flags?
The benchmark JAR file is created from a pom.xml file containing a mainClass attribute of org.openjdk.jmh.Main. That’s the class responsible for parsing these flags. This Main class uses the CommandLineOptions class to parse arguments like -f 1 then executes the Runner.run() method. Runner.runBenchmarks() checks whether the benchmarks should be run embedded or forked. runBenchmarksEmbedded() has a warning about using non-forked runs only for debugging purposes. This answers the question of why there are 2 JVMs: we are running in forked mode. runSeparate() has a getForkedMainCommand() method, which suggests that there is most likely a way to pass custom arguments to the ForkedMain JVM.
Now that we understand why there are 2 JVMs, can we control the heap size of each of them independently? The CommandLineOptions class has a list of all the supported arguments. Notice the jvmArgs, jvmArgsAppend, and jvmArgsAppend arguments! These suggest that we can indeed control the heap sizes of each of the JVMs. Use the jvmArgsAppend flag in the run_jmh_jdk_micros.sh script (e.g. just before the benchmark_filter_regex to specify a custom heap size for the forked java process (independent of the jvm_heap_size_opts).
Installing Maven
I did not have Java set up on my Ubuntu VM. Therefore, setting up MVN installed Java and many other dependencies. I decided to list these here for future reference.
saint@vm1ubuntu:~/java$ sudo apt install maven
Reading package lists... Done
Building dependency tree... Done
Reading state information... Done
The following additional packages will be installed:
  ca-certificates-java default-jre-headless java-common libaopalliance-java libapache-pom-java libatinject-jsr330-api-java libcdi-api-java libcommons-cli-java
  libcommons-io-java libcommons-lang3-java libcommons-parent-java libgeronimo-annotation-1.3-spec-java libgeronimo-interceptor-3.0-spec-java libguava-java
  libguice-java libhawtjni-runtime-java libjansi-java libjansi-native-java libjsr305-java libmaven-parent-java libmaven-resolver-java libmaven-shared-utils-java
  libmaven3-core-java libplexus-cipher-java libplexus-classworlds-java libplexus-component-annotations-java libplexus-interpolation-java libplexus-sec-dispatcher-java
  libplexus-utils2-java libsisu-inject-java libsisu-plexus-java libslf4j-java libwagon-file-java libwagon-http-shaded-java libwagon-provider-api-java
  openjdk-11-jre-headless
Suggested packages:
  default-jre libaopalliance-java-doc libatinject-jsr330-api-java-doc libel-api-java libcommons-io-java-doc libcommons-lang3-java-doc libasm-java libcglib-java
  libjsr305-java-doc libmaven-shared-utils-java-doc liblogback-java libplexus-classworlds-java-doc libplexus-sec-dispatcher-java-doc libplexus-utils2-java-doc junit4
  testng libcommons-logging-java liblog4j1.2-java fonts-dejavu-extra fonts-ipafont-gothic fonts-ipafont-mincho fonts-wqy-microhei | fonts-wqy-zenhei
The following NEW packages will be installed:
  ca-certificates-java default-jre-headless java-common libaopalliance-java libapache-pom-java libatinject-jsr330-api-java libcdi-api-java libcommons-cli-java
  libcommons-io-java libcommons-lang3-java libcommons-parent-java libgeronimo-annotation-1.3-spec-java libgeronimo-interceptor-3.0-spec-java libguava-java
  libguice-java libhawtjni-runtime-java libjansi-java libjansi-native-java libjsr305-java libmaven-parent-java libmaven-resolver-java libmaven-shared-utils-java
  libmaven3-core-java libplexus-cipher-java libplexus-classworlds-java libplexus-component-annotations-java libplexus-interpolation-java libplexus-sec-dispatcher-java
  libplexus-utils2-java libsisu-inject-java libsisu-plexus-java libslf4j-java libwagon-file-java libwagon-http-shaded-java libwagon-provider-api-java maven
  openjdk-11-jre-headless
0 upgraded, 37 newly installed, 0 to remove and 72 not upgraded.
Need to get 52.7 MB of archives.
After this operation, 189 MB of additional disk space will be used.
Do you want to continue? [Y/n]
The build_llvm_release.bat script in the LLVM repo is used to create a release build for Windows. Running it without any arguments displays a sample command line to use to build LLVM.
cd \repos && mkdir llvmcd \repos\llvm\llvm-project\llvm\utils\release
C:\> cd \repos\llvm\llvm-project\llvm\utils\release
C:\repos\llvm\llvm-project\llvm\utils\release> build_llvm_release.bat
--version option is required
=============================
Script for building the LLVM installer on Windows,
used for the releases at https://github.com/llvm/llvm-project/releases
Usage: build_llvm_release.bat --version <version> [--x86,--x64, --arm64]
Options:
--version: [required] version to build
--help: display this help
--x86: build and test x86 variant
--x64: build and test x64 variant
--arm64: build and test arm64 variant
Note: At least one variant to build is required.
Example: build_llvm_release.bat --version 15.0.0 --x86 --x64
Let us build version 17.0.1, which is the latest LLVM release. Open an administrator Developer Command Prompt then run:
:: set PATH=%PATH%;C:\Program Files\7-Zip
build_llvm_release.bat --version 17.0.1 --x64
The first error is caused by mv not being a standard command in the Windows command prompt. There are ways to create aliases, e.g. alias – Aliases in Windows command prompt – Stack Overflow but given that this is a batch file, why not just use the built-in function? I fix this in the script.
C:\repos\llvm\llvm-project\llvm\utils\release\llvm_package_17.0.1> mv llvm-project-* llvm-project   || exit /b 1
'mv' is not recognized as an internal or external command,
operable program or batch file.
The build directory needs to be deleted before restarting the build with the fix. Otherwise, the script will fail.
However, from a new command window, it looks like it hasn’t been set up.
C:\repos> python --version
Python was not found; run without arguments to install from the Microsoft Store, or disable this shortcut from Settings > Manage App Execution Aliases.
Just running python loads the Microsoft Store:
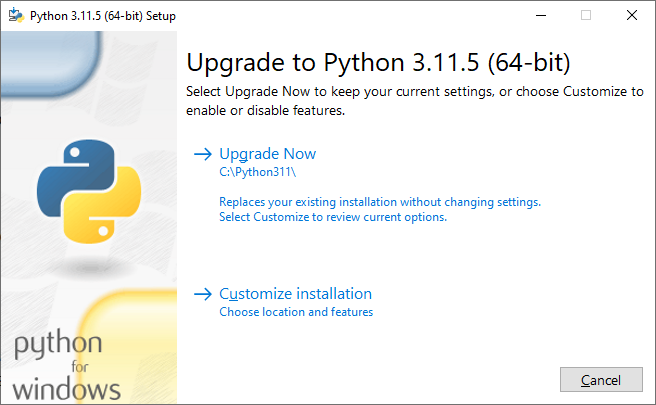
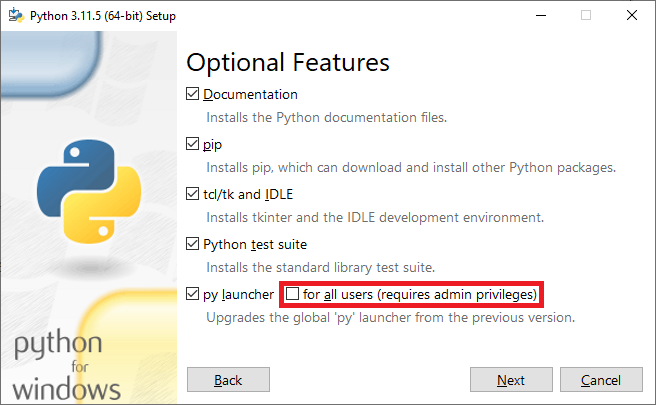
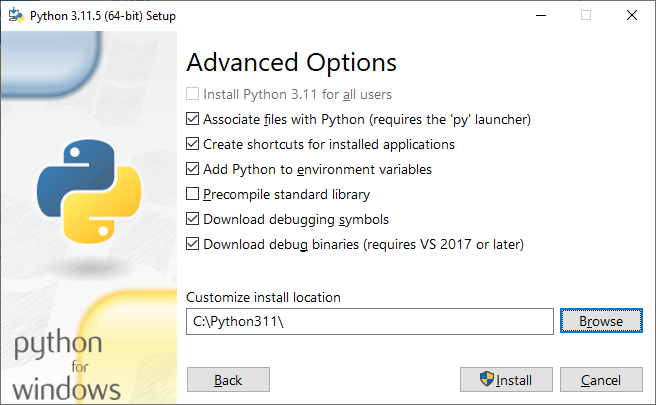
I proceed with the Customize Installation option in the open Python installer, this time selecting “for all users (requires admin privileges)”.
I’m not sure why the “Install Python 3.11 for all users” option is not checked on the “Advanced Options” page.
Opening a new command prompt then running python still gives the same behavior as before. where python shows that the new installation appears 2nd.
C:\repos> where python
C:\Users\saint\AppData\Local\Microsoft\WindowsApps\python.exe
C:\Python311\python.exe
The PATH environment variable has these paths in reverse order so I don’t understand what is happening. Looks like the easiest way forward is to just install python from the Microsoft Store – this at least ensures that python scripts can run. After a failure due to the python command not being found, closer inspection of build_llvm_release.bat reveals that it needs the PYTHON_HOME environment variable to be set. However, that is set on line 358 using the python_dir variable, which is in turn the first argument to :set_environment. The call to set_environment is from :do_build_32 (or do_build_64), which uses a hard-coded python path! The script should first validate the python installation and exit early if it cannot be found! I should have reported/fixed these when I worked on Tracking Down Missing Headers in LLVM for Windows – Saint’s Log (swesonga.org) last year.
Build Errors
With the Python path fixed, the build proceeds but the C++ compilation fails. A few months ago I got the error below build version 15.0.7. Unfortunately, I didn’t explicitly note the compiler version.
FAILED: tools/clang/lib/Analysis/FlowSensitive/CMakeFiles/obj.clangAnalysisFlowSensitive.dir/HTMLLogger.cpp.obj
C:\PROGRA~1\MICROS~3\2022\COMMUN~1\VC\Tools\MSVC\1438~1.331\bin\Hostx64\x64\cl.exe  /nologo /TP ... -c C:\repos\llvm\llvm-project\llvm\utils\release\llvm_package_17.0.1\llvm-project\clang\lib\Analysis\FlowSensitive\HTMLLogger.cpp
C:\repos\llvm\llvm-project\llvm\utils\release\llvm_package_17.0.1\llvm-project\clang\lib\Analysis\FlowSensitive\HTMLLogger.cpp(332): fatal error C1001: Internal compiler error.
(compiler file 'msc1.cpp', line 1587)
 To work around this problem, try simplifying or changing the program near the locations listed above.
If possible please provide a repro here: https://developercommunity.visualstudio.com
Please choose the Technical Support command on the Visual C++
 Help menu, or open the Technical Support help file for more information
Additional troubleshooting is obviously required to make progress here. I might try to create a narrowed down testcase for the internal compiler error or perhaps just report it as is and let the Visual C++ team figure that out.