Before my changes, safefetch.hpp included safefetch_windows.hpp, which uses structured exception handling. The read is done in a __try { } __except block. However, the Windows AArch64 port uses vectored exception handling. This is therefore not the right approach. I added the !defined(_M_ARM64) check to ensure that safefetch_static.hpp is included instead. This requires us to implement SafeFetch32_impl and SafeFetchN_impl, the same way the Linux and macosx AArch64 implementation do. These functions are declared as extern C because they will be implemented in assembly, specifically in safefetch_windows_aarch64.S. Here’s the implementation of SafeFetchN_impl (copied to match the other 2 AArch64 platforms):
    ; Support for intptr_t SafeFetchN(intptr_t* address, intptr_t defaultval);
    ;
    ;  x0 : address
    ;  x1 : defaultval

    ALIGN  4
    EXPORT _SafeFetchN_fault
    EXPORT _SafeFetchN_continuation
    EXPORT SafeFetchN_impl

SafeFetchN_impl
_SafeFetchN_fault
    ldr      x0, [x0]
    ret

_SafeFetchN_continuation
    mov      x0, x1
    ret

    END
Notice that it is a 4 assembly instructions function. The ldr instruction tries to dereference the pointer in x0. If the memory access succeeds, the function returns the loaded value successfully. Otherwise, the exception handler will be invoked. The exception handling logic checks whether the exception being handled was caused by the safefetch load. This is where the _SafeFetchN_fault label comes into play. If the exception is an EXCEPTION_ACCESS_VIOLATION, we can check whether the PC was at the _SafeFetchN_fault (the ldr) instruction. If so, the exception handler sets the PC in the OS CONTEXT structure to the _SafeFetchN_continuation instruction. The exception handler then returns EXCEPTION_CONTINUE_EXECUTION to allow execution to resume successfully at the mov instruction, which simply loads x0 with the error value that was passed in x1. The 32-bit safefetch function has an identical structure.
A few months ago, I was investigating some exception handling OpenJDK bugs on Windows AArch64. One of the bugs was in the safefetch implementation. I needed to switch part of the implementation to assembly language (similar to the Linux and macosx aarch64 safefetch implementations). Compilation failed after I added the new safefetch_windows_aarch64.S assembly source file. The failing command line was in the .cmdline file when the build terminated:
Command from build\windows-x86_64-server-slowdebug\make-support\failure-logs\support_native_jdk.incubator.vector_libjsvml_jsvml_d_acos_windows_x86.obj.cmdline

/cygdrive/d/java/ms/dups/openjdk-jdk/build/windows-x86_64-server-slowdebug/fixpath exec /cygdrive/c/progra~1/mib055~1/2022/enterprise/vc/tools/msvc/14.44.35207/bin/hostx64/x64/ml64.exe -nologo -c -Ta -Fo/cygdrive/d/java/ms/dups/openjdk-jdk/build/windows-x86_64-server-slowdebug/support/native/jdk.incubator.vector/libjsvml/jsvml_d_acos_windows_x86.obj /cygdrive/d/java/ms/dups/openjdk-jdk/src/jdk.incubator.vector/windows/native/libjsvml/jsvml_d_acos_windows_x86.S

From build\windows-x86_64-server-slowdebug\make-support\failure-logs\support_native_jdk.incubator.vector_libjsvml_jsvml_d_acos_windows_x86.obj.log

 Assembling: -Fod:\java\ms\dups\openjdk-jdk\build\windows-x86_64-server-slowdebug\support\native\jdk.incubator.vector\libjsvml\jsvml_d_acos_windows_x86.obj
MASM : fatal error A1000:cannot open file : -Fod:\java\ms\dups\openjdk-jdk\build\windows-x86_64-server-slowdebug\support\native\jdk.incubator.vector\libjsvml\jsvml_d_acos_windows_x86.obj
I just needed to have a separate else branch to handle setting up armasm64.exe to avoid passing ml64.exe flags to armasm64.exe. This successfully assembled my AArch64 assembly source file. However, the JVM would terminate with an access violation, which clearly isn’t supposed to happen because the fetch is supposed to be safe, by definition! I asked copilot: when would the program counter pointing at this aarch64 instruction result in an access violation? mov x0, x1. One scenario:
The Program Counter (PC) is pointing to an invalid address
If the PC is pointing to a location that is not mapped in the process’s address space (e.g., due to corruption, jumping to unmapped memory, or executing data as code), then fetching the instruction itself could trigger an access violation.
Example: If the PC points to a region of memory that has been freed or is protected (e.g., read-only or non-executable), the CPU will raise a fault when trying to fetch or decode the instruction.
This gave me a hint that my assembly instructions were probably not in an executable page! I found the AREA directive details at ARM Compiler armasm Reference Guide Version 6.01. It was tricky that the first AREA argument is a name and could therefore be anything. If I recall correctly, I think the access violation was because I didn’t have the CODE attribute on the AREA. With that fixed, I was able to successfully execute the compiled JVM.
This resulted in this error, which confirmed that it was a valid place to set the flag:
=== Output from failing command(s) repeated here ===
* For target support_native_jdk.incubator.vector_libjsvml_BUILD_LIBJSVML_run_ld:
LINK : fatal error LNK1181: cannot open input file 'd:\java\forks\dups12\openjdk\jdk\build\windows-x86_64-server-slowdebug\support\native\jdk.incubator.vector\libjsvml\jsvml_d_acos_windows_x86.obj'
* For target support_native_jdk.incubator.vector_libjsvml_jsvml_d_acos_windows_x86.obj:
 Assembling: sdf
MASM : fatal error A1000:cannot open file : sdf
* For target support_native_jdk.incubator.vector_libjsvml_jsvml_d_asin_windows_x86.obj:
 Assembling: sdf
MASM : fatal error A1000:cannot open file : sdf
After Magnus’s feedback on 8/23, I reverted that change and tried this instead:
diff --git a/make/autoconf/flags.m4 b/make/autoconf/flags.m4
index d50538108a4..8ba1a313cb2 100644
--- a/make/autoconf/flags.m4
+++ b/make/autoconf/flags.m4
@@ -320,6 +320,11 @@ AC_DEFUN([FLAGS_SETUP_TOOLCHAIN_CONTROL],
 [
   if test "x$TOOLCHAIN_TYPE" = xmicrosoft; then
     CC_OUT_OPTION=-Fo
+    if test "x$OPENJDK_TARGET_CPU" = xaarch64; then
+      AS_NON_ASM_EXTENSION_FLAG=
+    else
+      AS_NON_ASM_EXTENSION_FLAG=-Tazzz
+    endif
   else
     # The option used to specify the target .o,.a or .so file.
     # When compiling, how to specify the to be created object file.
diff --git a/make/common/native/CompileFile.gmk b/make/common/native/CompileFile.gmk
index 26472da6d02..7f8e8ffeddc 100644
--- a/make/common/native/CompileFile.gmk
+++ b/make/common/native/CompileFile.gmk
@@ -236,7 +236,7 @@ define CreateCompiledNativeFileBody
             # For assembler calls just create empty dependency lists
            $$(call ExecuteWithLog, $$@, $$(call MakeCommandRelative, \
                $$($1_COMPILER) $$($1_FLAGS) \
-               $(CC_OUT_OPTION)$$($1_OBJ) $$($1_SRC_FILE))) \
+               $(CC_OUT_OPTION)$$($1_OBJ) $(AS_NON_ASM_EXTENSION_FLAG) $$($1_SRC_FILE))) \
                | $(TR) -d '\r' | $(GREP) -v -e "Assembling:" || test "$$$$?" = "1" ; \
            $(ECHO) > $$($1_DEPS_FILE) ; \
            $(ECHO) > $$($1_DEPS_TARGETS_FILE)
The configure script failed:
Runnable configure script is not present
Generating runnable configure script at /cygdrive/d/java/forks/dups12/openjdk/jdk/build/.configure-support/generated-configure.sh
Using autoconf at /usr/bin/autoconf [autoconf (GNU Autoconf) 2.72]
-:166141: error: possibly undefined macro: AS_NON_ASM_EXTENSION_FLAG
      If this token and others are legitimate, please use m4_pattern_allow.
      See the Autoconf documentation.
configure: Configuration created at Sat Aug 23 15:11:36 MDT 2025.
On the prompt " recipe commences before first target" Copilot says:
The error message “recipe commences before first target” in GNU Make typically means that there’s a line in your Makefile that starts with a tab (indicating a recipe), but it appears before any target has been defined. In Makefiles, recipes (commands to execute) must follow a target and its dependencies.
I moved the check further up, which fixed the build. After the PR was closed, I got a comment about the quotes I introduced! They shouldn’t be there :(.
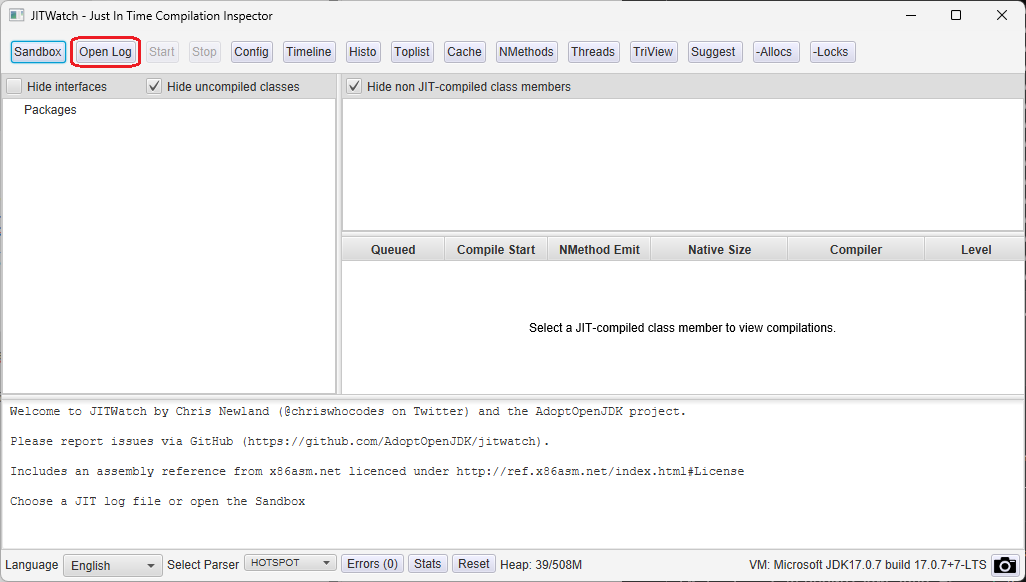
Let us try using JITWatch on the sample Factorization program I have been using to learn about systems performance. Use these instructions from that blog post to get JITWatch:
git clone https://github.com/AdoptOpenJDK/jitwatch.git
cd jitwatch
mvn clean package
# Produces an executable jar in ui/target/jitwatch-ui-shaded.jar

java -jar ui/target/jitwatch-ui-shaded.jar
Start the factorization sample application such that a hotspot log file is generated. To do so, use the flags listed in the JITWatch Instructions · AdoptOpenJDK/jitwatch Wiki (github.com). I decide to redirect the output to a file to avoid filling the script with the additional logging output.
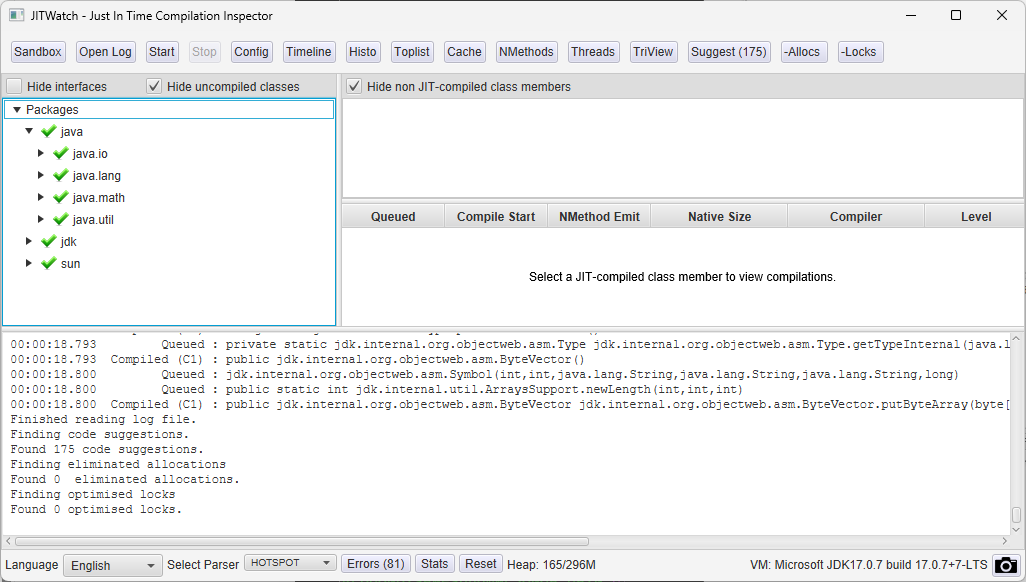
Click on the “Open Log” button in JITWatch then select the hotspot*.log file. Next, click on the Start button to process the JIT log.
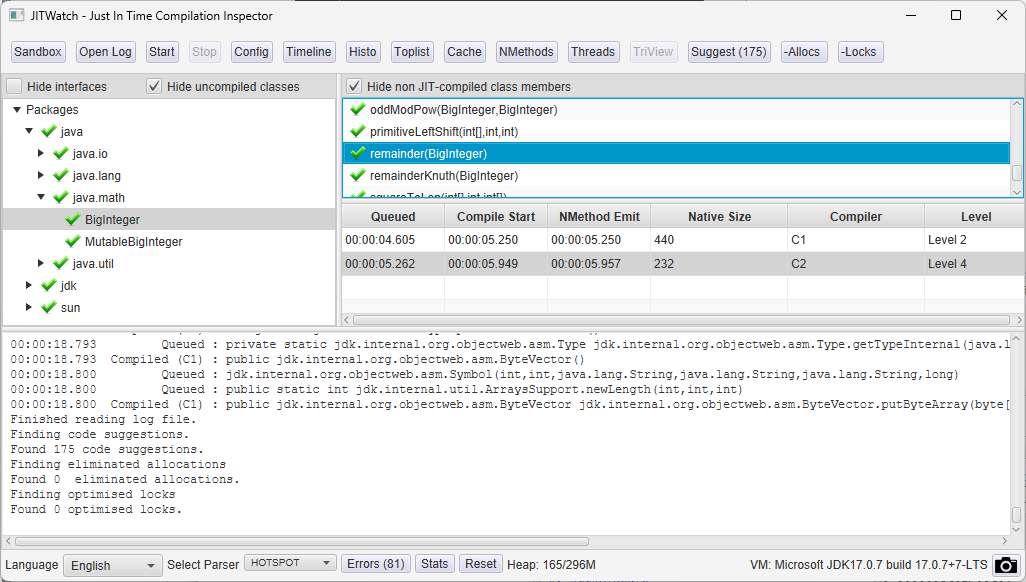
Opening a HotSpot Log FileProcessed HotSpot LogViewing JIT-compiled Class Members
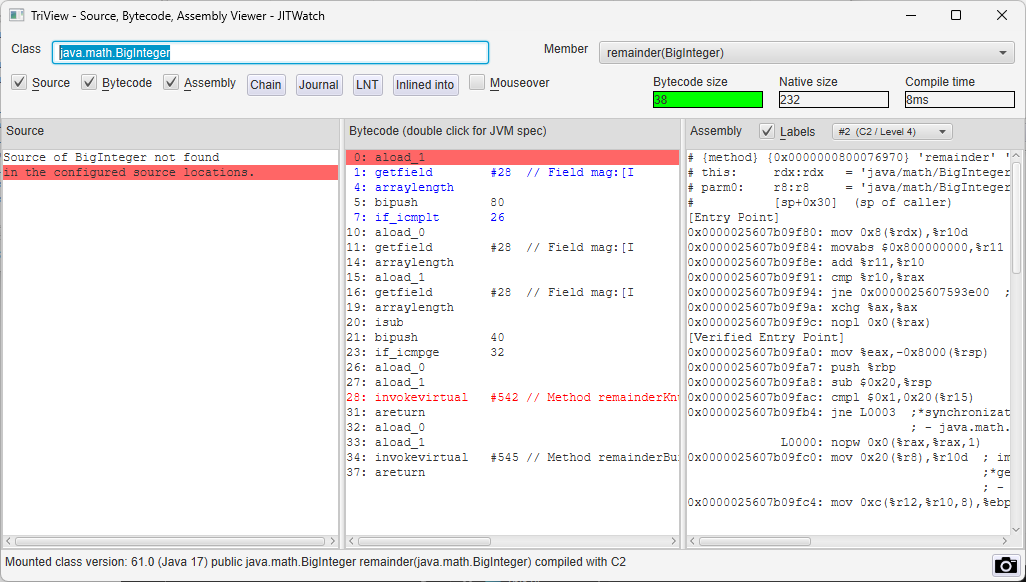
Clicking on a class member opens another window with the corresponding assembly instructions generated by the JIT. I haven’t set up any source code locations but the assembly instructions are still displayed.
Setting up MVN on Windows
To run JITWatch on Windows, download the Maven binaries from Maven – Download Apache Maven and verify the hashes using certutil. Extract the downloaded .zip file using tar. Here are the instructions I used in Git Bash.
mkdir -p /c/java/binaries/apache
cd /c/java/binaries/apache

curl -Lo apache-maven-3.9.3-bin.zip https://dlcdn.apache.org/maven/maven-3/3.9.3/binaries/apache-maven-3.9.3-bin.zip

certutil -hashfile apache-maven-3.9.3-bin.zip SHA512
# shasum -a 512 apache-maven-3.9.3-bin.zip

tar xf apache-maven-3.9.3-bin.zip
mkdir -p ~/java/binaries/jdk/x64
cd ~/java/binaries/jdk/x64
wget https://aka.ms/download-jdk/microsoft-jdk-17.0.7-linux-x64.tar.gz
tar xzf microsoft-jdk-17.0.7-linux-x64.tar.gz
Test the factorization application to verify that the Java build works.
export JAVA_HOME=~/java/binaries/jdk/x64/jdk-17.0.7+7

cd ~/repos/scratchpad/demos/java/FindPrimes
$JAVA_HOME/bin/javac Factorize.java
$JAVA_HOME/bin/java Factorize 123890571352112309857

# Use 4 threads to speed things up
$JAVA_HOME/bin/java Factorize 123890571352112309857 CUSTOM_THREAD_COUNT_VIA_THREAD_CLASS 4
We will need the PrintAssembly option to disassemble the code generated by the compiler when running a Java program. This option requires diagnostic VM options to be unlocked. This is the full command line for generating the disassembly from the application’s execution. The output is redirected to a code.asm file since it can be voluminous.
In the above example, I have used a Java build in a custom path. If you are using a Java build that is already installed, then a few extra steps might be needed to determine where the JAVA_HOME path, e.g.
saint@ubuntuvm:~$ which java
/usr/bin/java
saint@ubuntuvm:~$ ls -l `which java`
saint@ubuntuvm:~$ ls -l /etc/alternatives/java
This path C:\Program Files\Microsoft Visual Studio\2022\Enterprise\VC\Auxiliary\Build has various scripts to set up a command window as documented at Use the Microsoft C++ toolset from the command line | Microsoft Docs. If vcvarsx86_arm64.bat and vcvarsamd64_arm64.bat are missing in that folder on your Windows x64 machine, install the MSVC v143 – VS 2022 C++ ARM64 build tools (Latest) component in the Visual Studio 2022 installer.
Selection ARM64 Build Tools in VS Installer
Once it is installed, open a new cmd.exe window and run this command to set up the build environment:
To see the command Visual Studio uses to build the project, create a C++ console application and use the Configuration Manager to change the Active solution platform to ARM64. Next, go to Tools > Options then expand the Projects and Solutions node. Select Build And Run then change the MSBuild project build output verbosity to Detailed. Building the project should now show the full command line used to invoke the compiler, for example here are the command lines used in the Debug and Release configurations respectively.
Notice the /O2 flag (maximize speed) in the release build instead of the /Od flag (no optimizations) above. The debug build also uses the just my code /JMC, runtime error checks /RTC1, and debug multithread-specific version of the run-time library /MDd flags. For our testing purposes, we can ignore most of these flags.
Calling Printf
Here is a simple program, aarch64-abi-test-printf.cpp, which calls printf with a format specifier and 4 additional arguments.
#include <stdio.h>

int main()
{
    int result = printf("%.4f,%.4f,%.4f,%s", 1.2345, 1.2345, 1.2345, "str");
}
In the disassembly generated by dumpbin (printf-abi.asm), notice that all 5 arguments to printf are passed in registers! x0 contains a pointer to the format string, x1-x3 contain the address of the $LN3 label. The 64-bits at that label are the IEEE double floating point representation of 1.2345. x4 contains a pointer to the null-terminated string “str“.
Which are the printf String Arguments?
To determine what symbols in instructions like adrp x8,$SG5571 mean, we use the output of dumpbin /all. The RELOCATIONS section shows $SG5571 to have symbol index 8. The COFF SYMBOL TABLE shows this symbol index 8 to be in SECT3. The raw data for section 3 contains the format string and the single string parameter passed to printf. I’m still not sure how the assembler knows the difference in offsets between these 2 strings?
.
.
.
SECTION HEADER #3
  .rdata name
       0 physical address
       0 virtual address
      1A size of raw data
     31A file pointer to raw data (0000031A to 00000333)
       0 file pointer to relocation table
       0 file pointer to line numbers
       0 number of relocations
       0 number of line numbers
40400040 flags
         Initialized Data
         8 byte align
         Read Only

RAW DATA #3
  00000000: 73 74 72 00 00 00 00 00 25 2E 34 66 2C 25 2E 34  str.....%.4f,%.4
  00000010: 66 2C 25 2E 34 66 2C 25 73 00                    f,%.4f,%s.
.
.
.
RELOCATIONS #4
                                                Symbol    Symbol
 Offset    Type              Applied To         Index     Name
 --------  ----------------  -----------------  --------  ------
 00000008  PAGEBASE_REL21             90000008         8  $SG5571
 0000000C  PAGEOFFSET_12A             91000104         8  $SG5571
 0000001C  PAGEBASE_REL21             90000008         9  $SG5572
 00000020  PAGEOFFSET_12A             91000100         9  $SG5572
 00000024  BRANCH26                   94000000        16  printf
.
.
.
COFF SYMBOL TABLE
000 01057A64 ABS    notype       Static       | @comp.id
001 80010190 ABS    notype       Static       | @feat.00
002 00000000 SECT1  notype       Static       | .drectve
    Section length   62, #relocs    0, #linenums    0, checksum        0
004 00000000 SECT2  notype       Static       | .debug$S
    Section length   9C, #relocs    0, #linenums    0, checksum        0
006 00000000 SECT3  notype       Static       | .rdata
    Section length   1A, #relocs    0, #linenums    0, checksum B99D9667
008 00000000 SECT3  notype       Static       | $SG5571
009 00000008 SECT3  notype       Static       | $SG5572
00A 00000000 SECT4  notype       Static       | .text$mn
Compiling an Optimized Build
Specifying the /O2 flag for speed generates optimized code.
A previous post explored how to use LLVM as the backend disassembler for hsdis. The instructions for how to use GNU binutils (the currently supported option) are straightforward. Listing them here for completeness (assuming you have cloned the OpenJDK repo into your ~/repos/java/jdk folder). Note that they depend on more recent changes. See the docs on the Java command for more info about the -XX:CompileCommand option.
# Download and extract GNU binutils 2.37
cd ~
curl -Lo binutils-2.37.tar.gz https://ftp.gnu.org/gnu/binutils/binutils-2.37.tar.gz
tar xvf binutils-2.37.tar.gz

# Configure the OpenJDK repo for hsdis
cd ~/repos/java/jdk
bash configure --with-hsdis=binutils --with-binutils-src=~/binutils-2.37

# Build hsdis
make build-hsdis
To deploy the built hsdis library on macOS:
cd build/macosx-aarch64-server-release

# Copy the hsdis library into the JDK bin folder
cp support/hsdis/libhsdis.dylib jdk/bin/hsdis-aarch64.dylib
To deploy the built hsdis library on Ubuntu Linux (open question: is this step even necessary?):
cd build/linux-x86_64-server-release

# Copy the hsdis library into the JDK bin folder
cp support/hsdis/libhsdis.so jdk/bin/
Update 2024-03-13: use the make install-hsdis command to copy the hsdis binaries into the new OpenJDK build. This will ensure that the hsdis binary is copied to lib/hsdis-adm64.so (this file name should be used in place of any others that listed by find . -name *hsdis*).
Now we can disassemble some code, e.g. the String.checkIndex method mentioned in PR 5920.
# Disassemble some code
jdk/bin/java -XX:CompileCommand="print java.lang.String::checkIndex" -version
To see how to disassemble the code for a class, we can use the basic substitution cipher class from the post on Building HSDIS in Cygwin as an example. Download, compile and disassemble it using the commands below. Note that these commands save the .java file to a temp folder to make cleanup much easier. Also note the redirection to a file since the output can be voluminous.
cd jdk/bin
mkdir -p temp
cd temp

curl -Lo BasicSubstitutionCipher.java https://raw.githubusercontent.com/swesonga/scratchpad/main/apps/crypto/substitution-cipher/BasicSubstitutionCipher.java

../javac BasicSubstitutionCipher.java

../java -XX:+UnlockDiagnosticVMOptions -XX:+PrintAssembly -XX:+LogCompilation BasicSubstitutionCipher > disassembled.txt

open disassembled.txt
To specify a backend for hsdis, the OpenJDK repo needs to be configured with the --with-hsdis option. As of commit 77757ba9, LLVM is not yet supported as an hsdis disassembly backend. Therefore, this error from make/autoconf/jdk-options.m4 is displayed. Here’s an example on the Windows platform:
$ bash configure --with-hsdis=llvm
...
checking what hsdis backend to use... invalid
configure: error: Incorrect hsdis backend "llvm"
configure exiting with result code 1
To test the LLVM backend for hsdis on macOS, install LLVM using brew (Apple’s LLVM does not have the llvm-c include files):
# install LLVM
brew install llvm
Now build the OpenJDK. This should use Apple’s compiler since we have not made any configuration changes.
cd ~/repos/java/jdk
bash configure
make images
Now add brew’s LLVM bin directory to the PATH and run bash configure again passing the --with-hsdis=llvm option as shown below. The configuration process will detect the clang++ compiler installed by brew and set it up for use when the build-hsdis target is executed.
# Now add brew's LLVM to the PATH before running bash configure
export OLDPATH=$PATH
export PATH="/opt/homebrew/opt/llvm/bin:$PATH"

bash configure --with-hsdis=llvm
make build-hsdis
make install-hsdis
export PATH=$OLDPATH
The install-hsdis target does not appear to be copying the hsdis library to the jdk/bin folder so these commands are required:
cd build/macosx-aarch64-server-release
cp support/hsdis/libhsdis.dylib jdk/bin/hsdis-aarch64.dylib
git clone https://github.com/llvm/llvm-project.git
cd llvm-project
mkdir build_llvm
cd build_llvm
cmake ../llvm -D"LLVM_TARGETS_TO_BUILD:STRING=X86" -D"CMAKE_BUILD_TYPE:STRING=Release" -D"CMAKE_INSTALL_PREFIX=install_local" -A x64 -T host=x64
cmake --build . --config Release --target install
Now we can configure the OpenJDK repo for hsdis, and build both the JDK and hsdis.
bash configure --with-hsdis=llvm \
     LLVM_CONFIG=C:/dev/repos/llvm-project/build_llvm/install_local/bin \
     --with-llvm=C:/dev/repos/llvm-project/build_llvm/install_local/
make build-hsdis
make images
hsdis LLVM backend on Windows ARM64
Open question: is this supported?
Testing the hsdis LLVM backend
The String.checkIndex method of PR 5920 is a good candidate for testing the hsdis LLVM backend. The -XX:CompileCommand option can be used to print the generated assembler code after compilation of the specified method.
To view the command lines being executed by make as well as the value of the variables in use: make LOG=debug build-hsdis
Autoconf macros are defined using the AC_DEFUN macro. The JDKOPT_SETUP_HSDIS macro (modified by PR 5920) is defined using AC_DEFUN_ONCE, which is for macros that should only be called once.
To address warnings like ld: warning: dylib (/opt/homebrew/opt/llvm/lib/libunwind.dylib) was built for newer macOS version (12.0) than being linked (11.0) update MACOSX_VERSION_MIN in make/autoconf/flags.m4.
The previous post on Building HSDIS in Cygwin required running this command to actually build the hsdis DLL.
make OS=Linux MINGW=x86_64-w64-mingw32 BINUTILS=~/binutils-2.37
As it turns out, this make command fails because of a bug in the GNU binutils source code. This is the error I got:
...
x86_64-w64-mingw32-gcc -c -DHAVE_CONFIG_H -O    -I. -I/home/User/binutils-2.37/libiberty/../include  -W -Wall -Wwrite-strings -Wc++-compat -Wstrict-prototypes -Wshadow=local -pedantic  -D_GNU_SOURCE  /home/User/binutils-2.37/libiberty/rust-demangle.c -o rust-demangle.o
/home/User/binutils-2.37/libiberty/rust-demangle.c:78:3: error: unknown type name ‘uint’
   78 |   uint recursion;
      |   ^~~~
/home/User/binutils-2.37/libiberty/rust-demangle.c: In function ‘demangle_path’:
/home/User/binutils-2.37/libiberty/rust-demangle.c:81:37: error: ‘uint’ undeclared (first use in this function); did you mean ‘int’?
   81 | #define RUST_NO_RECURSION_LIMIT   ((uint) -1)
      |                                     ^~~~
...
make[2]: *** [Makefile:1230: rust-demangle.o] Error 1
...
At this point, I wasn’t sure which version I used to build successfully. Searching for that error (and binutils to narrow things down) led to this bug in the sourceware.org Bugzilla that appears to be the exact bug I ran into: 28207 – error: unknown type name ‘uint’ (78 | uint recursion;) avr-gcc mingw32 Windows Build (sourceware.org). Fortunately, one Alan helpfully points out that this bug fixed on the binutils-2.37 branch with commit 999566402e3.
I’m used to GitHub where looking at the repo structure implies that you’re at a URL you can copy and trim to clone. In this other web view, the URL to clone is listed above the shortlog:
At this point, it makes sense to verify that the 2.37 sources I downloaded actually contain the bug. Observe that:
the tags section contains a binutils-2_37 tag described as “Official GNU Binutils 2.37 Release” and committed on Sun, 18 Jul 2021 16:46:54 +0000 (17:46 +0100).
the fix for the build error shows a fix committed by Alan on Mon, 19 Jul 2021 11:32:21 +0000 (21:02 +0930)
Therefore, using binutils older than 2.37 should work just fine. However, it may still be necessary to run “rm -fr build” in the hsdis folder to enable 2.36 to be picked up when you run make (otherwise 2.37 is still baked into some of configure’s output).
Hsdis is an externally loadable disassembler plugin. It lets you see which assembly instructions the JVM generates for your Java code. On 64-bit Windows, it is a binary called hsdis-amd64.dll (and hsdis-i386.dll on 32-bit platforms). This binary needs to be in the same directory as jvm.dll. Some good resources out there on building the hsdis binary for the OpenJDK include:
For Cygwin, the latter resource (from 2012?) is all we need. I like that Gunnar’s blog post covered how to use hsdis after building it so this writeup aims to combine both blogs into a simple Cygwin install-build-disassemble set of instructions.
Building hsdis for 64-bit JVMs
Install Cygwin with the gcc-core, make, and mingw64-x86_64-gcc-core packages by launching the setup executable using this command (no need to bother selecting packages in the UI since you have already specified them on the command line)
setup-x86_64.exe -P gcc-core -P mingw64-x86_64-gcc-core -P make
mkdir ~/repos
cd ~/repos
git clone https://github.com/openjdk/jdk
Run these commands to download GNU binutils and build hsdis (Update 2022-01-07: version downgraded to 2.36 to avoid build failures investigated in Fixing Hsdis Compile Failure in GNU binutils).
cd ~
curl -Lo binutils-2.36.tar.gz https://ftp.gnu.org/gnu/binutils/binutils-2.36.tar.gz
tar xvf binutils-2.36.tar.gz

cd ~/repos/jdk/src/utils/hsdis
make OS=Linux MINGW=x86_64-w64-mingw32 BINUTILS=~/binutils-2.36
Copy the hsdis binary to the locally built java bin folder
I have created a basic substitution cipher, which we can compile and disassemble using the commands below. Note that these commands save the .java file to a temp folder to make cleanup much easier. Also note the redirection to a file since the output can be voluminous.
cd build/windows-x86_64-server-release/jdk/bin
mkdir -p temp
cd temp

curl -Lo BasicSubstitutionCipher.java https://raw.githubusercontent.com/swesonga/scratchpad/main/apps/crypto/substitution-cipher/BasicSubstitutionCipher.java

../javac BasicSubstitutionCipher.java

../java -XX:+UnlockDiagnosticVMOptions -XX:+PrintAssembly -XX:+LogCompilation BasicSubstitutionCipher > BasicSubstitutionCipher.disassembled.txt
Once the disassembly completes, we can view the instructions generated in the BasicSubstitutionCipher.disassembled.txt file.
One open question in this setup is why the installed GNU binutils cannot be used to build hsdis. Seems strange to have to build them from source when the binutils Cygwin package was also installed in step 1 above.