Of the many ways to transfer files to an Ubuntu guest on Hyper-V, running these PowerShell commands (as admin) suffices for a one-off file transfer. See 4 Ways to Transfer Files to a Linux Hyper-V Guest (altaro.com) for more details about this approach.
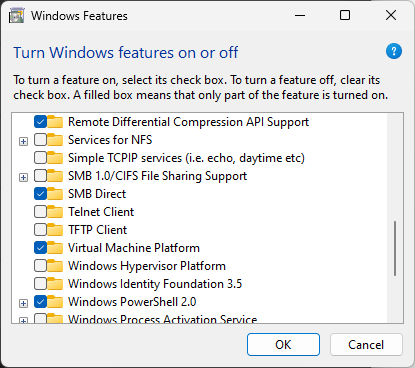
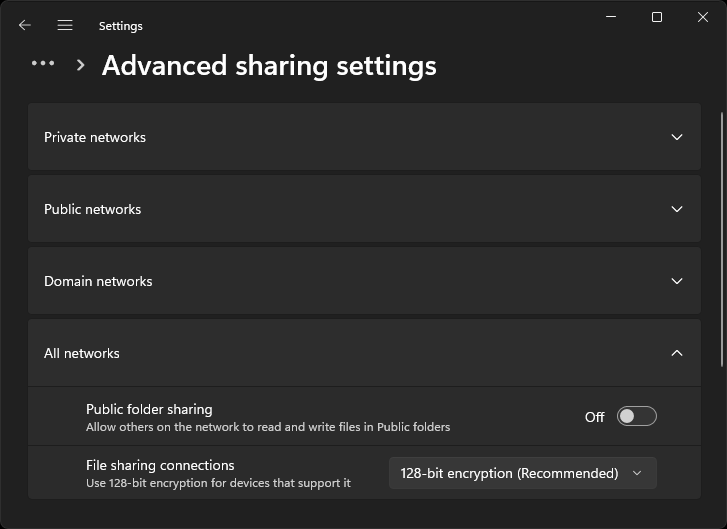
Yesterday I had a core dump from a Linux process that I wanted to specifically inspect in an Ubuntu VM. My host machine is a Windows 11 (10.0.22621.674) machine. The simple question of how to share files with my Ubuntu VM took me all over the map. Searching for hyper-v share files linux guest led me to Shared Folders over Hyper-V Ubuntu Guest (linuxhint.com). This had me enabling SMB 1.0/CIFS File Sharing Support (already had SMB Direct enabled) and Public folder sharing.
SMB Windows Features
Public Folder Sharing Settings
I then created an empty directory and turned on sharing on it as instructed. However, accessing it from Ubuntu turned out to be the problem. These are the suggested commands:
sudo apt install cifs-utils
mkdir ~/SharedFolder
sudo mount.cifs //<NAME OF YOUR PC>/<SHARED FOLDER NAME>
~/SharedFolder -o user=<YOUR WINDOWS USERNAME>
mount.cifs failed though.
saint@linuxvm:~$ sudo mount.cifs //DEVICENAME/virtual-machines
~/shared -o user=USERNAME
Password for USERNAME@//DEVICENAME/virtual-machines: ***
mount error(13): Permission denied
Refer to the mount.cifs(8) manual page (e.g. man mount.cifs) and kernel log messages (dmesg)
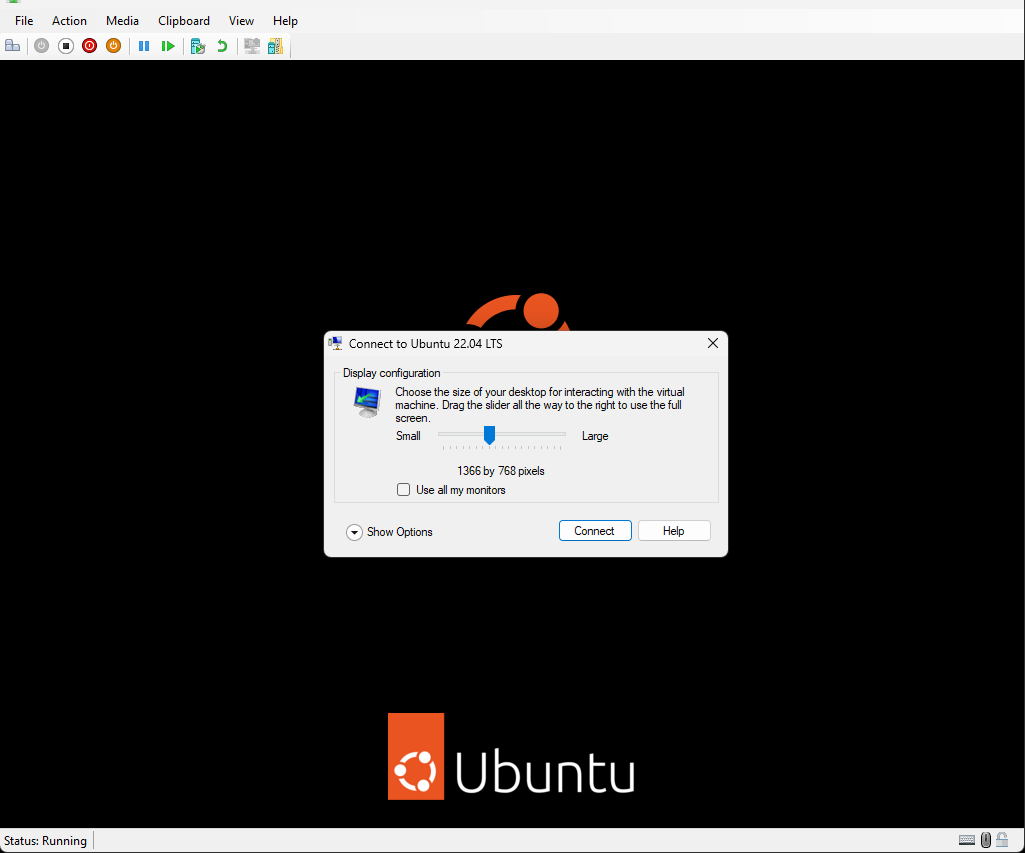
Click on Hyper-V’s Quick Create… command to start creating a VM. Select the latest Ubuntu LTS (22.04). Unfortunately, the only options available are the VM name and the network switch to use. Clicking on Create Virtual machine creates a VM on the primary/OS disk. I was pleasantly surprised to find that the Ubuntu 22.04 VM appeared to support enhanced session mode when Hyper-V asked for the screen resolution when connecting to it:
Connecting to Ubuntu VM
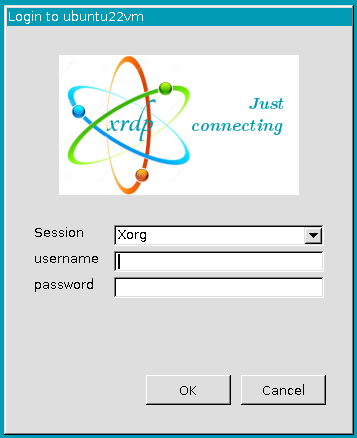
The enhanced session gives this xrdp login window:
xrdp Login Window
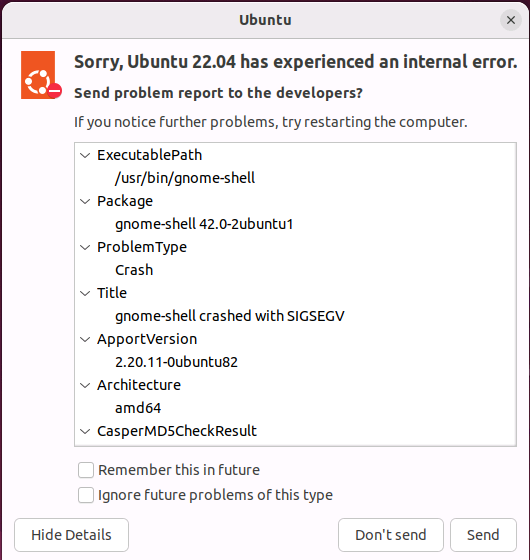
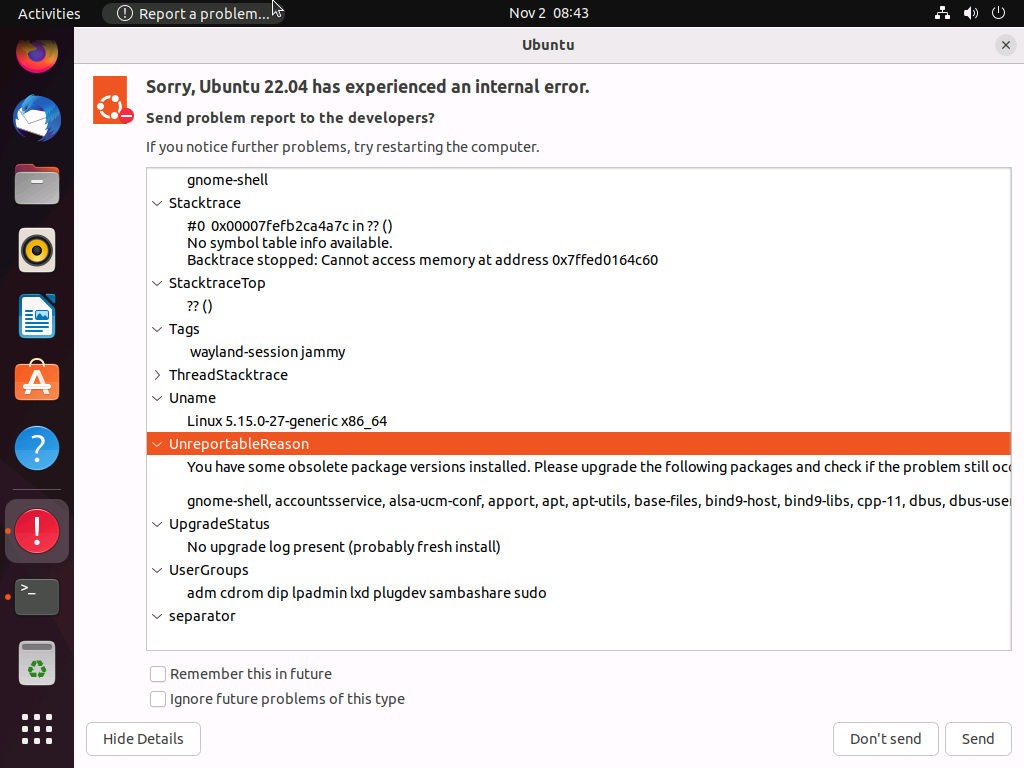
The window disappears when I enter my credentials and nothing happens for some time. I used the “Basic Session” toolbar button to switch back to the normal mode I’m used to. These are some of the errors I encounter:
Oh no! Something has gone wrong.
Internal Error Details
The error report points out that I have obsolete packages, among them gnome-shell (which crashed). I run sudo apt upgrade and says yes to the 368 upgrades (826 MB of archives). That is not sufficient to address this rdp bug so I stay in Basic Session mode for the rest of the time.
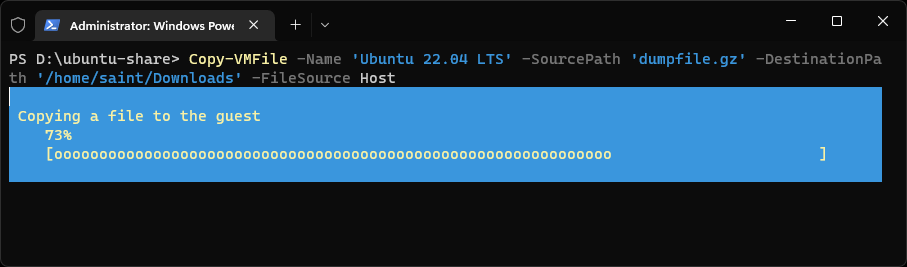
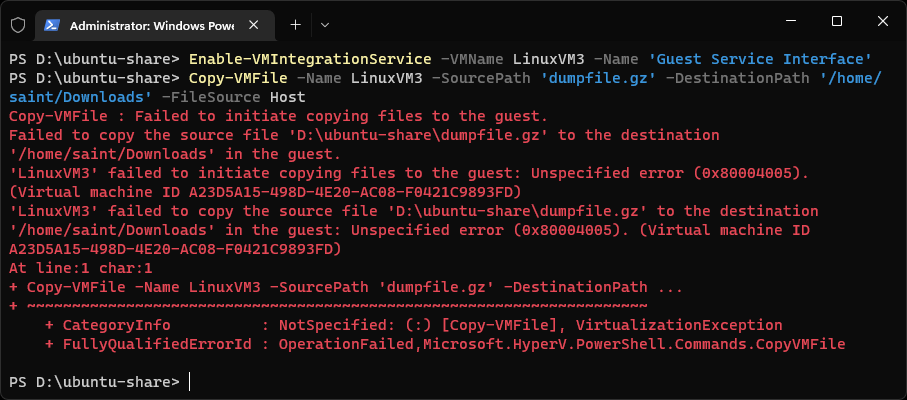
This leads me back to the PowerShell commands I used above. Lo and behold, they work this time! This is despite the fact that there don’t appear to be any processes displayed by ps -u root | grep hyper as described at 4 Ways to Transfer Files to a Linux Hyper-V Guest (altaro.com).
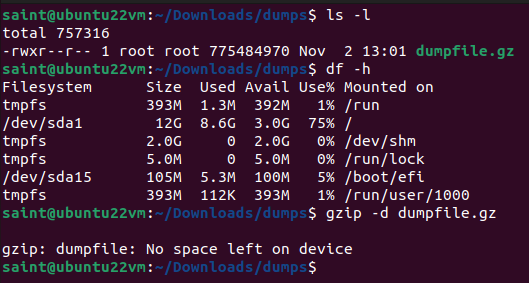
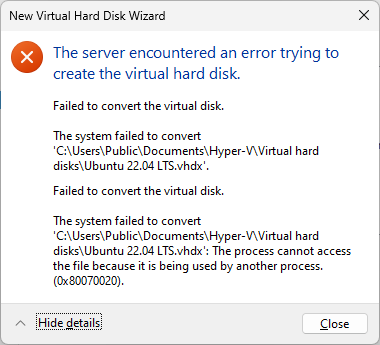
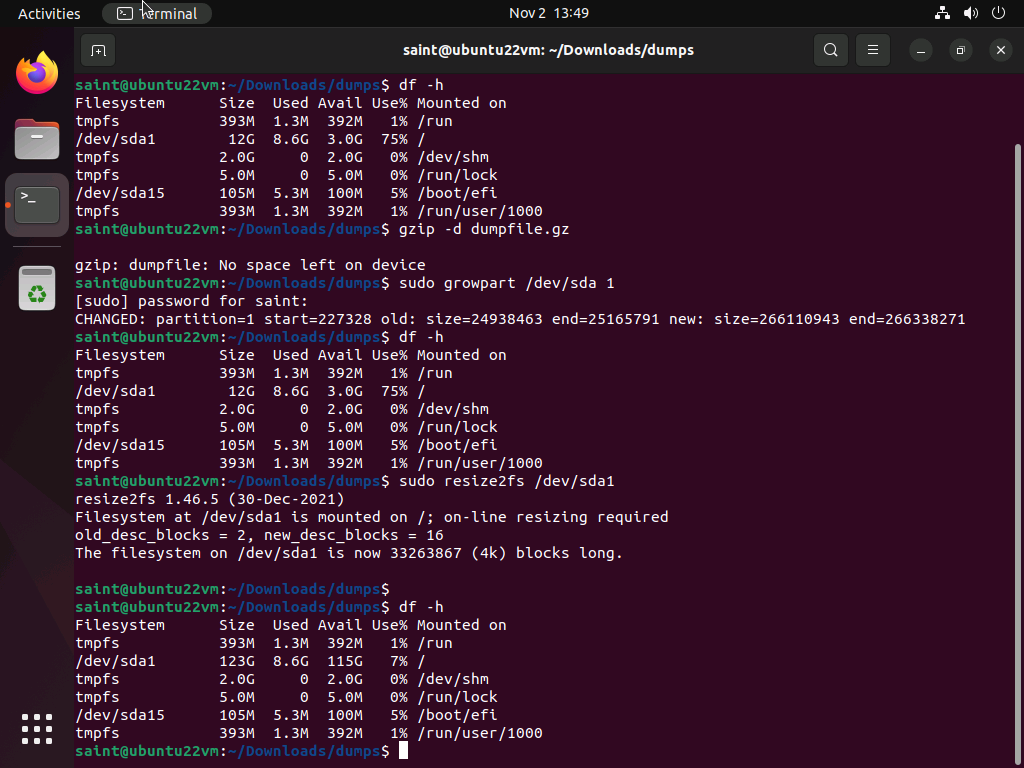
This is when I discover that I do not have enough space on the VM to expand my .gz file.
Inspecting Disk Usage
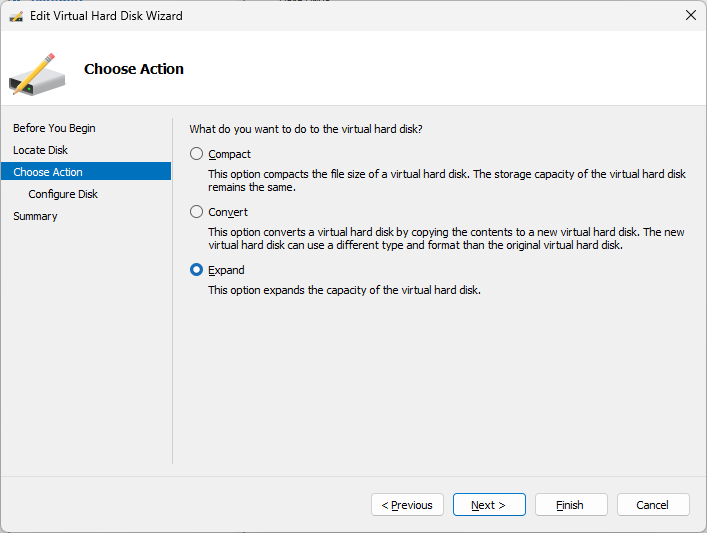
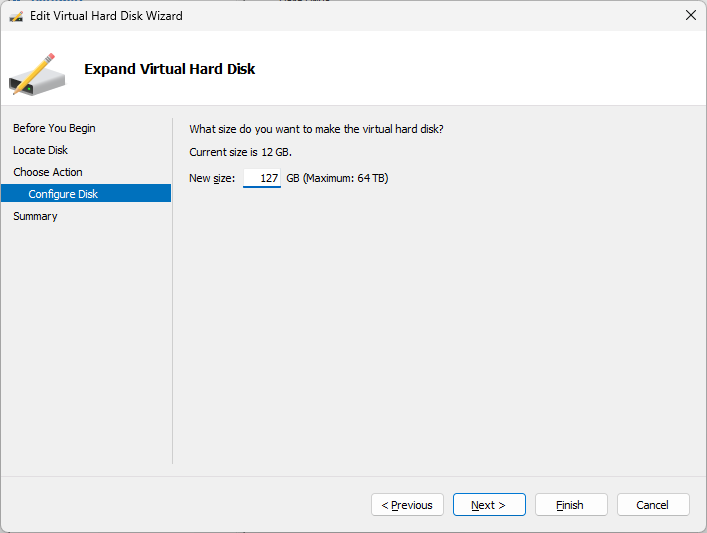
Unfortunately, the disk for the VM is only 12 GB (confirmed by launching Ubuntu and running out of space). Therefore, once the installation completes, expand the disk from 12 GB to a more reasonable size (e.g. 127 GB). If the default drive Quick Create used for the VM’s virtual disk does not have sufficient space, you will need to move the virtual hard disk to another drive then expand the partition in Ubuntu to use the whole virtual disk.
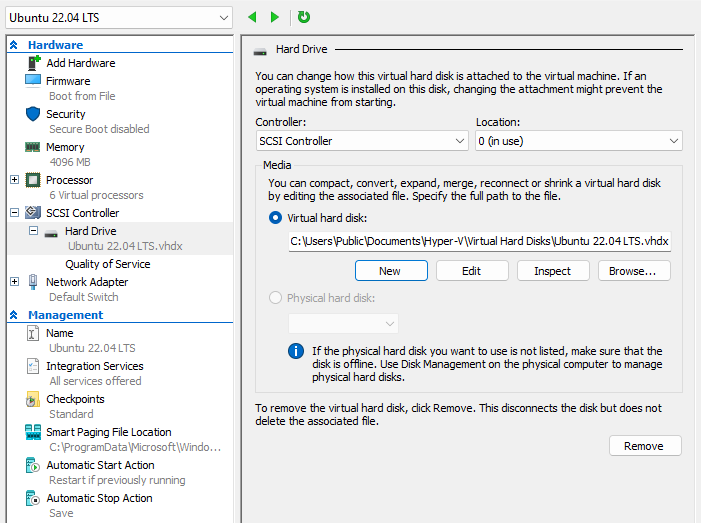
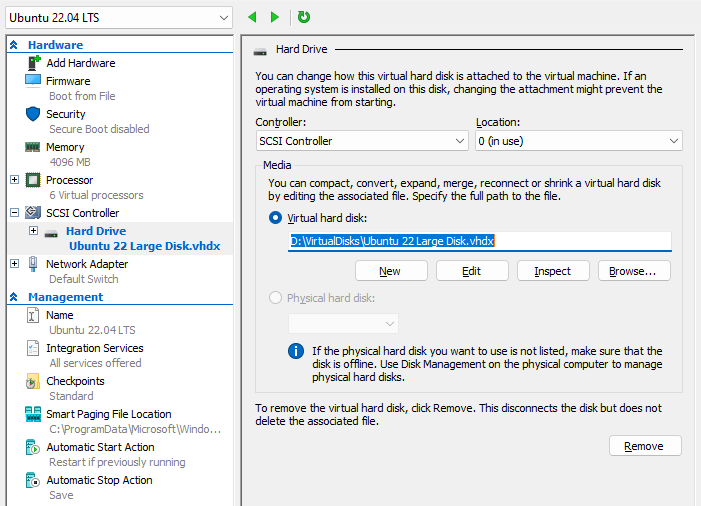
Open the virtual machine’s settings and select the VM’s Hard Drive. Click on the “New” button.
Select the disk type, e.g. “Dynamically Expanding“
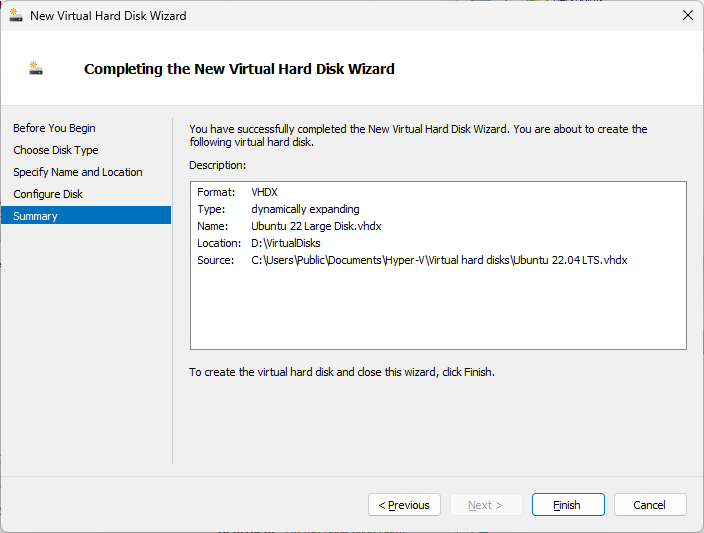
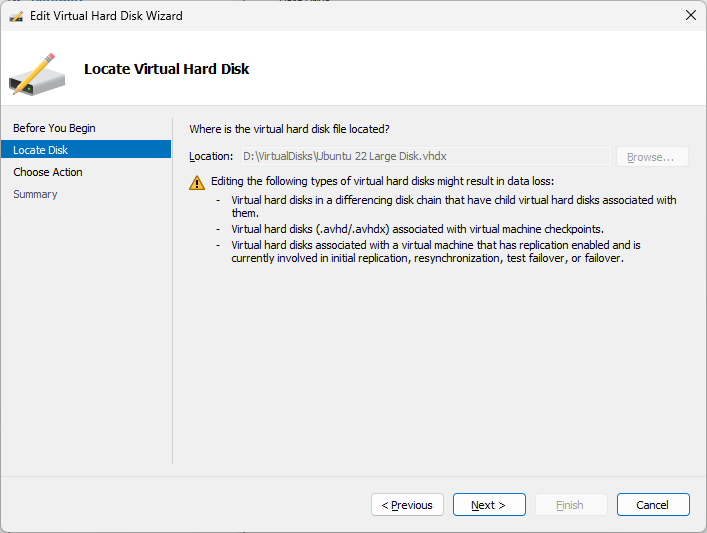
Specify the name and location of the virtual hard disk file. This is where I selected a hard drive with lots of space for expansion for the VM.
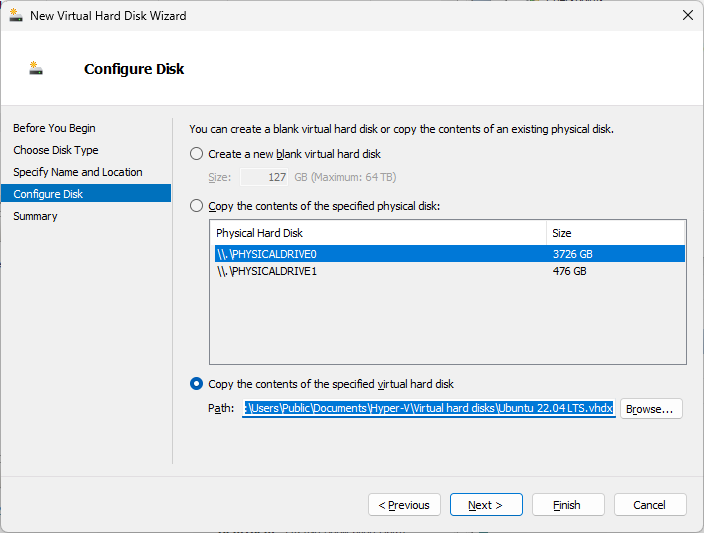
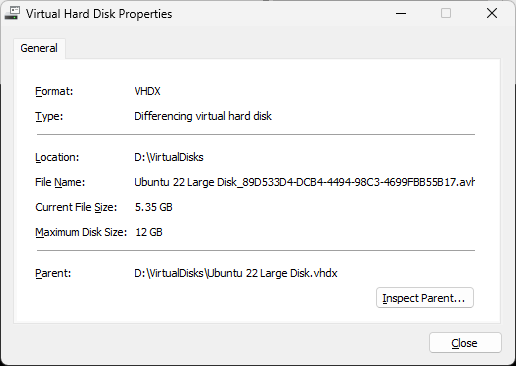
In the Configure Disk section, select the option to “Copy the contents of the specified virtual hard disk” and select the virtual machine’s current .vhdx file.
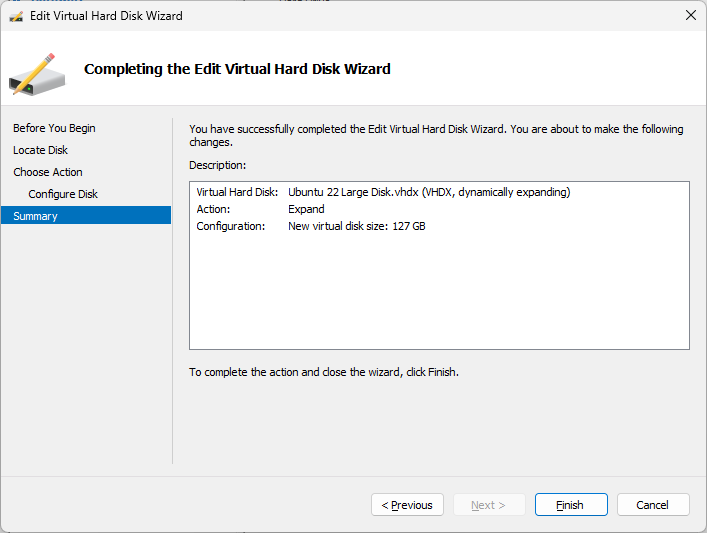
Verify that all parameters are correctly set then click on Finish.
If the VM was still running, this error dialog will most likely be displayed.
The new hard disk will be created with the content of the currently
After starting the VM again, I still didn’t have enough space to decompress my .gz file.
I recently had to investigate an OpenJDK google test. To run the test locally, I needed to ensure that configure is aware of my intent. As documented at jdk/building.md · openjdk/jdk (github.com), we need to pass the --with-gtest option to configure. We first need to get the appropriate googletest sources, e.g (in Git Bash):
cd /c/dev/repos
git clone -b release-1.8.1 https://github.com/google/googletest
Then in Cygwin:
cd /cygdrive/d/java/forks/jdk
bash configure --with-gtest=/cygdrive/c/dev/repos/googletest --with-debug-level=slowdebug
Once this is done, the OpenJDK repo can be built using this script. I use the time command to get statistics on how long the build took. I also only just discovered that the prompt can be configured to include the time.
time /cygdrive/d/dev/repos/scratchpad/scripts/java/cygwin/build-jdk.sh
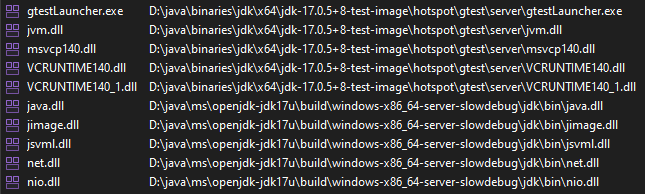
The googletest launcher is in the images folder of the build configuration:
An interesting observation is that the JVM test code is in build/windows-x86_64-server-slowdebug/images/test/hotspot/gtest/server/jvm.dll, which is just over 5 MB larger than build/windows-x86_64-server-slowdebug/jdk/bin/server/jvm.dll. Here’s a snippet of the call stack showing how the tests get kicked off.
jvm.dll!JVMInitializerListener::OnTestStart(const testing::TestInfo & test_info) Line 129
...
jvm.dll!RUN_ALL_TESTS() Line 2342	C++
jvm.dll!runUnitTestsInner(int argc, char * * argv) Line 289	C++
jvm.dll!runUnitTests(int argc, char * * argv) Line 370	C++
gtestLauncher.exe!main(int argc, char * * argv) Line 40	C++
[Inline Frame] gtestLauncher.exe!invoke_main() Line 78	C++
gtestLauncher.exe!__scrt_common_main_seh() Line 288	C++
kernel32.dll!BaseThreadInitThunk...
Behind the Scenes
My first attempt at running the gtests was to launch them using the gtestLauncher from a build I was testing but using a locally built JDK:
The logging I added to my local gtest was not showing up in the output. Naturally, the question that arose was how do I know which binaries it is running against since I don’t see the logging I expected? Process Explorer and Process Monitor did not seem to have a way to show me all the DLLs in the process (before it terminated). I end up creating a dump file using Process Explorer. Here are the non-Windows binaries – a mix of local build and CI build DLLS.
DLLs Loaded in gTestLauncher.exe
This was what inspired me to figure out how to run the whole show with locally built binaries as described in the main section of this post.
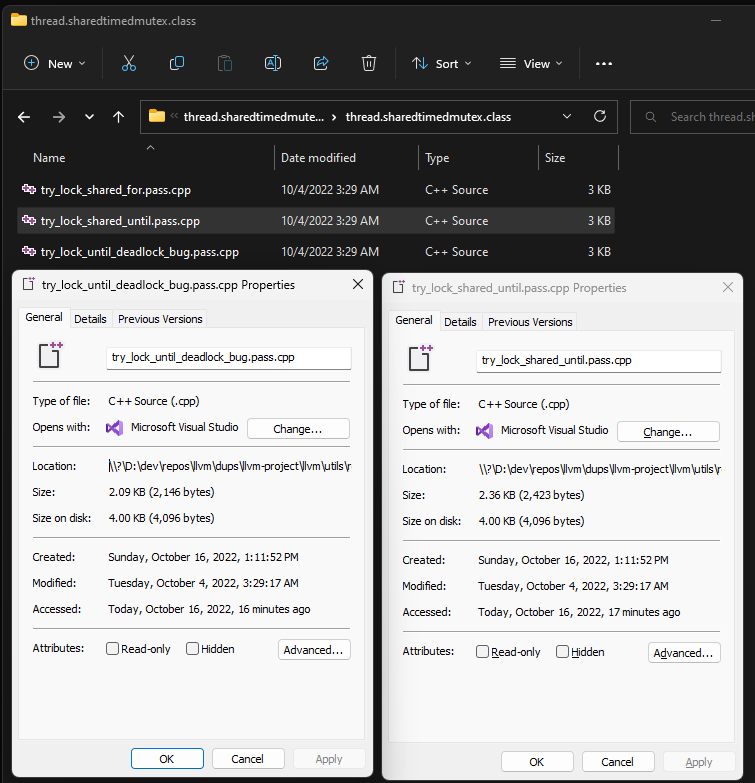
llvm_package_15.0.2\llvm-project-llvmorg-15.0.2\libcxx\test\std\thread\thread.mutex\thread.mutex.requirements\thread.sharedtimedmutex.requirements\thread.sharedtimedmutex.class\try_lock_shared_for.pass.cpp - The system cannot find the path specified.
llvm_package_15.0.2\llvm-project-llvmorg-15.0.2\libcxx\test\std\thread\thread.mutex\thread.mutex.requirements\thread.sharedtimedmutex.requirements\thread.sharedtimedmutex.class\try_lock_shared_until.pass.cpp - The system cannot find the path specified.
llvm_package_15.0.2\llvm-project-llvmorg-15.0.2\libcxx\test\std\thread\thread.mutex\thread.mutex.requirements\thread.sharedtimedmutex.requirements\thread.sharedtimedmutex.class\try_lock_until_deadlock_bug.pass.cpp - The system cannot find the path specified.
These files still exist on disk though! They are displayed if you dir their containing directory but are not found if you dir their full paths! They cannot be deleted using del either. Interestingly, pressing tab after the directory path will autocomplete the file names.
C:\> dir D:\dev\repos\llvm\dups\llvm-project\llvm\utils\release\llvm_package_15.0.2\llvm-project-llvmorg-15.0.2\libcxx\test\std\thread\thread.mutex\thread.mutex.requirements\thread.sharedtimedmutex.requirements\thread.sharedtimedmutex.class\
 Volume in drive D is DATAVOL1
 Volume Serial Number is 8800-8693

 Directory of D:\dev\repos\llvm\dups\llvm-project\llvm\utils\release\llvm_package_15.0.2\llvm-project-llvmorg-15.0.2\libcxx\test\std\thread\thread.mutex\thread.mutex.requirements\thread.sharedtimedmutex.requirements\thread.sharedtimedmutex.class

10/16/2022  01:22 PM    <DIR>          .
10/04/2022  03:29 AM    <DIR>          ..
10/04/2022  03:29 AM             2,461 try_lock_shared_for.pass.cpp
10/04/2022  03:29 AM             2,423 try_lock_shared_until.pass.cpp
10/04/2022  03:29 AM             2,146 try_lock_until_deadlock_bug.pass.cpp
               3 File(s)          7,030 bytes

C:\> dir D:\dev\repos\llvm\dups\llvm-project\llvm\utils\release\llvm_package_15.0.2\llvm-project-llvmorg-15.0.2\libcxx\test\std\thread\thread.mutex\thread.mutex.requirements\thread.sharedtimedmutex.requirements\thread.sharedtimedmutex.class\try_lock_shared_for.pass.cpp
 Volume in drive D is DATADRIVE1
 Volume Serial Number is 548C-FFC9

 Directory of D:\dev\repos\llvm\dups\llvm-project\llvm\utils\release\llvm_package_15.0.2\llvm-project-llvmorg-15.0.2\libcxx\test\std\thread\thread.mutex\thread.mutex.requirements\thread.sharedtimedmutex.requirements\thread.sharedtimedmutex.class

File Not Found

C:\> del D:\dev\repos\llvm\dups\llvm-project\llvm\utils\release\llvm_package_15.0.2\llvm-project-llvmorg-15.0.2\libcxx\test\std\thread\thread.mutex\thread.mutex.requirements\thread.sharedtimedmutex.requirements\thread.sharedtimedmutex.class\try_lock_shared_for.pass.cpp
The system cannot find the path specified.
These files can be viewed in file explorer. Something that caught my eye when examining their properties is that their locations started with the \\?\ prefix! That seems unusual for files on my local drive.
File Locations Starting with \\?\
Resource monitor does not show any images with associated handles when searching for “try_lock”. Neither does searching for “\?\D:\dev\repos\llvm\”. I tried using Process Explorer’s “Find Handle or DLL…” command as well. There also don’t appear to be any child processes for the cmd.exe process I was using (a Developer 2019 Command Prompt).
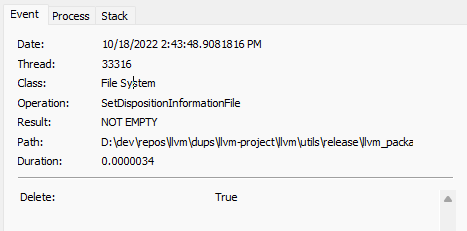
Next idea, open Process Monitor and see what’s happening when dir and rmdir are executed. I used the Path contains thread.sharedtimedmutex.class filter. The deletes are showing up as SetDispositionInformationFile events and seem to be using the RemoveDirectoryW function.
The RemoveDirectory function marks a directory for deletion on close. Therefore, the directory is not removed until the last handle to the directory is closed.
Notice the NOT EMPTY result of the SetDispositionInformationFile event. I believe this comes from RemoveDirectoryW. There’s the question of how the 3 files are printed to the command line. The FindNextFile API is used to search for files.
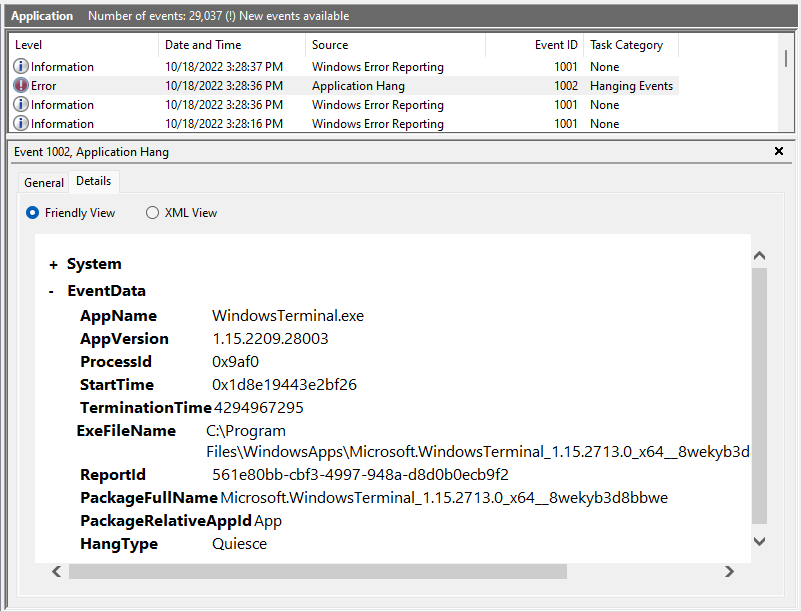
Ah, in the middle of this investigation, PowerShell.exe dies and so does Windows Terminal. All my tabs, everything, gone! Aaaargh… Windows Event Viewer has an Information level event showing that powershell.exe crashed due to a System.InvalidOperationException. This is then followed by another Information event with the WER source and P1 problem signature Microsoft.WindowsTerminal_1.15.2713.0_x64__8wekyb3d8bbwe. Then comes the Error level event with the Application Hang source and General explanation that “The program WindowsTerminal.exe version 1.15.2209.28003 stopped interacting with Windows and was closed. To see if more information about the problem is available, check the problem history in the Security and Maintenance control panel.” The ExeFileName is cut off below but simply append “\WindowsTerminal.exe” to the package name to reconstruct it. Looks like I need to avoid PowerShell. And why is there no crash dump created for it???
One upside of this crash is that it lets me confirm that it is not the cmd.exe process that is hanging onto those files. I terminate explorer.exe and when I run new task in Task Manager, it asks me to create a Windows Hello pin. What is happening?? Now moving on to opening these files: Notepad++ acts as though nothing happened when you File->Open and select one of them. Notepad opens it though! Running cat in Git Bash also dumps its contents:
cat /d/dev/repos/llvm/dups/llvm-project/llvm/utils/release/llvm_package_15.0.2/llvm-project-llvmorg-15.0.2/libcxx/test/std/thread/thread.mutex/thread.mutex.requirements/thread.sharedtimedmutex.requirements/thread.sharedtimedmutex.class/try_lock_shared_for.pass.cpp
//===----------------------------------------------------------------------===//
//
// Part of the LLVM Project, under the Apache License v2.0 with LLVM Exceptions.
// See https://llvm.org/LICENSE.txt for license information.
...
I’m suspecting Windows Defender but don’t have any definitive proof. According to Enable attack surface reduction (ASR) rules, this command in an admin powershell should do the trick if the problem was Windows Defender:
Well, looks like rm from Git Bash works just fine as does deleting from file explorer. Unfortunately, this unsolved issue is probably going to continue to cause pain in command prompt batch files like the LLVM build script.
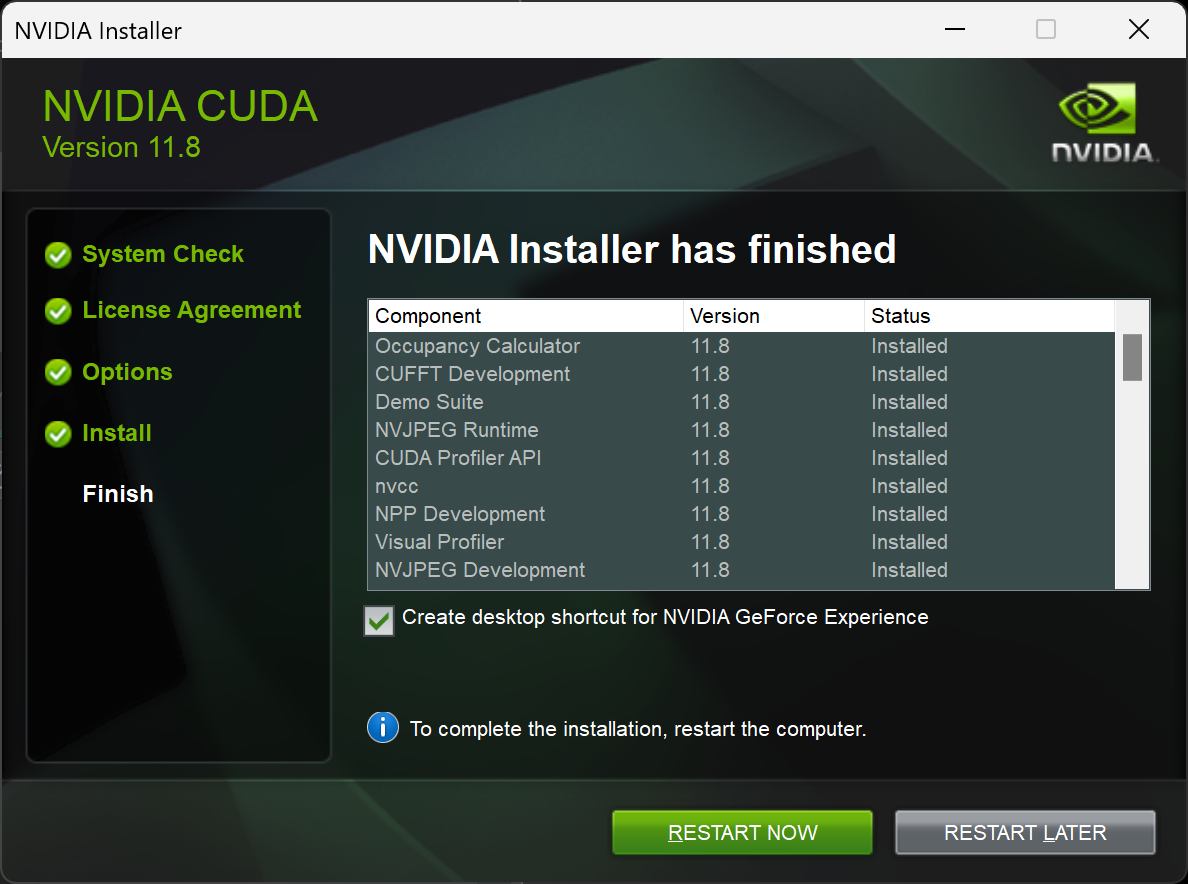
I had previously installed the 11.1 toolkit on my Surface Book so I started by uninstalling all apps that showed up when searching for “nvidia” under “Installed Apps” except NVIDIA Graphics Driver 461 and NVIDIA Update 38.0.2.0. I then got the new installer from Installation Guide Windows :: CUDA Toolkit Documentation (nvidia.com) and installed every component presented by the installer. Note that older builds can be found at the CUDA Toolkit Archive.
Installed NVIDIA CUDA Components
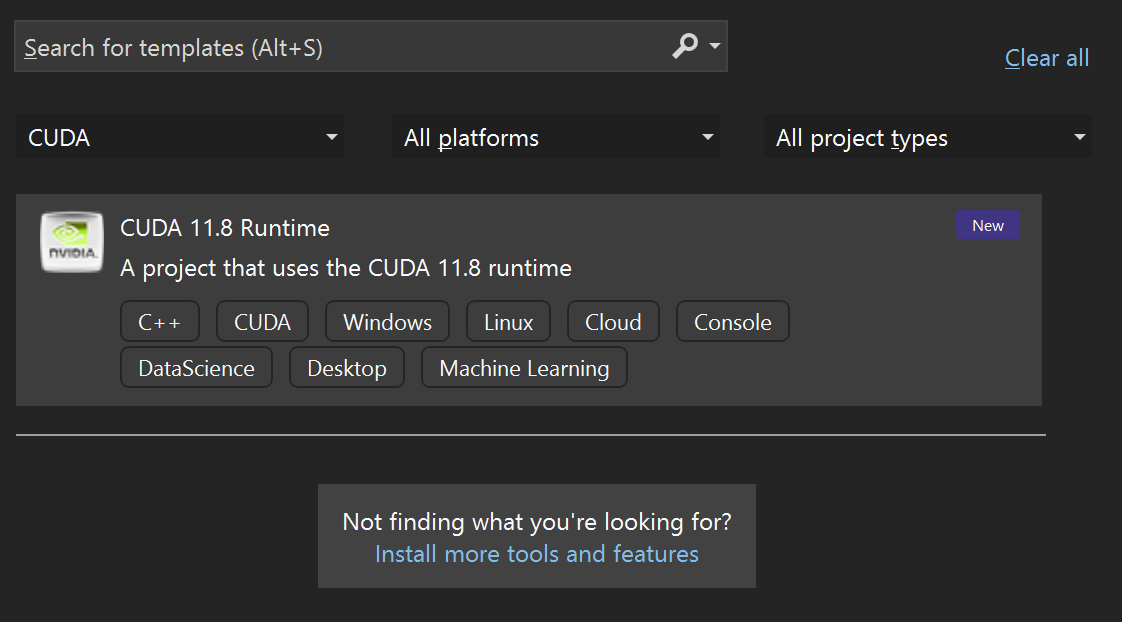
You can now create a new CUDA project in Visual Studio:
Visual Studio’s Create New Project Dialog
Surface Book 2 CUDA Issues
Creating and running a CUDA 11.8 Runtime project on my Surface Book 2 fails with the error cudaSetDevice failed! Do you have a CUDA-capable GPU installed?addWithCuda failed! A search for using nvidia GPU on surface book 2 leads to suggestions that involve the NVIDIA Control Panel. Unfortunately, it doesn’t start on my laptop. A peek at the event viewer reveals why:
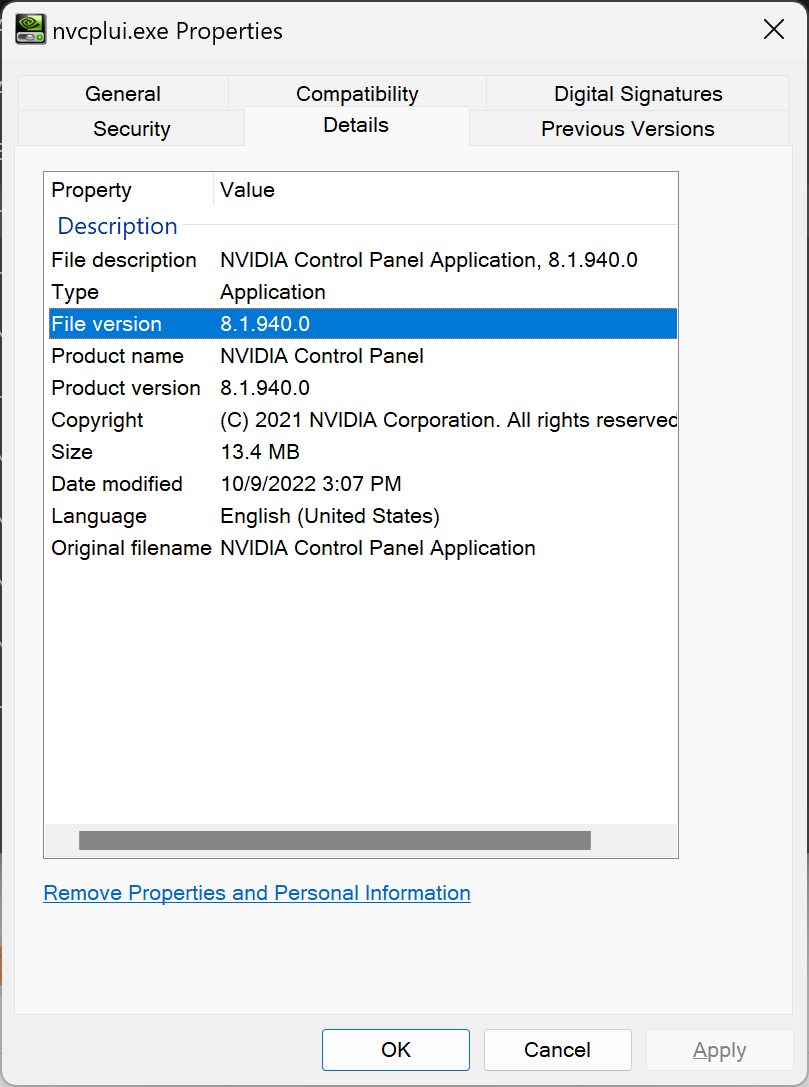
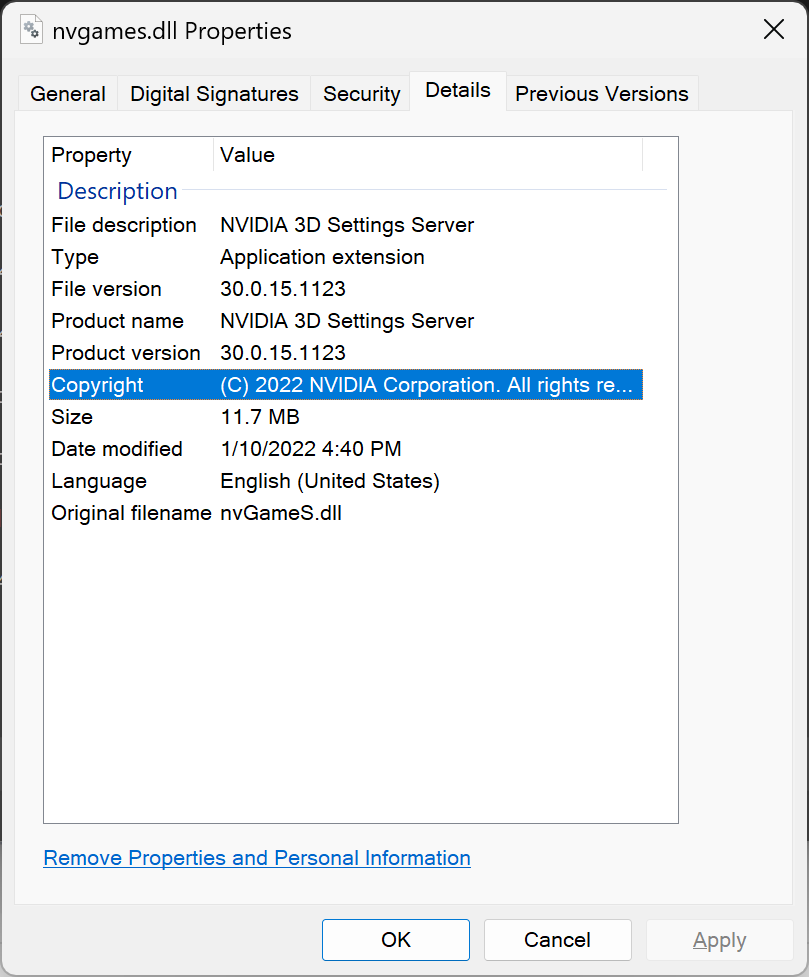
Opening the dump file in Visual Studio to see what’s going on is not helpful because there are no symbols available for the NVIDIA binaries. The NVIDIA Driver Symbol Server even says that it does not have PDBs (even though that’s for drivers) so this is not an optimistic path. The trimmed callstack of the main thread from the dump is shown below though. The paths to the NVIDIA binaries are C:\Program Files\WindowsApps\NVIDIACorp.NVIDIAControlPanel_8.1.962.0_x64__56jybvy8sckqj\nvcplui.exe and C:\Windows\System32\DriverStore\FileRepository\nvmsoui.inf_amd64_8fd9664c41d93f19\nvgames.dll
>	nvcplui.exe!00007ff756d547f5	Unknown
 	nvcplui.exe!00007ff756d529c7	Unknown
 	nvcplui.exe!00007ff756d09f57	Unknown
 	KERNELBASE.dll!UnhandledExceptionFilter	C
 	[Inline Frame] ntdll.dll!RtlpThreadExceptionFilter	C
...
 	ntdll.dll!RtlRaiseException	C
 	[External Code]
 	nvgames.dll!00007ffd372ba7d2	Unknown
...
 	nvgames.dll!00007ffd36ffd59f	Unknown
 	combase.dll!???::CreateInstance	C++
...
 	[Inline Frame] combase.dll!CoCreateInstanceEx	C++
 	combase.dll!CoCreateInstance	C++
 	nvcplui.exe!00007ff756afdf63	Unknown
...
 	nvcplui.exe!00007ff756d08f63	Unknown
 	kernel32.dll!BaseThreadInitThunk	C
 	ntdll.dll!RtlUserThreadStart	C
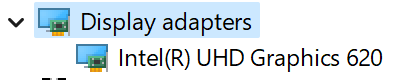
Launching it again errors with a dialog claiming that an NVIDIA graphics card was not detected in my system. Check out the language too…
Sure enough, device manager no long shows the GTX 1060 in the list of display adapters.
Rebooting restores the GTX 1060 but doesn’t address the crash in the NVIDIA Control Panel so I decide to move to my workstation and everything is much smoother there. The new Visual Studio CUDA project runs to completion so I turn my attention back to the CUDA installer to work on resolving the Surface Book 2 issues. The first thing I notice is that the installer is not keyboard accessible, so here’s a detour…
NVIDIA Installer Accessibility Issues
Is the NVIDIA Installer narrator-friendly? Narrator informs me that there are new natural voices available so I install them (Microsoft Aria, Guy, and Jenny).
CUDA 11.6 Driver Components
Looks like narrator works with the installer. However, the installer cannot be used via keyboard alone due to these issues:
You cannot TAB out of the NVIDIA software license agreement.
Narrator doesn’t read the captions below the Express and Custom radio buttons on the Installation Options page.
You cannot TAB into the components tree to select them via keyboard.
Keyboard navigation works after clicking on a component but the focus goes back to the NEXT button after using ALT+TAB to switch to another program then back.
Narrator reads the individual components, e.g. “NSight Systems, Selected” regardless of whether the checkbox is ticked or not. How does one know it’s a checkbox?
The custom installation components columns are not resizable (Component, New Version, and Current Version). For example, what NVIDIA GeForce Experience compo…
Why isn’t it resizable?
A general usability issue: why do all the NVIDIA components need to be uninstalled individually instead of having an option to remove everything?
Outstanding Questions
How do we figure out which component installed the NVIDIA Control Panel? One approach is to uninstall the existing components until the control panel binary from the dump file is deleted on disk. Removing NVIDIA NSight Systems 2022.4.2 removed the C:\Program Files\WindowsApps\NVIDIACorp.NVIDIAControlPanel_8.1.962.0_x64__56jybvy8sckqj\ directory. However, installing only this component in 11.6 did not bring back the NVIDIA control panel!
The installer asks for a path to a temp directory to unpack setup file into. Could examining that folder help determine where the control panel is coming from?
Was this installer generated by NSIS?
Resolution
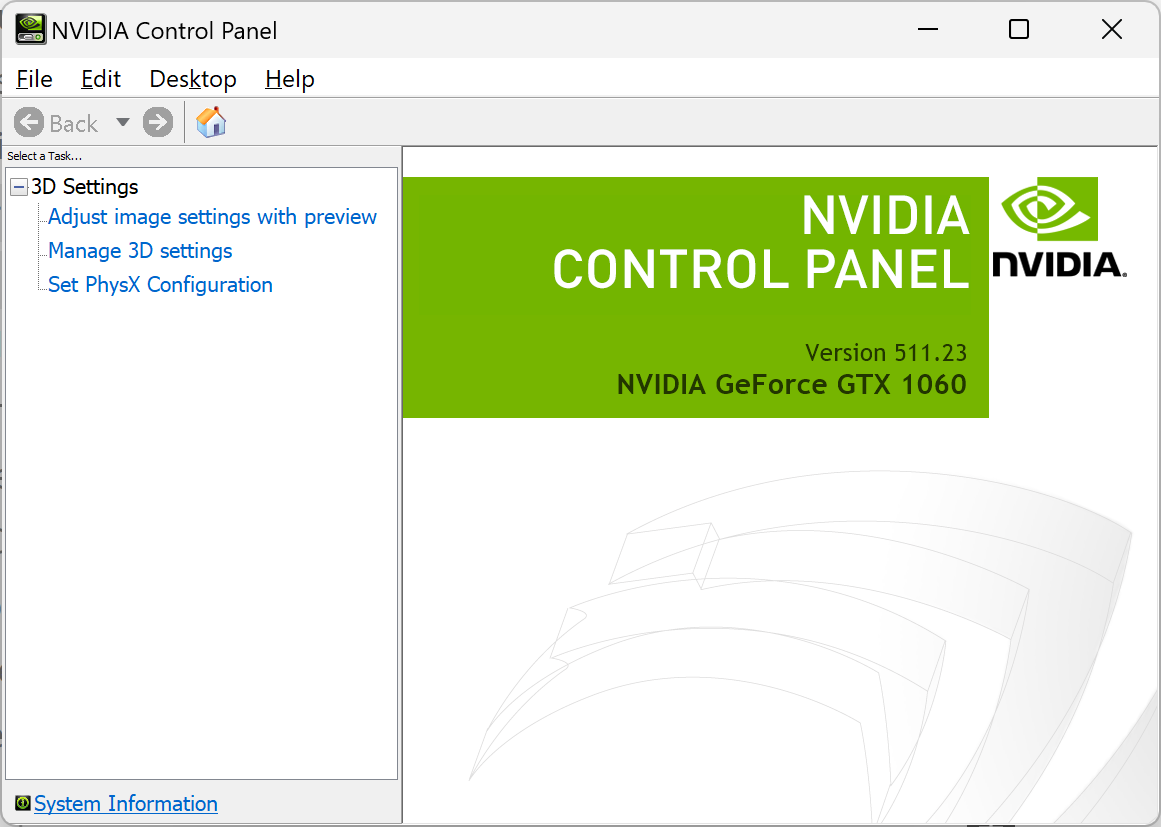
I end up uninstalling all “nvidia” components on the Installed Apps page except NVIDIA Graphics Driver 461.40 then installing all components from CUDA 11.6. This finally has a working control panel!
NVIDIA Control Panel from CUDA 11.6 Installer
Surprisingly, this executable is in C:\Program Files\WindowsApps\NVIDIACorp.NVIDIAControlPanel_8.1.962.0_x64__56jybvy8sckqj, the same directory as 11.8! This must not have been the buggy component! Here is the version info for the 2 NVIDIA binaries in the earlier crash dump (nvgames.dll is now in C:\Windows\System32\DriverStore\FileRepository\nvmsoui.inf_amd64_ed4d74dfae95b5e6):
nvcplui.exe Properties
Visual Studio 2022 does not have the new CUDA project option though. However, changing the paths (in the .vcxproj) for my new project created using the 11.8 tools on my VS 2022 desktop makes the program work. Looks like I need to use 11.7 instead so I uninstall all the “nvidia” components except the NVIDIA Control Panel and the NVIDIA Graphics Driver 511.23 before installing 11.7. Thankfully, 11.7 works just fine!
This command fails after about an hour, and git svn clone https://svn.code.sf.net/p/nsis/code/ times out after getting r960. Not sure why these folks aren’t on GitHub.
D:\dev\repos> python -m pip install --user scons
Collecting scons
  Downloading SCons-4.4.0-py3-none-any.whl (4.2 MB)
     ━━━━━━━━━━━━━━━━━━━━━━━━━━━━━━━━━━━━━━━━ 4.2/4.2 MB 11.7 MB/s eta 0:00:00
Requirement already satisfied: setuptools in c:\python310\lib\site-packages (from scons) (58.1.0)
Installing collected packages: scons
  WARNING: The scripts scons-configure-cache.exe, scons.exe and sconsign.exe are installed in '%APPDATA%\Python\Python310\Scripts' which is not on PATH.
  Consider adding this directory to PATH or, if you prefer to suppress this warning, use --no-warn-script-location.
Successfully installed scons-4.4.0

[notice] A new release of pip available: 22.2 -> 22.2.2
[notice] To update, run: python.exe -m pip install --upgrade pip

D:\dev\repos> python -m pip uninstall scons
Found existing installation: SCons 4.4.0
Uninstalling SCons-4.4.0:
  Would remove:
    %APPDATA%\python\python310\scripts\scons-configure-cache.exe
    %APPDATA%\python\python310\scripts\scons.exe
    %APPDATA%\python\python310\scripts\sconsign.exe
    %APPDATA%\python\python310\site-packages\scons-4.4.0.dist-info\*
    %APPDATA%\python\python310\site-packages\scons\*
    %APPDATA%\python\scons-time.1
    %APPDATA%\python\scons.1
    %APPDATA%\python\sconsign.1
Proceed (Y/n)? y
  Successfully uninstalled SCons-4.4.0

D:\dev\repos> python -m pip install scons
Collecting scons
  Using cached SCons-4.4.0-py3-none-any.whl (4.2 MB)
Requirement already satisfied: setuptools in c:\python310\lib\site-packages (from scons) (58.1.0)
Installing collected packages: scons
Successfully installed scons-4.4.0

D:\dev\repos> where scons
C:\Python310\Scripts\scons.exe
The next prerequisite is zlib. Instead of downloading binaries from the unsecured site linked to, I decided to build the zlib sources myself. I only built the 64-bit version but turns out they are serious about setting ZLIB_W32:
D:\dev\repos\nsis\nsis-3.08-src> scons UNICODE=yes
scons: Reading SConscript files ...
Mkdir("build\urelease\config")
WARNING: VER_PACKED not set, defaulting to 0x03007666!
Delete("nsis-29-Sep-2022.cvs")
Delete(".instdist")
Delete(".test")
Using Microsoft tools configuration (14.3)
Checking for memset requirement... yes
Checking for memcpy requirement... no
Checking for C library gdi32... yes
Checking for C library user32... yes
Checking for C library pthread... no
Checking for C library iconv... no
Checking for C library shlwapi... yes
Checking for C library oleaut32... yes
Checking for C library version... yes
Checking for C library shell32... yes
Checking for C library version... yes
Please specify folder of zlib for Win32 via ZLIB_W32
Copying the DLL is not sufficient. To see why the error below occurs, consult config.log.
...
Checking for C library zdll... no
Checking for C library z... no
zlib (win32) is missing!
For example, config.log ends with C:\dev\software\zlib\win32\zlib.h(34): fatal error C1083: Cannot open include file: 'zconf.h': No such file or directory because I copied only zlib.h. I notice in config.log that it’s trying to also link using zdll.lib. Fix this by running:
cd /d D:\dev\repos\zlib
copy zlib.h C:\dev\software\zlib\win32\
copy zconf.h C:\dev\software\zlib\win32\
copy contrib\vstudio\vc14\x86\ZlibDllRelease\zlibwapi.lib C:\dev\software\zlib\win32\zdll.lib
set ZLIB_W32=C:\dev\software\zlib\win32\
Compilation now fails due to unresolved external symbols:
link /nologo /nocoffgrpinfo /map /subsystem:console,5.01 /STACK:2097152 /OUT:build\urelease\makensis\makensis.exe /LIBPATH:C:\dev\software\zlib\win32 gdi32.lib user32.lib shlwapi.lib oleaut32.lib version.lib shell32.lib version.lib zdll.lib build\urelease\makensis\build.obj build\urelease\makensis\clzma.obj build\urelease\makensis\crc32.obj build\urelease\makensis\DialogTemplate.obj build\urelease\makensis\dirreader.obj build\urelease\makensis\fileform.obj build\urelease\makensis\growbuf.obj build\urelease\makensis\icon.obj build\urelease\makensis\lang.obj build\urelease\makensis\lineparse.obj build\urelease\makensis\makenssi.obj build\urelease\makensis\manifest.obj build\urelease\makensis\mmap.obj build\urelease\makensis\Plugins.obj build\urelease\makensis\ResourceEditor.obj build\urelease\makensis\ResourceVersionInfo.obj build\urelease\makensis\BinInterop.obj build\urelease\makensis\script.obj build\urelease\makensis\scriptpp.obj build\urelease\makensis\ShConstants.obj build\urelease\makensis\strlist.obj build\urelease\makensis\tokens.obj build\urelease\makensis\tstring.obj build\urelease\makensis\utf.obj build\urelease\makensis\util.obj build\urelease\makensis\winchar.obj build\urelease\makensis\writer.obj build\urelease\makensis\bzip2\blocksort.obj build\urelease\makensis\bzip2\bzlib.obj build\urelease\makensis\bzip2\compress.obj build\urelease\makensis\bzip2\huffman.obj build\urelease\makensis\7zip\7zGuids.obj build\urelease\makensis\7zip\7zip\Common\OutBuffer.obj build\urelease\makensis\7zip\7zip\Common\StreamUtils.obj build\urelease\makensis\7zip\7zip\Compress\LZ\LZInWindow.obj build\urelease\makensis\7zip\7zip\Compress\LZMA\LZMAEncoder.obj build\urelease\makensis\7zip\7zip\Compress\RangeCoder\RangeCoderBit.obj build\urelease\makensis\7zip\Common\Alloc.obj build\urelease\makensis\7zip\Common\CRC.obj
build.obj : error LNK2019: unresolved external symbol _deflate referenced in function "public: virtual int __thiscall CZlib::Compress(bool)" (?Compress@CZlib@@UAEH_N@Z)
build.obj : error LNK2019: unresolved external symbol _deflateEnd referenced in function "public: virtual int __thiscall CZlib::End(void)" (?End@CZlib@@UAEHXZ)
build.obj : error LNK2019: unresolved external symbol _deflateInit2_ referenced in function "public: virtual int __thiscall CZlib::Init(int,unsigned int)" (?Init@CZlib@@UAEHHI@Z)
build\urelease\makensis\makensis.exe : fatal error LNK1120: 3 unresolved externals
scons: *** [build\urelease\makensis\makensis.exe] Error 1120
scons: building terminated because of errors.
Run dumpbin /headers zlibwapi.lib to examine the symbols in the lib file. Each of these does appear in a slightly different decorated form. For the declaration ZEXTERN int ZEXPORT deflateEnd OF((z_streamp strm)); in zlib.h we see the Name mangling below. This looks like __stdcall, coming from the expansion of ZEXPORT in zconf.h.
  Version      : 0
  Machine      : 14C (x86)
  TimeDateStamp: 6336126F Thu Sep 29 15:47:27 2022
  SizeOfData   : 0000001B
  DLL name     : zlibwapi.dll
  Symbol name  : _deflateEnd@4
  Type         : code
  Name type    : ordinal
  Ordinal      : 6
Just by chance, I CTRL+click on the deflateEnd method on the line int ret = deflateEnd(stream); in nsis-3.08-src/Source/czlib.h and it opens ZLIB.H in nsis-3.08-src/Source/zlib/. This file has been here the whole time, with the other header file I manually copied (and others that I might have needed to)! This header is directly included by Source\exehead\fileform.c, for example, so the build will fail if this folder is removed. (is this a bug though?)
In the NSIS sources, ZEXPORT is defined without a value. The link error is therefore caused by the use of _cdecl in the NSIS sources and __stdcall in the zlib source code I built. I end up changing the latter and rebuilding since the change in the former doesn’t seem to fix the build error and I don’t have time to investigate that. More specifically, I change line 355 of zconf.h to define ZEXPORT _cdecl. Now the build succeeds and this command create an installation:
I can run D:\dev\repos\nsis\local-install\makensisw.exe once but it is then blocked by Windows Defender. I guess I’ll have to review Troubleshoot problems with attack surface reduction rules. To create a debug build, use this command line:
I’ve had an interest in 3D modeling since my high school days. This was most likely informed by my curiosity about how computer games and animations are made. I recently downloaded Blender to start toying with and hopefully teach my kids and I some animation skills. I settled on Blender (instead of 3DS Max, which was the first such product I used) because it is free. There are also some decent Blender tutorials on YouTube. Here’s the channel I started watching:
Building the Source Code
I decided to dig into the sources and see how easy it is to build Blender on Windows. Thankfully, there are detailed instructions – Building Blender/Windows – Blender Developer Wiki. The subversion client is the only one I don’t have installed on my desktop. Weird that they zipped the MSI for a 3% compression ratio (saving 211 KB on a 7232 KB MSI.
17:19:55.47 D:\dev\repos\other\blender> make update
Warning: Python not found, there is likely an issue with the library folder
No explicit msvc version requested, autodetecting version.
**********************************************************************
** Visual Studio 2019 Developer Command Prompt v16.11.19
** Copyright (c) 2021 Microsoft Corporation
**********************************************************************
[vcvarsall.bat] Environment initialized for: 'x64'
Compiler Detection successful, detected VS2019

The required external libraries in "D:\dev\repos\other\blender\..\lib\win64_vc15" are missing

Would you like to download them? (y/n)y

Downloading win64_vc15 libraries, please wait.

A    D:\dev\repos\other\lib\win64_vc15\openpgl
A    D:\dev\repos\other\lib\win64_vc15\openpgl\lib
A    D:\dev\repos\other\lib\win64_vc15\openpgl\lib\cmake
A    D:\dev\repos\other\lib\win64_vc15\openpgl\lib\cmake\openpgl-0.3.1
A    D:\dev\repos\other\lib\win64_vc15\openpgl\include
...
A    D:\dev\repos\other\lib\win64_vc15\vulkan\share\vulkan\registry\vkconventions.py
A    D:\dev\repos\other\lib\win64_vc15\vulkan\share\vulkan\registry\validusage.json
A    D:\dev\repos\other\lib\win64_vc15\wintab\include\wintab.h
 U   D:\dev\repos\other\lib\win64_vc15
Checked out revision 63049.
python not found, required for this operation

19:10:47.57 D:\dev\repos\other\blender>
Here’s the command line used to download the libraries:
Run make update again since it failed the first time because python was not found but it has now been checked out into the lib folder. Once that completes, run make to build Blender. Interestingly, it fails because it can’t find CMake yet it said to open a plain cmd prompt. I work around this by switching to the VS 2019 Developer Command Prompt instead of updating my PATH and that unblocks the build.
21:08:42.26 D:\dev\repos\other\blender> make

No explicit msvc version requested, autodetecting version.
**********************************************************************
** Visual Studio 2019 Developer Command Prompt v16.11.19
** Copyright (c) 2021 Microsoft Corporation
**********************************************************************
[vcvarsall.bat] Environment initialized for: 'x64'
Compiler Detection successful, detected VS2019
Building blender with VS2019 for x64 in D:\dev\repos\other\blender\..\build_windows_x64_vc16_Release
-- Selecting Windows SDK version 10.0.22572.0 to target Windows 10.0.22621.
-- The C compiler identification is MSVC 19.29.30146.0
-- The CXX compiler identification is MSVC 19.29.30146.0
...
  -- Installing: D:/dev/repos/other/build_windows_x64_vc16_Release/bin/Release/3.4/datafiles/usd/usdVolImaging/resources
  -- Installing: D:/dev/repos/other/build_windows_x64_vc16_Release/bin/Release/3.4/datafiles/usd/usdVolImaging/resources/plugInfo.json
21:35:47.14 D:\dev\repos\other\blender>
This is a really smooth experience (compared to ahem, zlib). I’m amazed it built and generated a local install folder in less than half an hour. I could launch build_windows_x64_vc16_Release\bin\Release\blender.exe, open the About Blender menu and see version 3.4.0 Alpha from hash 206dead86058. The release notes – Reference/Release Notes/3.4 – Blender Developer Wiki – are also quite useful, especially the Developer Intro!
Once these are installed, run the commands below in a Visual Studio 2022 Developer Command Prompt to build zlib for Windows. The x64 directory will contain zlibwapi.dll, which can be renamed to zlib.dll according to zlib/readme.txt (from the latest commit as of this post).
Unfortunately (or maybe fortunately?), I didn’t see any binaries at zlib. There is a link to the zlib GitHub repo though and zlib/DLL_FAQ.txt at master · madler/zlib (github.com) says to review the zlib site for an alternative download location. Sure enough, it does have a link to zlib for Windows 9x/NT/2000/XP/2003 (DLL version, plus related utilities). That doesn’t inspire much confidence in the binaries though… Might as well build them myself.
Investigating How to Build zlib
Open a Visual Studio Developer Command Prompt then build the project I saw in the docs:
git clone https://github.com/madler/zlib
cd zlib/contrib/vstudio/vc14
msbuild zlibvc.vcxproj
There are other prereqs, apparently:
MSBuild version 17.3.1+2badb37d1 for .NET Framework
Build started 9/29/2022 11:01:01 AM.
Project "D:\dev\repos\zlib\contrib\vstudio\vc14\zlibvc.vcxproj" on node 1 (default targets).
C:\Program Files\Microsoft Visual Studio\2022\Enterprise\MSBuild\Microsoft\VC\v170\Microsoft.CppBuild.targets(460,5): error MSB8020: The build tools for Visual Studio 2015 (Platform Toolset = 'v140') cannot b
e found. To build using the v140 build tools, please install Visual Studio 2015 build tools.  Alternatively, you may upgrade to the current Visual Studio tools by selecting the Project menu or right-click the
 solution, and then selecting "Retarget solution". [D:\dev\repos\zlib\contrib\vstudio\vc14\zlibvc.vcxproj]
Done Building Project "D:\dev\repos\zlib\contrib\vstudio\vc14\zlibvc.vcxproj" (default targets) -- FAILED.


Build FAILED.
D:\dev\repos\zlib\contrib\vstudio\vc14> msbuild zlibvc.vcxproj
MSBuild version 17.3.1+2badb37d1 for .NET Framework
Build started 9/29/2022 11:23:13 AM.
Project "D:\dev\repos\zlib\contrib\vstudio\vc14\zlibvc.vcxproj" on node 1 (default targets).
C:\Program Files (x86)\MSBuild\Microsoft.Cpp\v4.0\V140\Platforms\Win32\PlatformToolsets\v140\Toolset.targets(34,5): error MSB8036: The Windows SDK version 8.1 was not found. Install the required version of Wi
ndows SDK or change the SDK version in the project property pages or by right-clicking the solution and selecting "Retarget solution". [D:\dev\repos\zlib\contrib\vstudio\vc14\zlibvc.vcxproj]
Done Building Project "D:\dev\repos\zlib\contrib\vstudio\vc14\zlibvc.vcxproj" (default targets) -- FAILED.


Build FAILED.
D:\dev\repos\zlib\contrib\vstudio\vc14> msbuild zlibvc.vcxproj
MSBuild version 17.3.1+2badb37d1 for .NET Framework
Build started 9/29/2022 11:51:10 AM.
Project "D:\dev\repos\zlib\contrib\vstudio\vc14\zlibvc.vcxproj" on node 1 (default targets).
PrepareForBuild:
  Creating directory "x86\ZlibDllDebug\Tmp\".
  Creating directory "x86\ZlibDllDebug\Tmp\zlibvc.tlog\".
InitializeBuildStatus:
  Creating "x86\ZlibDllDebug\Tmp\zlibvc.tlog\unsuccessfulbuild" because "AlwaysCreate" was specified.
PreBuildEvent:
  cd ..\..\masmx86
  bld_ml32.bat
  :VCEnd
  The system cannot find the path specified.
  'bld_ml32.bat' is not recognized as an internal or external command,
  operable program or batch file.
C:\Program Files (x86)\MSBuild\Microsoft.Cpp\v4.0\V140\Microsoft.CppCommon.targets(123,5): error MSB3073: The command "cd ..\..\masmx86 [D:\dev\repos\zlib\contrib\vstudio\vc14\zlibvc.vcxproj]
C:\Program Files (x86)\MSBuild\Microsoft.Cpp\v4.0\V140\Microsoft.CppCommon.targets(123,5): error MSB3073: bld_ml32.bat [D:\dev\repos\zlib\contrib\vstudio\vc14\zlibvc.vcxproj]
C:\Program Files (x86)\MSBuild\Microsoft.Cpp\v4.0\V140\Microsoft.CppCommon.targets(123,5): error MSB3073: :VCEnd" exited with code 9009. [D:\dev\repos\zlib\contrib\vstudio\vc14\zlibvc.vcxproj]
Done Building Project "D:\dev\repos\zlib\contrib\vstudio\vc14\zlibvc.vcxproj" (default targets) -- FAILED.


Build FAILED.
This looks like really bad development on the zlib repo. Removing scripts without removing outdated documentation, much less documenting the new way to build. This is Please fix 1.2.12 compile · Issue #631 · madler/zlib (github.com). Instead of using the workarounds there, just build 1.2.11 and let the zlib folks deal with that mess.
git switch --detach v1.2.11
cd zlib/contrib/vstudio/vc14
msbuild zlibvc.vcxproj
hsdis is a plugin for disassembling code dynamically generated by the Java Virtual Machine. On Linux & MacOS, it uses GNU binutils. Support for the LLVM disassembly backend was recently added to hsdis in https://github.com/openjdk/jdk/pull/7531. This was motivated by the fact that GNU binutils is not distributed with the JDK (due to licensing reasons mentioned at https://github.com/openjdk/jdk/pull/5920#issuecomment-942398786) and the LLVM disassembly may be preferrable in certain circumstances. Unfortunately, the official Windows LLVM distribution does not have the header files necessary to build the hotspot disassembler. This prevents Windows developers from easily using the LLVM disassembler backend because they now have to build LLVM themselves as well – see hsdis LLVM backend for Windows ARM64 and Building LLVM for Windows ARM64, for example. In this post, we investigate why the LLVM Windows build does not have the necessary header files. The llvm-c directory in Windows build contains these 2 files only:
C:\Program Files\LLVM\include\llvm-c>dir
 Volume in drive C is OSDisk
 Volume Serial Number is c070-2ac0

 Directory of C:\Program Files\LLVM\include\llvm-c

01/08/2022  11:54 AM    <DIR>          .
01/08/2022  11:54 AM    <DIR>          ..
09/24/2021  10:18 AM            29,760 lto.h
09/24/2021  10:18 AM             9,632 Remarks.h
               2 File(s)         39,392 bytes
               2 Dir(s)  62,273,200,128 bytes free
I created a local LLVM build (see Building LLVM with CMake) and confirmed that it has all the header files.
C:\dev\repos\llvm-project\build_llvm\install_local\include\llvm-c>dir /w
 Volume in drive C is OSDisk
 Volume Serial Number is 0087-4c48

 Directory of C:\dev\repos\llvm-project\build_llvm\install_local\include\llvm-c

[.]                   [..]                  Analysis.h
BitReader.h           BitWriter.h           blake3.h
Comdat.h              Core.h                DataTypes.h
DebugInfo.h           Deprecated.h          Disassembler.h
DisassemblerTypes.h   Error.h               ErrorHandling.h
ExecutionEngine.h     ExternC.h             Initialization.h
IRReader.h            Linker.h              LLJIT.h
lto.h                 Object.h              Orc.h
OrcEE.h               Remarks.h             Support.h
Target.h              TargetMachine.h       [Transforms]
Types.h
              28 File(s)        382,361 bytes
               3 Dir(s)  59,158,138,880 bytes free
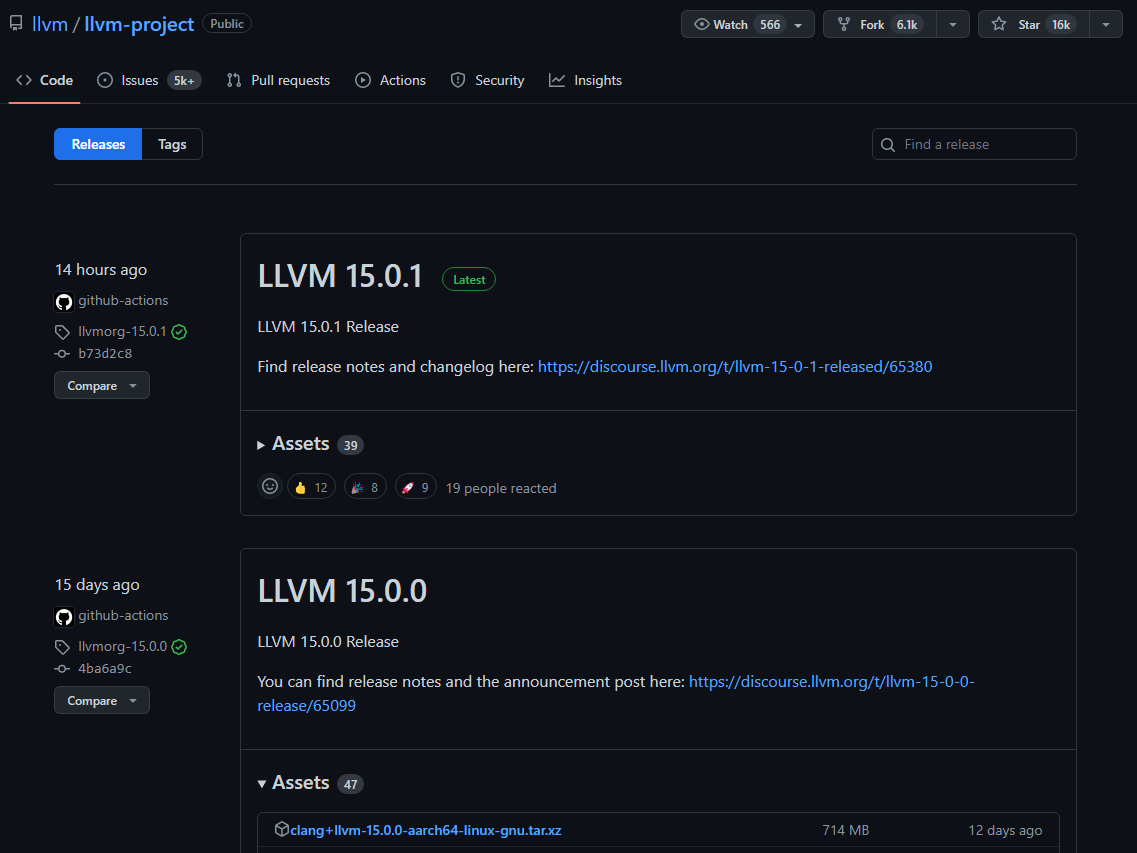
Does this problem still exist in the latest Windows LLVM release? I went to Releases · llvm/llvm-project (github.com) to find the latest LLVM installer for Windows but couldn’t find it. Turns out it’s because the 15.0.1 release is only 14 hours old so some of the assets probably haven’t been uploaded. Notice that 15.0.0 has 47 assets. I can successfully download and install LLVM-15.0.0-win64.exe and see that the header files are still missing.
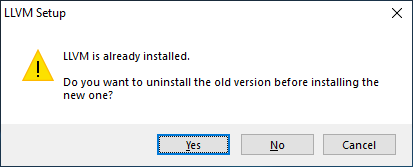
Interestingly, trying to install LLVM-15.0.0-win32.exe before uninstalling LLVM-15.0.0-win64.exe gives this dialog and clicking Yes uninstalls before the actual installation of the 32-bit build starts!
LLVM is already installed.
I assumed that would happen at this stage:
All the same, these dialogs have strings that can lead us to the sources that create the installer! The installer looks very similar to the one from Building the Elmer Install Folder so searching the llvm codebase for “ncis ” gives only a handful of hits leading to the key discovery of build_llvm_release.bat! (later learn that this needs to be executed in a (2019) developer command prompt so that the ninja command can be found). That script requires 7zip though. The script fails on my machine because it can’t find 7zip. Failure seems to be coming from the for-statement (see for | Microsoft Learn for usage). The for command uses the escape character (^) as explained at set | Microsoft Learn.
C:\dev\repos\llvm-project\llvm\utils\release> build_llvm_release.bat 15.0.0
Check 7-zip version and/or administrator permissions.
'7z.exe' is not recognized as an internal or external command,
operable program or batch file.
You need to modify the paths below:
Revision: llvmorg-15.0.0
Package version: 15.0.0
Build dir: C:\dev\repos\llvm-project\llvm\utils\release\llvm_package_15.0.0

Press any key to continue . . .
-- Looking for CrashReporterClient.h
-- Looking for CrashReporterClient.h - not found
-- Looking for pfm_initialize in pfm
-- Looking for pfm_initialize in pfm - not found
-- Could NOT find ZLIB (missing: ZLIB_LIBRARY ZLIB_INCLUDE_DIR)
CMake Error at C:/Program Files/Microsoft Visual Studio/2022/Preview/Common7/IDE/CommonExtensions/Microsoft/CMake/CMake/share/cmake-3.24/Modules/FindPackageHandleStandardArgs.cmake:230 (message):
  Could NOT find LibXml2 (missing: LIBXML2_INCLUDE_DIR)
Call Stack (most recent call first):
  C:/Program Files/Microsoft Visual Studio/2022/Preview/Common7/IDE/CommonExtensions/Microsoft/CMake/CMake/share/cmake-3.24/Modules/FindPackageHandleStandardArgs.cmake:594 (_FPHSA_FAILURE_MESSAGE)
  C:/Program Files/Microsoft Visual Studio/2022/Preview/Common7/IDE/CommonExtensions/Microsoft/CMake/CMake/share/cmake-3.24/Modules/FindLibXml2.cmake:108 (FIND_PACKAGE_HANDLE_STANDARD_ARGS)
  cmake/config-ix.cmake:156 (find_package)
  CMakeLists.txt:774 (include)


-- Configuring incomplete, errors occurred!
See also "C:/dev/repos/llvm-project/llvm/utils/release/llvm_package_15.0.0/build32_stage0/CMakeFiles/CMakeOutput.log".
See also "C:/dev/repos/llvm-project/llvm/utils/release/llvm_package_15.0.0/build32_stage0/CMakeFiles/CMakeError.log".
Looking through FindPackageHandleStandardArgs.cmake leads me to the simple realization that the wrong define is being used on the command line. Could this be because I’m using a newer CMake? I’ve been using the VS 2022 Preview Developer Command Prompt thus far. My VS 2019 (16.11.19) installation uses CMake 3.20. Both FindLibXml2.cmake in 3.20 and FindLibXml2.cmake in 3.24 require the LIBXML2_INCLUDE_DIR variable. However, they also claim (at the top) to set these variables.
in my build folder (build_llvm), there is a CPackConfig.cmake file that sets variables like CPACK_PACKAGE_FILE_NAME and CPACK_NSIS_DISPLAY_NAME. Since it is NSIS Wiki (sourceforge.io) in use, I wonder about running the package target myself in a manner similar to that used to create my local build. I switch back to a previous build directory (created without the build_llvm_release.bat) and run:
cmake --build . --config Release --target package
The resulting failure below indicates that NSIS is required.
MSBuild version 17.4.0-preview-22466-03+48ab5664b for .NET Framework
  PipSqueak.vcxproj -> C:\dev\repos\llvm-project\build_llvm\unittests\Support\DynamicLibrary\Release\PipSqueak.dll
  SecondLib.vcxproj -> C:\dev\repos\llvm-project\build_llvm\unittests\Support\DynamicLibrary\Release\SecondLib.dll
  obj.llvm-tblgen.vcxproj -> C:\dev\repos\llvm-project\build_llvm\utils\TableGen\obj.llvm-tblgen.dir\Release\obj.llvm-tblgen.lib
  LLVMDemangle.vcxproj -> C:\dev\repos\llvm-project\build_llvm\Release\lib\LLVMDemangle.lib
...
  verify-uselistorder.vcxproj -> C:\dev\repos\llvm-project\build_llvm\Release\bin\verify-uselistorder.exe
  yaml-bench.vcxproj -> C:\dev\repos\llvm-project\build_llvm\Release\bin\yaml-bench.exe
  yaml2obj.vcxproj -> C:\dev\repos\llvm-project\build_llvm\Release\bin\yaml2obj.exe
EXEC : CPack error : Cannot find NSIS compiler makensis: likely it is not installed, or not in your PATH [C:\dev\repos\llvm-project\build_llvm\package.vcxproj]
EXEC : CPack error : Could not read NSIS registry value. This is usually caused by NSIS not being installed. Please install NSIS from http://nsis.sourceforge.net [C:\dev\repos\llvm-proje
ct\build_llvm\package.vcxproj]
EXEC : CPack error : Cannot initialize the generator NSIS [C:\dev\repos\llvm-project\build_llvm\package.vcxproj]
After installing NSIS, the previous command successfully creates an LLVM for Windows installer.
...
  verify-uselistorder.vcxproj -> C:\dev\repos\llvm-project\build_llvm\Release\bin\verify-uselistorder.exe
  yaml-bench.vcxproj -> C:\dev\repos\llvm-project\build_llvm\Release\bin\yaml-bench.exe
  yaml2obj.vcxproj -> C:\dev\repos\llvm-project\build_llvm\Release\bin\yaml2obj.exe
  CPack: Create package using NSIS
  CPack: Install projects
  CPack: - Install project: LLVM [Release]
  CMake Warning (dev) at C:/Program Files/Microsoft Visual Studio/2022/Preview/Common7/IDE/CommonExtensions/Microsoft/CMake/CMake/share/cmake-3.24/Modules/GNUInstallDirs.cmake:243 (messa
  ge):
    Unable to determine default CMAKE_INSTALL_LIBDIR directory because no
    target architecture is known.  Please enable at least one language before
    including GNUInstallDirs.
  Call Stack (most recent call first):
    C:/dev/repos/llvm-project/llvm/cmake/modules/LLVMInstallSymlink.cmake:5 (include)
    C:/dev/repos/llvm-project/build_llvm/tools/llvm-ar/cmake_install.cmake:48 (include)
    C:/dev/repos/llvm-project/build_llvm/tools/cmake_install.cmake:39 (include)
    C:/dev/repos/llvm-project/build_llvm/cmake_install.cmake:71 (include)
  This warning is for project developers.  Use -Wno-dev to suppress it.

  CPack: Create package
  CPack: - package: C:/dev/repos/llvm-project/build_llvm/LLVM-16.0.0git-win64.exe generated.
This installer generates the LLVM includes on disk as expected. The issue must therefore be confined to the installer generated by the script.
Reviewing Ninja NSIS Packaging
At this point, I ran build_llvm_release.bat to create an installer. Once packaging is complete, the install_manifest.txt file can be used to determine which files are in the installer. The batch file also runs lots of tests and this was annoying when trying to generate installers. Once the tests failed on the build I was creating and I had CTRL+C’d a couple of times, I ran ninja package myself (taken from the batch file)
C:\dev\repos\llvm-project\llvm\utils\release\llvm_package_15.0.0\build32_stage0>ninja package
[0/1] Run CPack packaging tool...CPack: Create package using NSIS
CPack: Install projects
CPack: - Install project: LLVM []
CMake Warning (dev) at C:/Program Files/Microsoft Visual Studio/2022/Preview/Common7/IDE/CommonExtensions/Microsoft/CMake/CMake/share/cmake-3.24/Modules/GNUInstallDirs.cmake:243 (message):
  Unable to determine default CMAKE_INSTALL_LIBDIR directory because no
  target architecture is known.  Please enable at least one language before
  including GNUInstallDirs.
Call Stack (most recent call first):
  C:/dev/repos/llvm-project/llvm/utils/release/llvm_package_15.0.0/llvm-project/llvm/cmake/modules/LLVMInstallSymlink.cmake:5 (include)
  C:/dev/repos/llvm-project/llvm/utils/release/llvm_package_15.0.0/build32_stage0/tools/llvm-ar/cmake_install.cmake:40 (include)
  C:/dev/repos/llvm-project/llvm/utils/release/llvm_package_15.0.0/build32_stage0/tools/cmake_install.cmake:39 (include)
  C:/dev/repos/llvm-project/llvm/utils/release/llvm_package_15.0.0/build32_stage0/cmake_install.cmake:114 (include)
This warning is for project developers.  Use -Wno-dev to suppress it.

CPack: Create package
CPack: - package: C:/dev/repos/llvm-project/llvm/utils/release/llvm_package_15.0.0/build32_stage0/LLVM-15.0.0-win32.exe generated.
I then try to find a package target in build.ninja. Search for CMakeFiles\package.util.+ include since we’re interested in include files. There are some interesting differences in the include directories of the build created manually from the local install and the one created by the script, e.g.
Try searching in build.ninja for the 2 header files the installer creates in the (broken) shipping LLVM for Windows build. Nothing there but searching the file system for remarks.h gives interesting results, e.g. the existence of an NSIS project file: project.nsi. Looks like there are some tutorials showing how to create .nsi files at Invoking NSIS run-time commands on compile-time – NSIS (sourceforge.io). The way NSIS is used with CPack when building is documented at Packaging With CPack — Mastering CMake
… but I completely missed the fact that the 2nd didn’t have these lines from the first.
if(CMAKE_INSTALL_COMPONENT STREQUAL "llvm-headers" OR NOT CMAKE_INSTALL_COMPONENT)
  file(INSTALL DESTINATION "${CMAKE_INSTALL_PREFIX}/include" TYPE DIRECTORY FILES
    "C:/dev/repos/llvm-project/llvm/include/llvm"
    "C:/dev/repos/llvm-project/llvm/include/llvm-c"
    FILES_MATCHING REGEX "/[^/]*\\.def$" REGEX "/[^/]*\\.h$" REGEX "/[^/]*\\.td$" REGEX "/[^/]*\\.inc$" REGEX "/license\\.txt$")
endif()

if(CMAKE_INSTALL_COMPONENT STREQUAL "llvm-headers" OR NOT CMAKE_INSTALL_COMPONENT)
  file(INSTALL DESTINATION "${CMAKE_INSTALL_PREFIX}/include" TYPE DIRECTORY FILES
    "C:/dev/repos/llvm-project/build_llvm/include/llvm"
    "C:/dev/repos/llvm-project/build_llvm/include/llvm-c"
    FILES_MATCHING REGEX "/[^/]*\\.def$" REGEX "/[^/]*\\.h$" REGEX "/[^/]*\\.gen$" REGEX "/[^/]*\\.inc$" REGEX "/cmakefiles$" EXCLUDE REGEX "/config\\.h$" EXCLUDE)
endif()
Search the codebase for “llvm-headers” and find the llvm-header component definition. That whole code block is gated by the LLVM_INSTALL_TOOLCHAIN_ONLY variable! This is explicitly turned off in build_llvm_release.bat! I rerun the batch file and see tests failing after the build succeeds. CTRL+C to kill the processes so that I can get to the root issue: does turning off that flag fix the includes? makensis fails, probably because I killed the build and some things might still have been in use?
C:\dev\repos\llvm-project\llvm\utils\release\llvm_package_15.0.0\build32_stage0>ninja package
[0/1] Run CPack packaging tool...CPack: Create package using NSIS
CPack: Install projects
CPack: - Install project: LLVM []
CMake Warning (dev) at C:/Program Files/Microsoft Visual Studio/2022/Preview/Common7/IDE/CommonExtensions/Microsoft/CMake/CMake/share/cmake-3.24/Modules/GNUInstallDirs.cmake:243 (message):
  Unable to determine default CMAKE_INSTALL_LIBDIR directory because no
  target architecture is known.  Please enable at least one language before
  including GNUInstallDirs.
Call Stack (most recent call first):
  C:/dev/repos/llvm-project/llvm/utils/release/llvm_package_15.0.0/llvm-project/llvm/cmake/modules/LLVMInstallSymlink.cmake:5 (include)
  C:/dev/repos/llvm-project/llvm/utils/release/llvm_package_15.0.0/build32_stage0/tools/llvm-ar/cmake_install.cmake:40 (include)
  C:/dev/repos/llvm-project/llvm/utils/release/llvm_package_15.0.0/build32_stage0/tools/cmake_install.cmake:39 (include)
  C:/dev/repos/llvm-project/llvm/utils/release/llvm_package_15.0.0/build32_stage0/cmake_install.cmake:128 (include)
This warning is for project developers.  Use -Wno-dev to suppress it.

CPack: Create package
CPack Error: Problem running NSIS command: "C:/Program Files (x86)/NSIS/makensis.exe" "C:/dev/repos/llvm-project/llvm/utils/release/llvm_package_15.0.0/build32_stage0/_CPack_Packages/win32/NSIS/project.nsi"
Please check C:/dev/repos/llvm-project/llvm/utils/release/llvm_package_15.0.0/build32_stage0/_CPack_Packages/win32/NSIS/NSISOutput.log for errors
CPack Error: Problem compressing the directory
CPack Error: Error when generating package: LLVM

FAILED: CMakeFiles/package.util
cmd.exe /C "cd /D C:\dev\repos\llvm-project\llvm\utils\release\llvm_package_15.0.0\build32_stage0 && "C:\Program Files\Microsoft Visual Studio\2022\Preview\Common7\IDE\CommonExtensions\Microsoft\CMake\CMake\bin\cpack.exe" --config ./CPackConfig.cmake"
ninja: build stopped: subcommand failed.
NSISOutput.log failed due to an “Internal compiler error #12345: error mmapping datablock to 17235001.” However, the include files are now present in the source directory being packaged by NSIS.
Turning Off Tests
There are many tests that the build script runs and some of them are failing. Testing is not on my critical path since all I need is to generate installers so I modify the scripts to enable me to package the build without running all the tests. I then start my build without tests and go to bed only to wake up the next morning to find that I need to rerun it because there are no running programs when I log in. Event Viewer doesn’t show any reboot-related events and sure enough, Task Manager shows over 9 days of uptime still. Turns out the Desktop Window Manager crashed (C:\WINDOWS\system32\dwm.exe)! Curse you dwmcore.dll. Well, time to install those updates I’ve been putting off and reboot before jumping back in. Now on the new Windows 10.0.22621.521. The build still fails:
-- LLVM host triple: i686-pc-windows-msvc
-- LLVM default target triple: i686-pc-windows-msvc
-- Using Release VC++ CRT: MD
-- Looking for os_signpost_interval_begin
-- Looking for os_signpost_interval_begin - not found
CMake Error at C:/Program Files (x86)/Microsoft Visual Studio/2019/Enterprise/Common7/IDE/CommonExtensions/Microsoft/CMake/CMake/share/cmake-3.20/Modules/FindPackageHandleStandardArgs.cmake:230 (message):
  Could NOT find Python3 (missing: Python3_EXECUTABLE Interpreter) (Required
  is at least version "3.6")

      Reason given by package:
          Interpreter: Cannot use the interpreter "C:/Python310/python.exe"

Call Stack (most recent call first):
  C:/Program Files (x86)/Microsoft Visual Studio/2019/Enterprise/Common7/IDE/CommonExtensions/Microsoft/CMake/CMake/share/cmake-3.20/Modules/FindPackageHandleStandardArgs.cmake:594 (_FPHSA_FAILURE_MESSAGE)
  C:/Program Files (x86)/Microsoft Visual Studio/2019/Enterprise/Common7/IDE/CommonExtensions/Microsoft/CMake/CMake/share/cmake-3.20/Modules/FindPython/Support.cmake:3165 (find_package_handle_standard_args)
  C:/Program Files (x86)/Microsoft Visual Studio/2019/Enterprise/Common7/IDE/CommonExtensions/Microsoft/CMake/CMake/share/cmake-3.20/Modules/FindPython3.cmake:485 (include)
  CMakeLists.txt:817 (find_package)


-- Configuring incomplete, errors occurred!
See also "C:/dev/repos/llvm-project/llvm/utils/release/llvm_package_15.0.0/build32_stage0/CMakeFiles/CMakeOutput.log".
See also "C:/dev/repos/llvm-project/llvm/utils/release/llvm_package_15.0.0/build32_stage0/CMakeFiles/CMakeError.log".
When I interrupted the tests before modifying the batch file to skip them, I noticed that they were being run by %LOCALAPPDATA%\Microsoft\WindowsApps\python3.9.exe. This is still present on my machine. Ah, turns out I’m now using the 2019 developer command prompt (and therefore an older CMake). The only difference between CMake 3.20 FindPython3.cmake and CMake 3.24 FindPython3.cmake is a comment about static libraries, so this failure is a mystery.
Diagnosing Build Failures
Since this issue also bit me when I moved to my Surface Book, it is worth understanding why it happens.
Missing CMake in Visual Studio 17.3.4 Developer Command Prompt
Here is the VS 2022 Preview vs VS 2022 Enterprise path to CMake:
C:\Program Files (x86)\Microsoft Visual Studio\Installer> where cmake
C:\Program Files\Microsoft Visual Studio\2022\Preview\Common7\IDE\CommonExtensions\Microsoft\CMake\CMake\bin\cmake.exe

C:\dev\repos\llvm-project\llvm\utils\release> where cmake
INFO: Could not find files for the given pattern(s).
The View Logs link opens the Documents folder under This PC – not particularly useful. Interestingly though, clicking on the Modify button shows a Total space required 1.63 GB. How is there space required before I’ve selected anything? Something similar happens with 16.11.19 though. Without making any individual component selections, I start the install process. CMake gets (re-?)installed as shown below. This fixes the setup warnings as well and cmake is now usable in the VS2022 command prompt.
Missing Python3 in VS 17.3.4 Developer Command Prompt
This is the error I got when trying to build LLVM on my Surface Book 2 in the VS 2022 developer command prompt:
CMake Error at C:/Program Files/CMake/share/cmake-3.17/Modules/FindPackageHandleStandardArgs.cmake:164 (message):
  Could NOT find Python3 (missing: Python3_EXECUTABLE Interpreter) (Required
  is at least version "3.6")

      Reason given by package:
          Interpreter: Cannot use the interpreter "C:/Python310/python.exe"

Call Stack (most recent call first):
  C:/Program Files/CMake/share/cmake-3.17/Modules/FindPackageHandleStandardArgs.cmake:445 (_FPHSA_FAILURE_MESSAGE)
  C:/Program Files/CMake/share/cmake-3.17/Modules/FindPython/Support.cmake:2437 (find_package_handle_standard_args)
  C:/Program Files/CMake/share/cmake-3.17/Modules/FindPython3.cmake:309 (include)
  CMakeLists.txt:817 (find_package)
Uninstalling CMake enables the command line to pick up the CMake distributed with Visual Studio. Python3 is now found successfully in the path below (I’ve shortened it using %LOCALAPPDATA%).
-- Found Python3: %LOCALAPPDATA%/Microsoft/WindowsApps/python3.8.exe (found suitable version "3.8.10", minimum required is "3.6") found components: Interpreter
Missing Python3 in VS 16.11.19 Developer Command Prompt
Interestingly, I still get the same error in VS 2019 despite uninstalling CMake 3.17. My earlier hypothesis is therefore invalid.
CMake Error at C:/Program Files (x86)/Microsoft Visual Studio/2019/Enterprise/Common7/IDE/CommonExtensions/Microsoft/CMake/CMake/share/cmake-3.20/Modules/FindPackageHandleStandardArgs.cmake:230 (message):
  Could NOT find Python3 (missing: Python3_EXECUTABLE Interpreter) (Required
  is at least version "3.6")

      Reason given by package:
          Interpreter: Cannot use the interpreter "C:/Python310/python.exe"

Call Stack (most recent call first):
  C:/Program Files (x86)/Microsoft Visual Studio/2019/Enterprise/Common7/IDE/CommonExtensions/Microsoft/CMake/CMake/share/cmake-3.20/Modules/FindPackageHandleStandardArgs.cmake:594 (_FPHSA_FAILURE_MESSAGE)
  C:/Program Files (x86)/Microsoft Visual Studio/2019/Enterprise/Common7/IDE/CommonExtensions/Microsoft/CMake/CMake/share/cmake-3.20/Modules/FindPython/Support.cmake:3165 (find_package_handle_standard_args)
  C:/Program Files (x86)/Microsoft Visual Studio/2019/Enterprise/Common7/IDE/CommonExtensions/Microsoft/CMake/CMake/share/cmake-3.20/Modules/FindPython3.cmake:485 (include)
  CMakeLists.txt:817 (find_package)
C:/Python310/python.exe -c "import sys; sys.stdout.write('.'.join([str(x) for x in sys.version_info[:3]]))"
I comment out the ERROR_QUIET line to reveal the stdout and stderr output from python since the return code from the python process is causing the CMake error to be raised. Running with --trace-expand --trace-redirect=cmake_trace.txt now reveals the root cause (paths below cleaned up using %LOCALAPPDATA%):
Python path configuration:
  PYTHONHOME = '%LOCALAPPDATA%\Programs\Python\Python310-32'
  PYTHONPATH = (not set)
  program name = 'C:/Python310/python.exe'
  isolated = 0
  environment = 1
  user site = 1
  import site = 1
  sys._base_executable = 'C:\\Python310\\python.exe'
  sys.base_prefix = '%LOCALAPPDATA%\\Programs\\Python\\Python310-32'
  sys.base_exec_prefix = '%LOCALAPPDATA%\\Programs\\Python\\Python310-32'
  sys.platlibdir = 'lib'
  sys.executable = 'C:\\Python310\\python.exe'
  sys.prefix = '%LOCALAPPDATA%\\Programs\\Python\\Python310-32'
  sys.exec_prefix = '%LOCALAPPDATA%\\Programs\\Python\\Python310-32'
  sys.path = [
    'C:\\Python310\\python310.zip',
    '%LOCALAPPDATA%\\Programs\\Python\\Python310-32\\DLLs',
    '%LOCALAPPDATA%\\Programs\\Python\\Python310-32\\lib',
    'C:\\Python310',
  ]
Fatal Python error: init_fs_encoding: failed to get the Python codec of the filesystem encoding
Python runtime state: core initialized
ModuleNotFoundError: No module named 'encodings'

Current thread 0x00003174 (most recent call first):
  <no Python frame>
django – init_fs_encoding: failed to get the Python codec of the filesystem encoding – Stack Overflow is a hint that the PYTHONHOME is wrong. Sure enough, I didn’t change it in build_llvm_release.bat so the paths in the configuration above do not exist! This now raises another question: how on earth does this work in VS 2022? I notice on my desktop that python.exe does not even appear in the CMake tracing output! The difference in behavior stems from the fact that the find_program command in Modules/FindPython/Support.cmake · v3.20.0 finds python 3.10 first in the VS 2019 environment. This path is then assigned to _Python3_EXECUTABLE, preventing the 3.8 path from being used. One important difference between CMake 3.20 and 3.23 that I notice is FindPython: fix typo error (fff8d5b2) · Commits · CMake / CMake · GitLab (kitware.com). Since the fix for the build_llvm_release.bat script is straightforward and it is clear that there are some CMake implementation differences at work, we no longer need to dig into why this behavior could be happening.
Python Hangs
One of my build attempts successfully completes stage0 but hangs when CMake tries to detect the python version. Manually running the same command (copied from Process Explorer) also hangs. Even %LOCALAPPDATA%/Microsoft/WindowsApps/python3.9.exe --version hangs. Inspecting the full dump created by Task Manager reveals that python3.9.exe made a call to get (what looks like) the Package.InstalledLocation Property (Windows.ApplicationModel) – Windows UWP applications | Microsoft Learn
...
-- Looking for os_signpost_interval_begin
-- Looking for os_signpost_interval_begin - not found
Windows becomes pretty unusable as I investigate this behavior (mouse doesn’t work, changes program in focus but can’t click on anything). A reboot fixes these issues (e.g. version now works). Can’t believe we have to deal with this in 2022???
7z x clang+llvm-15.0.1-aarch64-linux-gnu.tar.xz
7z x clang+llvm-15.0.1-arm64-apple-darwin21.0.tar.xz
7z x clang+llvm-15.0.1-x86_64-apple-darwin.tar.xz

tar xf clang+llvm-15.0.1-aarch64-linux-gnu.tar
tar xf clang+llvm-15.0.1-arm64-apple-darwin21.0.tar
tar xf clang+llvm-15.0.1-x86_64-apple-darwin.tar
Here are the directories in the include folder before the installer is created. There are also 28 include files in the include/llvm-c/ directory as desired.
Directory of llvm\utils\release\llvm_package_15.0.0\build32_stage0\_CPack_Packages\win64\NSIS\LLVM-15.0.0-win64\include
 clang
 clang-c
 clang-tidy
 lld
 lldb
 llvm
 llvm-c
Outstanding Questions
Why does the NSIS project fail to build? Why are there test failures and build errors?
Why does the Linux build have ompt-multiplex.h and the aarch64-unknown-linux-gnu directory?
How is the Windows ARM64 installer generated?
Why doesn’t the Windows build have c++, flang, mlir, mlir-c, and polly?
How do we get symbols to the Python app in the Microsoft Store?
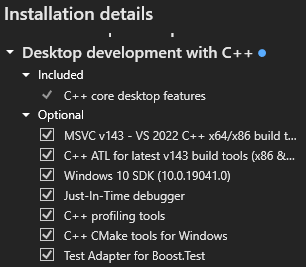
This path C:\Program Files\Microsoft Visual Studio\2022\Enterprise\VC\Auxiliary\Build has various scripts to set up a command window as documented at Use the Microsoft C++ toolset from the command line | Microsoft Docs. If vcvarsx86_arm64.bat and vcvarsamd64_arm64.bat are missing in that folder on your Windows x64 machine, install the MSVC v143 – VS 2022 C++ ARM64 build tools (Latest) component in the Visual Studio 2022 installer.
Selection ARM64 Build Tools in VS Installer
Once it is installed, open a new cmd.exe window and run this command to set up the build environment:
To see the command Visual Studio uses to build the project, create a C++ console application and use the Configuration Manager to change the Active solution platform to ARM64. Next, go to Tools > Options then expand the Projects and Solutions node. Select Build And Run then change the MSBuild project build output verbosity to Detailed. Building the project should now show the full command line used to invoke the compiler, for example here are the command lines used in the Debug and Release configurations respectively.
Notice the /O2 flag (maximize speed) in the release build instead of the /Od flag (no optimizations) above. The debug build also uses the just my code /JMC, runtime error checks /RTC1, and debug multithread-specific version of the run-time library /MDd flags. For our testing purposes, we can ignore most of these flags.
Calling Printf
Here is a simple program, aarch64-abi-test-printf.cpp, which calls printf with a format specifier and 4 additional arguments.
#include <stdio.h>

int main()
{
    int result = printf("%.4f,%.4f,%.4f,%s", 1.2345, 1.2345, 1.2345, "str");
}
In the disassembly generated by dumpbin (printf-abi.asm), notice that all 5 arguments to printf are passed in registers! x0 contains a pointer to the format string, x1-x3 contain the address of the $LN3 label. The 64-bits at that label are the IEEE double floating point representation of 1.2345. x4 contains a pointer to the null-terminated string “str“.
Which are the printf String Arguments?
To determine what symbols in instructions like adrp x8,$SG5571 mean, we use the output of dumpbin /all. The RELOCATIONS section shows $SG5571 to have symbol index 8. The COFF SYMBOL TABLE shows this symbol index 8 to be in SECT3. The raw data for section 3 contains the format string and the single string parameter passed to printf. I’m still not sure how the assembler knows the difference in offsets between these 2 strings?
.
.
.
SECTION HEADER #3
  .rdata name
       0 physical address
       0 virtual address
      1A size of raw data
     31A file pointer to raw data (0000031A to 00000333)
       0 file pointer to relocation table
       0 file pointer to line numbers
       0 number of relocations
       0 number of line numbers
40400040 flags
         Initialized Data
         8 byte align
         Read Only

RAW DATA #3
  00000000: 73 74 72 00 00 00 00 00 25 2E 34 66 2C 25 2E 34  str.....%.4f,%.4
  00000010: 66 2C 25 2E 34 66 2C 25 73 00                    f,%.4f,%s.
.
.
.
RELOCATIONS #4
                                                Symbol    Symbol
 Offset    Type              Applied To         Index     Name
 --------  ----------------  -----------------  --------  ------
 00000008  PAGEBASE_REL21             90000008         8  $SG5571
 0000000C  PAGEOFFSET_12A             91000104         8  $SG5571
 0000001C  PAGEBASE_REL21             90000008         9  $SG5572
 00000020  PAGEOFFSET_12A             91000100         9  $SG5572
 00000024  BRANCH26                   94000000        16  printf
.
.
.
COFF SYMBOL TABLE
000 01057A64 ABS    notype       Static       | @comp.id
001 80010190 ABS    notype       Static       | @feat.00
002 00000000 SECT1  notype       Static       | .drectve
    Section length   62, #relocs    0, #linenums    0, checksum        0
004 00000000 SECT2  notype       Static       | .debug$S
    Section length   9C, #relocs    0, #linenums    0, checksum        0
006 00000000 SECT3  notype       Static       | .rdata
    Section length   1A, #relocs    0, #linenums    0, checksum B99D9667
008 00000000 SECT3  notype       Static       | $SG5571
009 00000008 SECT3  notype       Static       | $SG5572
00A 00000000 SECT4  notype       Static       | .text$mn
Compiling an Optimized Build
Specifying the /O2 flag for speed generates optimized code.
We need to clone 2 repos to execute the crystal growth experiment. The opencgs repo is a dependency of the test-cz-induction repo.
cd ~/repos/fem/elmer/research
git clone https://github.com/nemocrys/opencgs
git clone https://github.com/nemocrys/test-cz-induction
Next, install the opencgs module using pip then set up the crystal growth simulation mesh.
cd opencgs
pip install -e .
This installation output contains an error about an incompatible numpy version but ends with a message about all the components being successfully installed.
Requirement already satisfied: kiwisolver>=1.0.1 in /home/saint/.local/lib/python3.8/site-packages (from matplotlib->pyelmer->opencgs==0.3.1) (1.4.4)
Requirement already satisfied: fonttools>=4.22.0 in /home/saint/.local/lib/python3.8/site-packages (from matplotlib->pyelmer->opencgs==0.3.1) (4.34.4)
ERROR: pandas 1.4.3 has requirement numpy>=1.18.5; platform_machine != "aarch64" and platform_machine != "arm64" and python_version < "3.10", but you'll have numpy 1.17.4 which is incompatible.
...
Successfully installed commonmark-0.9.1 meshio-5.3.4 opencgs pandas-1.4.3 pygments-2.12.0 python-dateutil-2.8.2 pytz-2022.1 rich-12.5.1 typing-extensions-4.3.0
I ignore the error and forge ahead with running the crystal simulation setup:
cd ../test-cz-induction
python3 setup.py
This fails with an error related to numpy.
python3 setup.py
Traceback (most recent call last):
  File "setup.py", line 19, in <module>
    import opencgs.control as ctrl
  File "/home/saint/repos/fem/elmer/research/opencgs/opencgs/__init__.py", line 5, in <module>
    import opencgs.post
  File "/home/saint/repos/fem/elmer/research/opencgs/opencgs/post.py", line 2, in <module>
    import meshio
  File "/home/saint/.local/lib/python3.8/site-packages/meshio/__init__.py", line 1, in <module>
    from . import (
  File "/home/saint/.local/lib/python3.8/site-packages/meshio/_cli/__init__.py", line 1, in <module>
    from ._main import main
  File "/home/saint/.local/lib/python3.8/site-packages/meshio/_cli/_main.py", line 5, in <module>
    from . import _ascii, _binary, _compress, _convert, _decompress, _info
  File "/home/saint/.local/lib/python3.8/site-packages/meshio/_cli/_ascii.py", line 4, in <module>
    from .. import ansys, flac3d, gmsh, mdpa, ply, stl, vtk, vtu, xdmf
  File "/home/saint/.local/lib/python3.8/site-packages/meshio/ansys/__init__.py", line 1, in <module>
    from ._ansys import read, write
  File "/home/saint/.local/lib/python3.8/site-packages/meshio/ansys/_ansys.py", line 14, in <module>
    from .._helpers import register_format
  File "/home/saint/.local/lib/python3.8/site-packages/meshio/_helpers.py", line 7, in <module>
    from numpy.typing import ArrayLike
$ pip install numpy --upgrade
Collecting numpy
  Downloading numpy-1.23.1-cp38-cp38-manylinux_2_17_x86_64.manylinux2014_x86_64.whl (17.1 MB)
     |████████████████████████████████| 17.1 MB 3.6 MB/s
Installing collected packages: numpy
  WARNING: The scripts f2py, f2py3 and f2py3.8 are installed in '/home/saint/.local/bin' which is not on PATH.
  Consider adding this directory to PATH or, if you prefer to suppress this warning, use --no-warn-script-location.
Successfully installed numpy-1.23.1
That’s all that’s needed to get things to run. For example, setting up the mesh now works:
python3 setup.py
The crystal growth simulation can now be executed as well:
python3 run.py
Interestingly, the simulation completes successfully!
crucible
melt
crystal
inductor
seed
insulation
crucible_adapter
axis_bt
...
using material graphite-CZ3R6300 from self.materials_dict
using material insulation from self.materials_dict
using material steel-1.4541 from self.materials_dict
using material vacuum from self.materials_dict
Wrote sif-file.
Starting simulation  ./simdata/2022-07-31_13-35_ss_test-cz-induction_vacuum  ...
[] [] {'CPU-time': 55.87, 'real-time': 57.49}
Finished simulation  ./simdata/2022-07-31_13-35_ss_test-cz-induction_vacuum  .
Post processing...
evaluating heat fluxes

Finished post processing.
This implies that the segmentation fault I ran into on Windows was specific to the Windows Elmer build.
Visualization
Use ParaView to visualize the results of the simulation.
sudo apt install paraview
There are different variables that can be visualized. I selected temperature for the screenshot below. Other options included joule field, joule heating, potential im, newy, etc.