I was reviewing jtreg test failures in some GitHub actions last week. Since I was only interested in the failures, I decided to write a script to extract the failure details from the log files I had downloaded from GitHub. This looked like another task for the VS Code agent so I wrote the algorithm for extracting the failure details into individual text files, which would be easier to review. Below is the prompt I used.
write a python script that processes all the text files in a user-specified folder. For each text file:
- split it into sections using "--------------------------------------------------" as a separator
- generate a filename for the section from the first line after the separator. To do so, use the text after "TEST: " and replace /, #, and . with underscores and append the ".txt" extension.
- if the section contains the string "test jdk:" then write the content of the entire section to a file with the generated name.
I thought I would need to do at least some debugging of the script but I did not! The script worked flawlessly. I didn’t even need to execute it myself because the flow of using the agent included running the script on my raw folder and then generating a README file! See the script and the README at Add scripts generated by Claude Sonnet 4 VS Code agent · swesonga/scratchpad@f5e8057. The agent was using the Claude Sonnet 4 model.
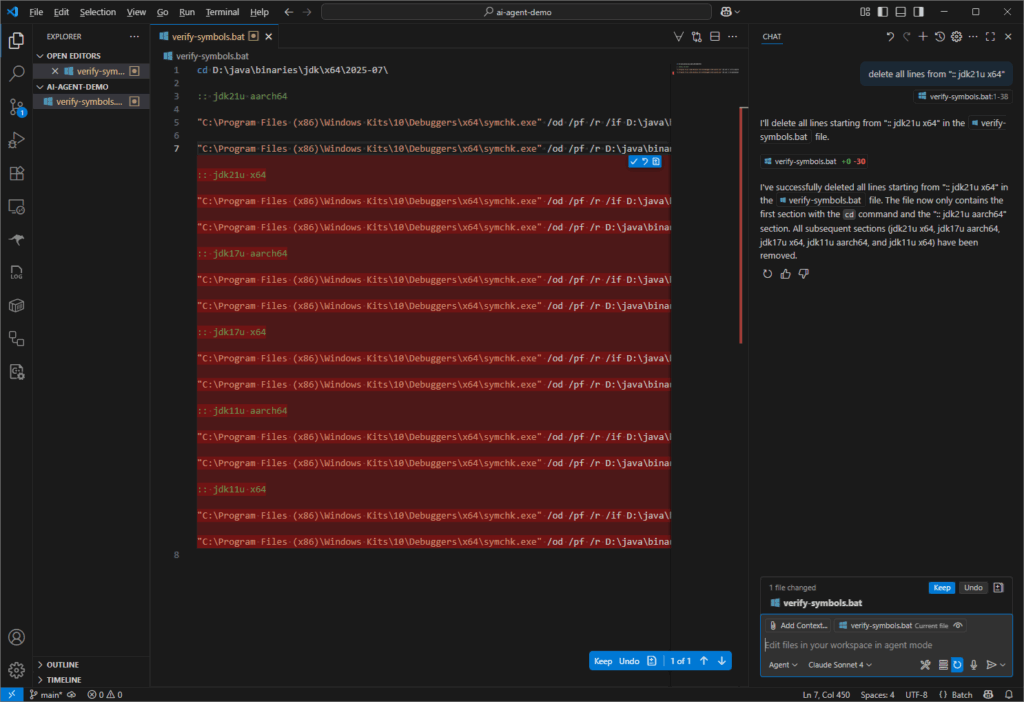
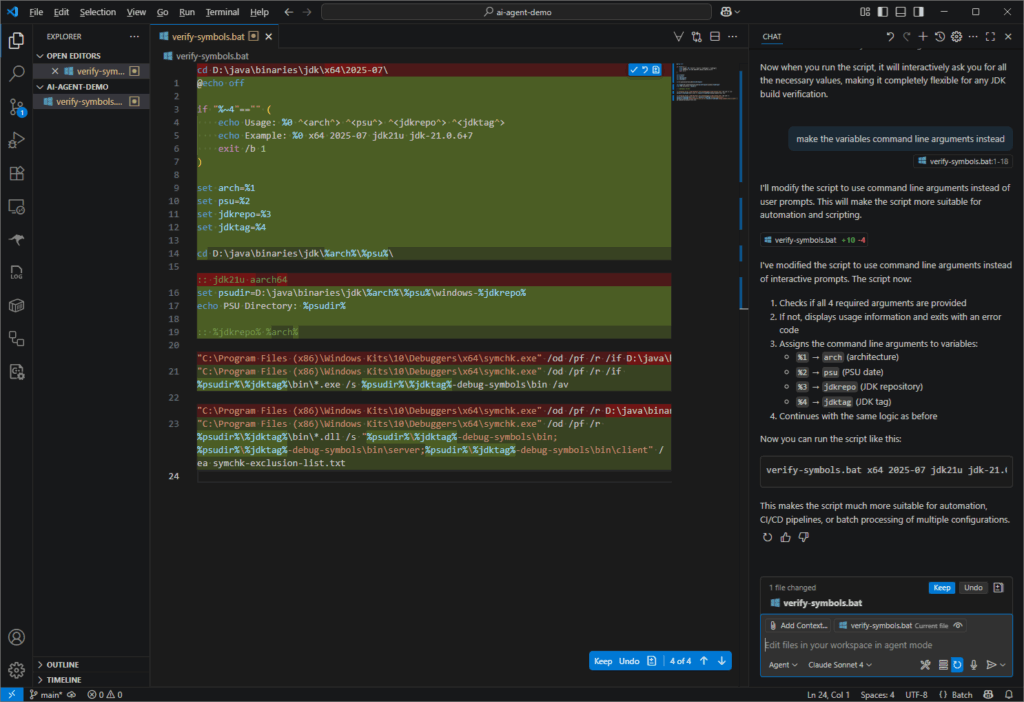
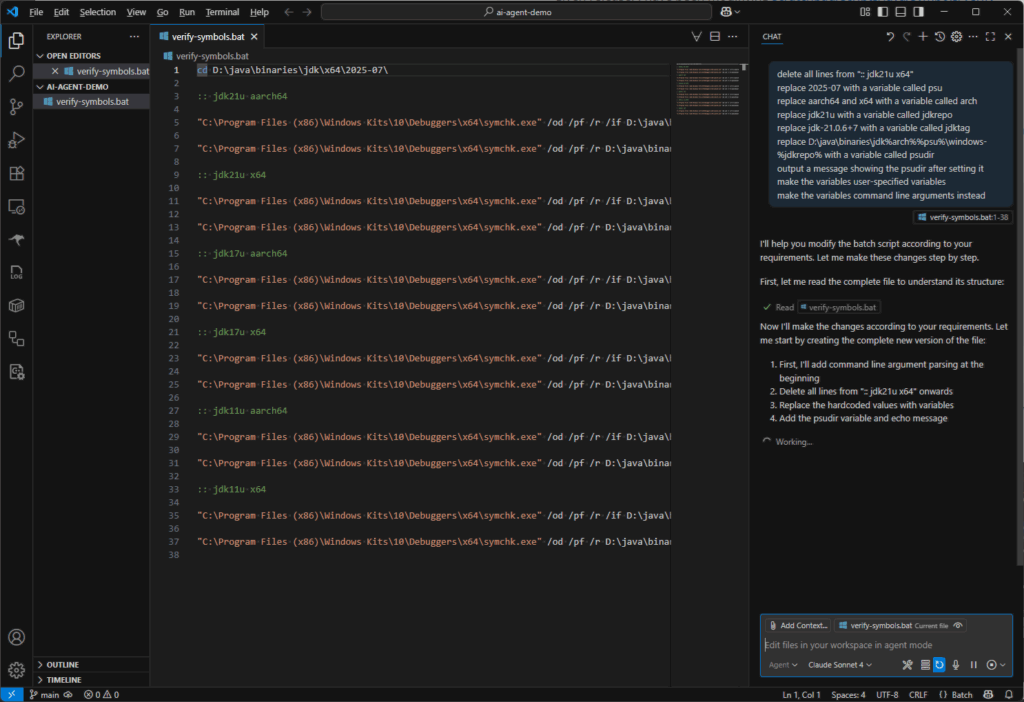
delete all lines from ":: jdk21u x64"
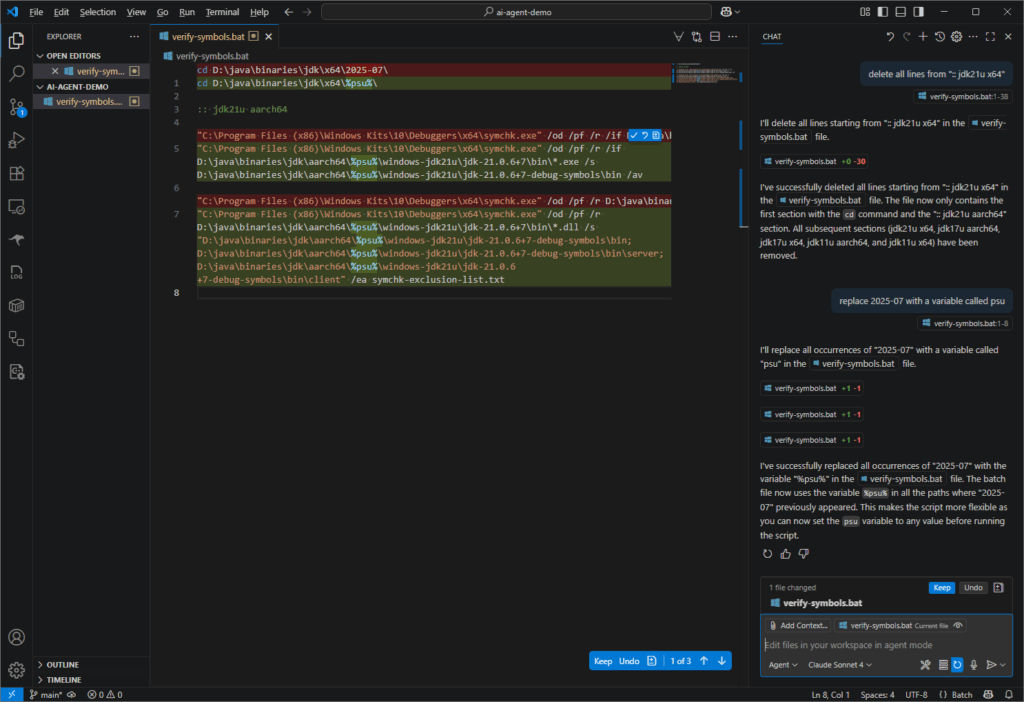
replace 2025-07 with a variable called psu
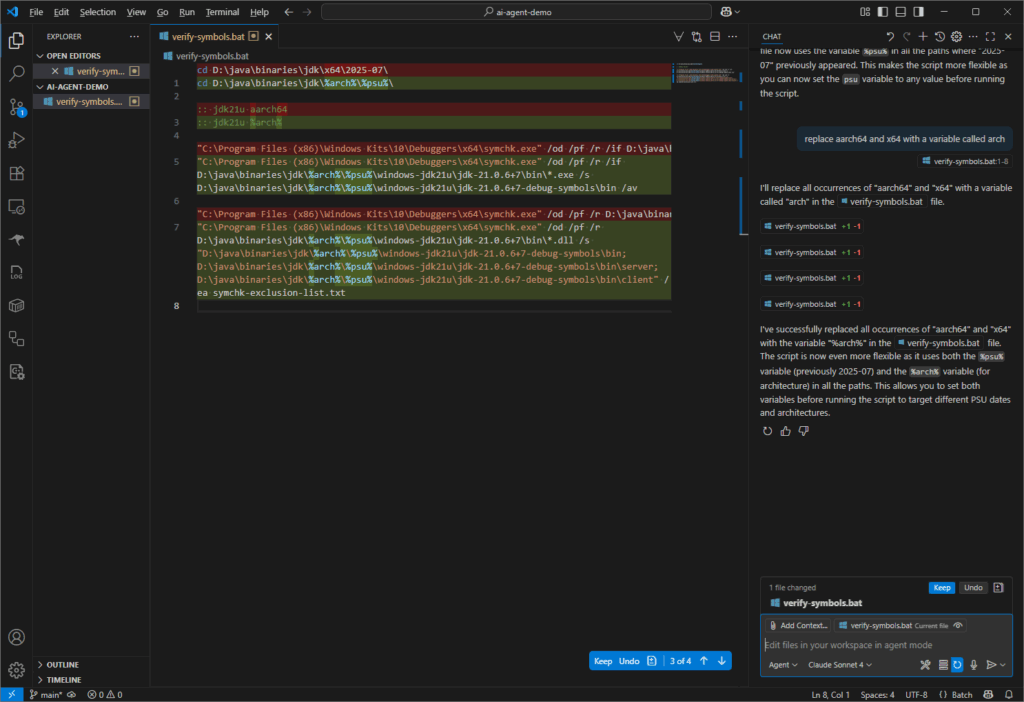
replace aarch64 and x64 with a variable called arch
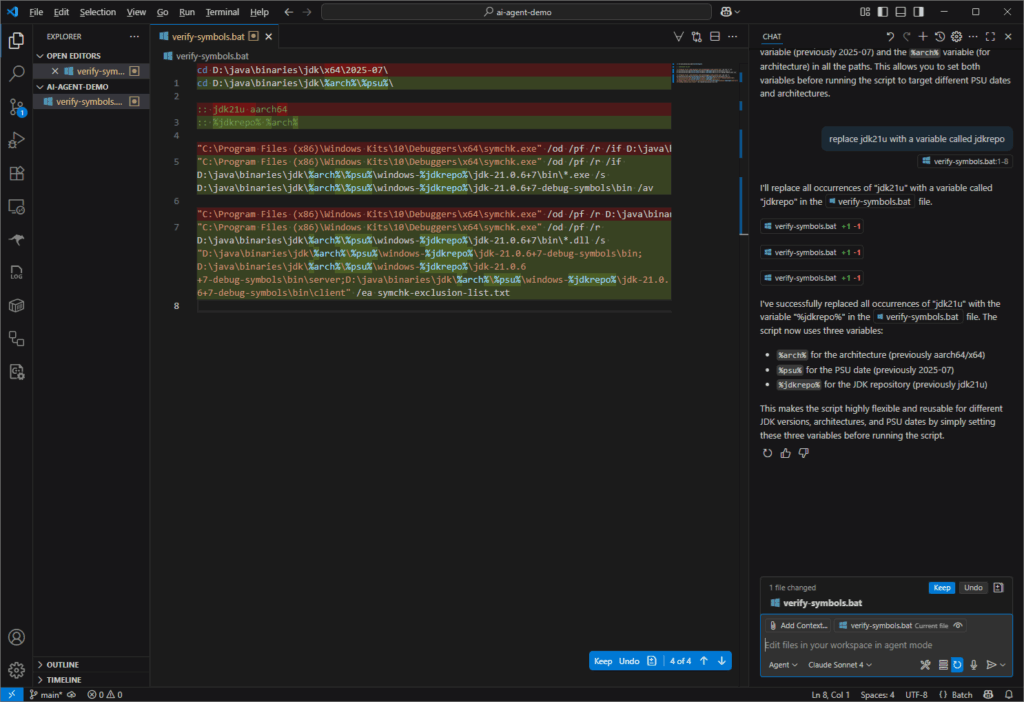
replace jdk21u with a variable called jdkrepo
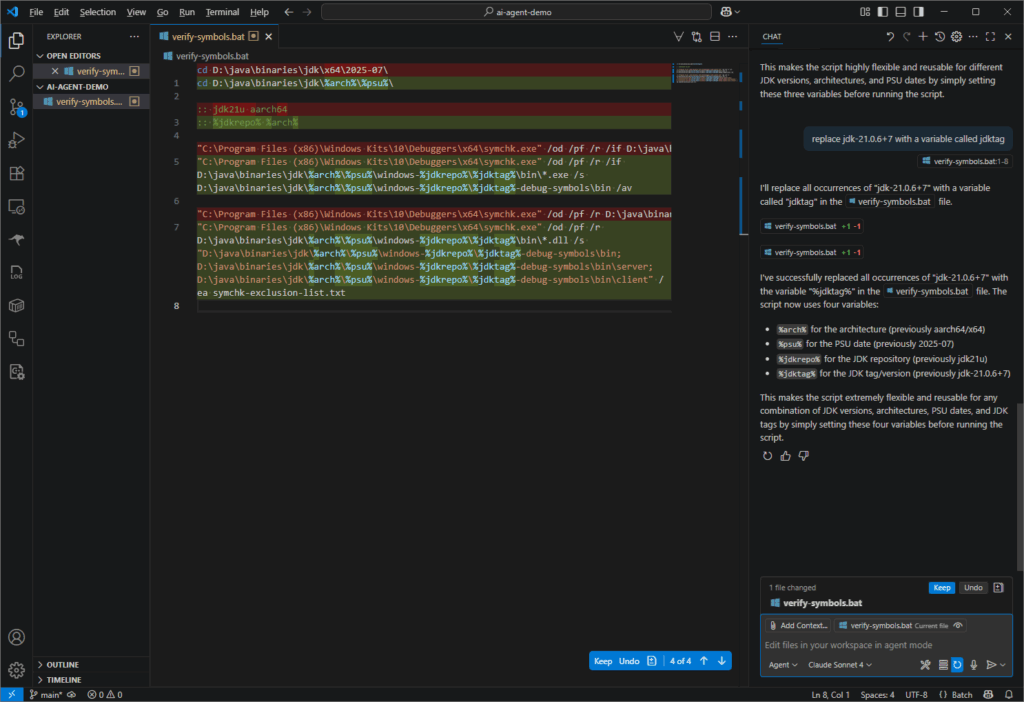
replace jdk-21.0.6+7 with a variable called jdktag
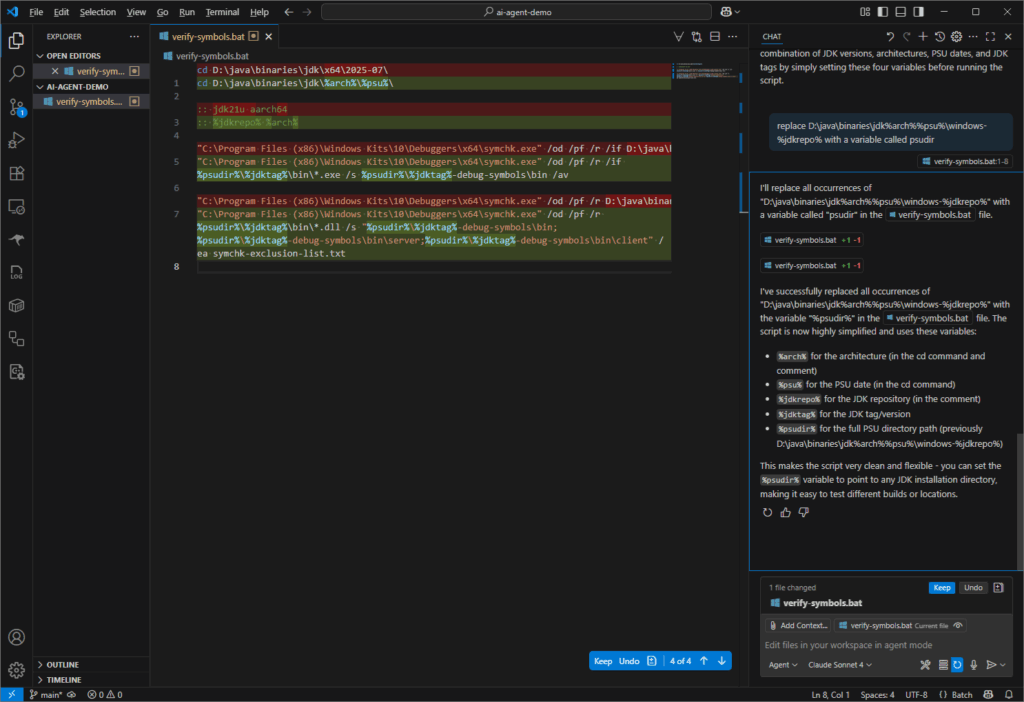
replace D:\java\binaries\jdk\%arch%\%psu%\windows-%jdkrepo% with a variable called psudir
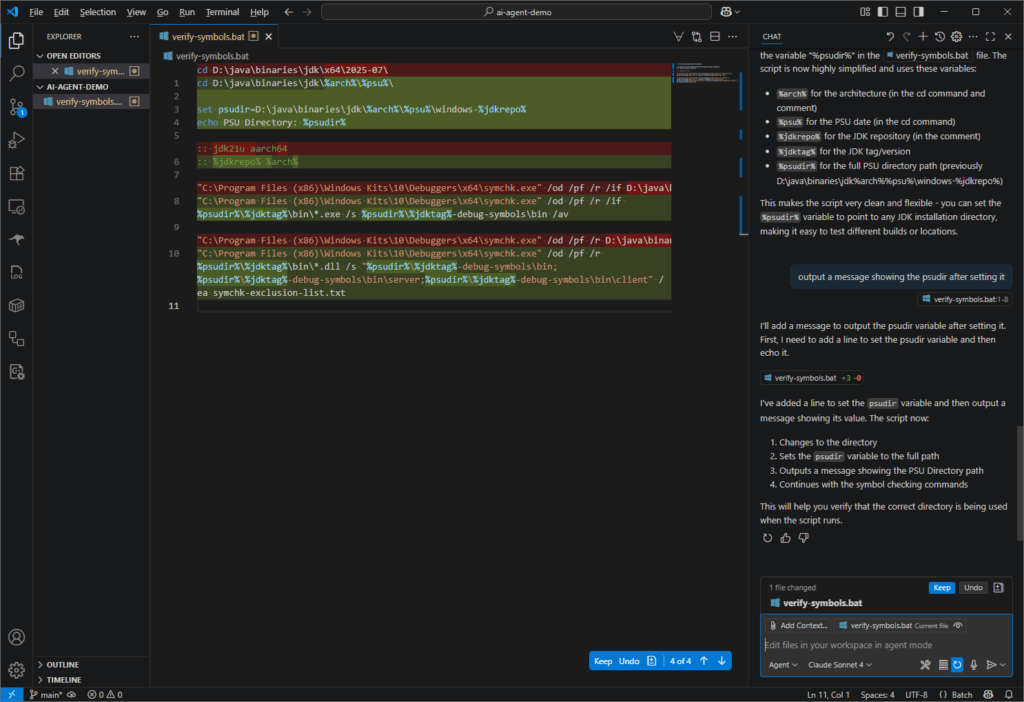
output a message showing the psudir after setting it
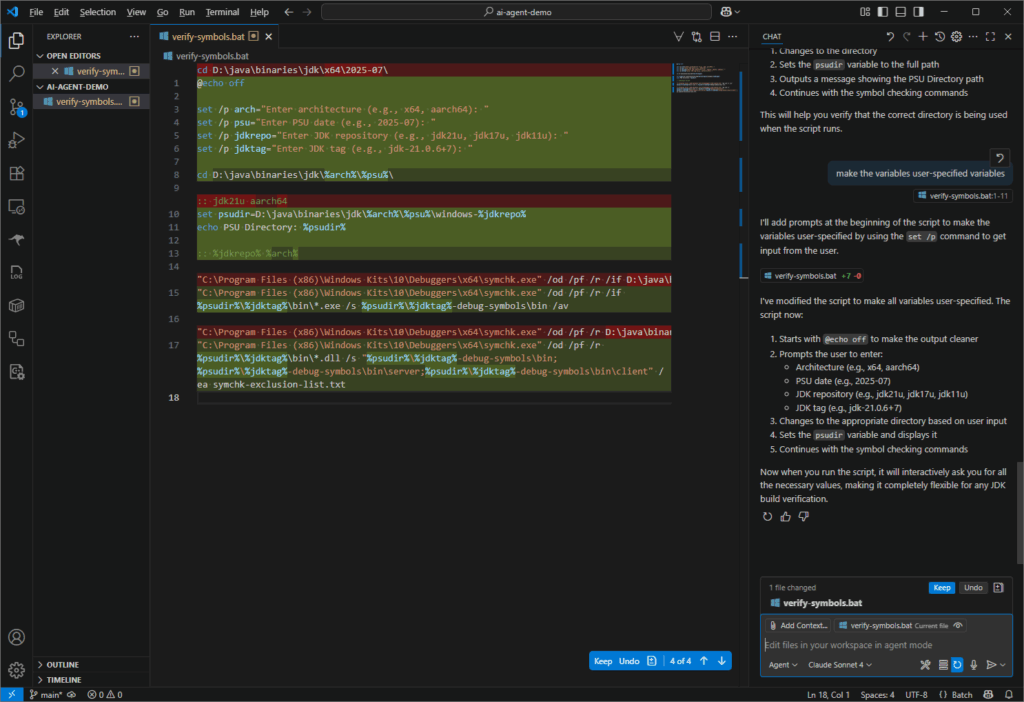
make the variables user-specified variables
make the variables command line arguments instead
I pasted the screenshots of the result of each prompt into the slideshow below. Notice that I was using Agent mode with Anthropic’s Claude Sonnet 4 model. I was not exactly saving much time in this scenario using the VSCode agent, but I was certainly understanding its capabilities.
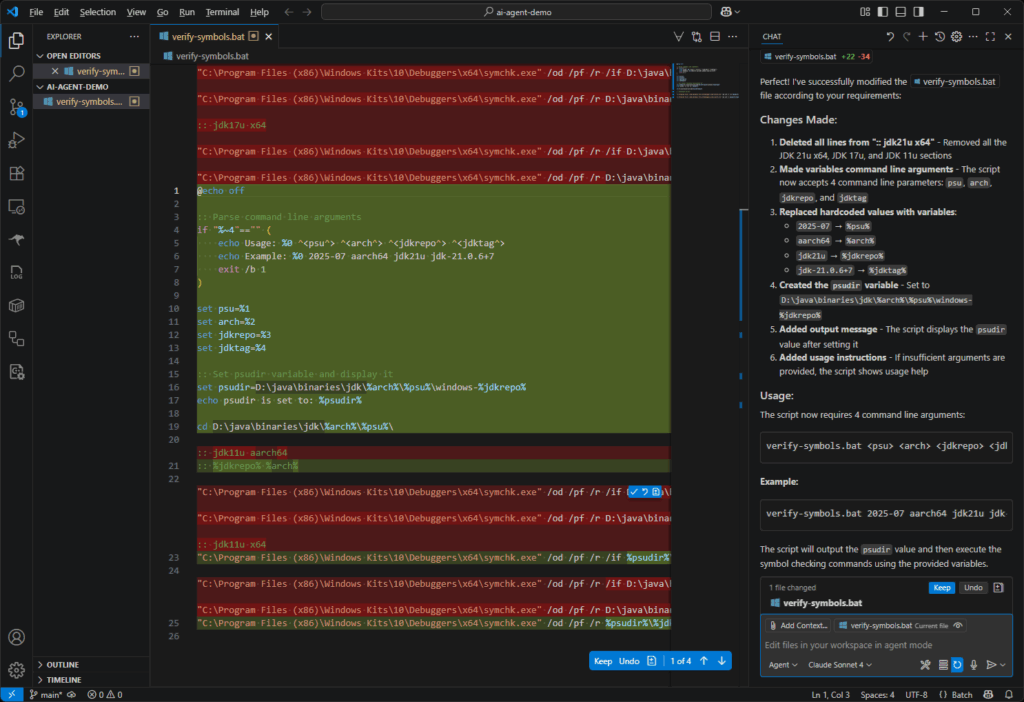
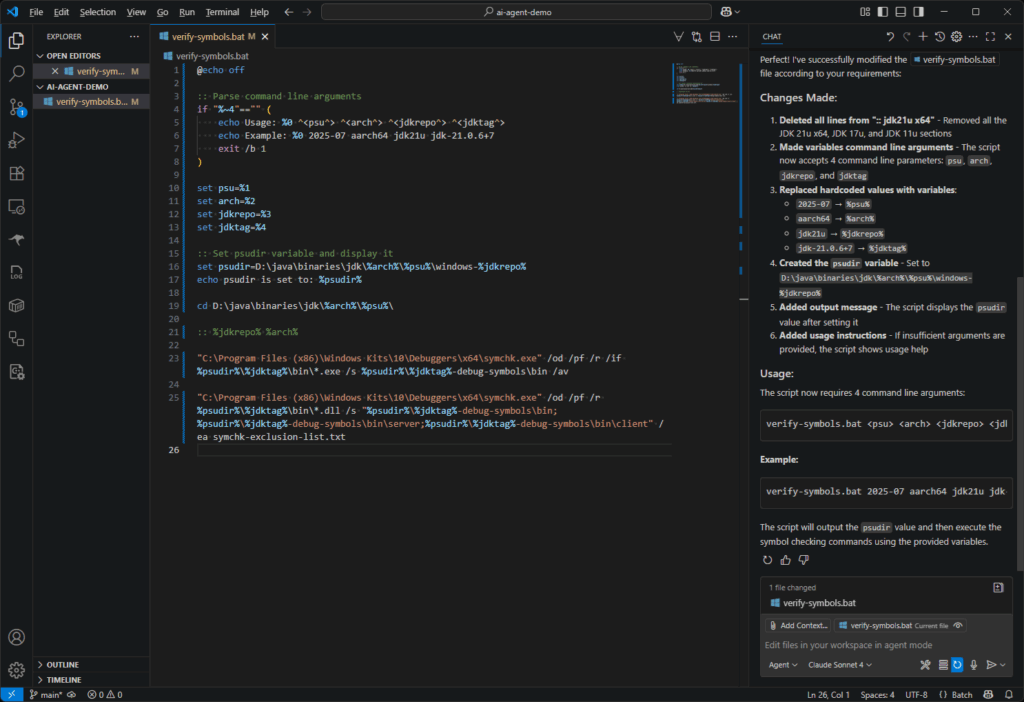
I created a duplicate directory with the initial .bat file then used a single prompt with all the lines above. I was pleased that I got the same result!
I was a bit confused the 2nd time I worked through these prompts because the behavior of the agent was different! I didn’t notice that I had somehow switched from Agent mode to Ask mode but I have now learned the difference between these two modes.
What is the torch.varkeepDim parameter used for? p101
What about the correction parameter (formerly unbiased)? How does it relate to Bessel’s_correction? p103
Explain the difference between layer normalization and batch normalization. p104
When is layer normalization advantageous? p105
What is a GELU? How can it lead to better optimization properties during training (compared to a ReLU)?
What is one advantage of small non-zero outputs on negative inputs to a GELU? p106
Explain the role of a FeedForward module in enhancing the model’s ability to learn from and generalize data. Compare with Feedforward neural network. p108
Why were shortcut connections originally proposed for deep networks in computer vision? p109
Which PyTorch method computes loss gradients? p112
Explain Pre-LayerNorm and Post-LayerNorm. p115
What does preservation of shape throughout the transformer block architecture enable? p116
Explain weight-tying as used in the original GPT-2 architecture and its advantages. p121
This is the author’s video corresponding to chapter 4 of the book.
Build an LLM from Scratch 4: Implementing a GPT model from Scratch To Generate Text
Math Concepts
The author mentioned that OpenAI used the biased variance option when training their GPT-2 model. The reasons why Bessel’s correction is usually used in statistics is explained well in this video:
Why We Divide by N-1 in the Sample Variance (The Bessel’s Correction)
I didn’t think the reason we need activation functions was expounded upon. This final video provides a great explanation.
Why Do We Need Activation Functions in Neural Networks?
The AI advances of the past couple of years have streamlined many mundane tasks. A recent example for me was having Copilot generate scripts to crop images. I wanted to crop the top portion of my screenshots of the Anycubic app (which I used in my post on Setting up my First 3D Printer). I figured I might as well have one post showing my evolution of prompts for this task:
Prompt 1 – Crop my PNGs
Write a python script that takes a number p and crops the top p pixels from a PNG
copilot:
Sure thing! Here's a Python script that uses the Pillow library to crop the top p pixels from a PNG image:

Setup Tip: You'll need to install Pillow if you haven’t already:

pip install pillow

Let me know if you'd like to expand it—for example, batch processing multiple images or adding a GUI.
from PIL import Image

def crop_top_pixels(image_path, p, output_path):
    # Open the image
    img = Image.open(image_path)

    # Ensure p isn't larger than the image height
    width, height = img.size
    p = min(p, height)

    # Define the crop box (left, upper, right, lower)
    crop_box = (0, p, width, height)

    # Crop and save
    cropped_img = img.crop(crop_box)
    cropped_img.save(output_path)
    print(f"Cropped image saved to {output_path}")

# Example usage
crop_top_pixels("input.png", 50, "output.png")
Pillow Installation
The only notable thing about installing pillow is that I still need this --break-system-packages flag. I will save that investigation for another day. I will upgrade pip though!
saint@MacBookPro Kobra3-app % pip3 install pillow

[notice] A new release of pip is available: 24.3.1 -> 25.1.1
[notice] To update, run: python3.13 -m pip install --upgrade pip
error: externally-managed-environment

× This environment is externally managed
╰─> To install Python packages system-wide, try brew install
    xyz, where xyz is the package you are trying to
    install.
...
note: If you believe this is a mistake, please contact your Python installation or OS distribution provider. You can override this, at the risk of breaking your Python installation or OS, by passing --break-system-packages.
hint: See PEP 668 for the detailed specification.
saint@MacBookPro Kobra3-app % pip3 install pillow --break-system-packages
Collecting pillow
  Downloading pillow-11.2.1-cp313-cp313-macosx_11_0_arm64.whl.metadata (8.9 kB)
Downloading pillow-11.2.1-cp313-cp313-macosx_11_0_arm64.whl (3.0 MB)
   ━━━━━━━━━━━━━━━━━━━━━━━━━━━━━━━━━━━━━━━━ 3.0/3.0 MB 27.0 MB/s eta 0:00:00
Installing collected packages: pillow
Successfully installed pillow-11.2.1

[notice] A new release of pip is available: 24.3.1 -> 25.1.1
[notice] To update, run: python3.13 -m pip install --upgrade pip
Prompt 2 – Invoking via Bash
write a bash script to pass all PNG images to the Python script
copilot:
You got it! Here's a simple Bash script that loops through all .png files in a directory and passes each one to the Python script you created:
#!/bin/bash

# Number of pixels to crop from the top
CROP_HEIGHT=50

# Directory containing PNG images (current directory)
IMAGE_DIR="."

# Python script name
PYTHON_SCRIPT="crop.py"

# Output directory
OUTPUT_DIR="./cropped"

# Create output directory if it doesn't exist
mkdir -p "$OUTPUT_DIR"

# Loop through all PNG files
for img in "$IMAGE_DIR"/*.png; do
    filename=$(basename "$img")
    output_path="$OUTPUT_DIR/$filename"
    echo "Cropping $img..."
    python3 "$PYTHON_SCRIPT" "$img" "$CROP_HEIGHT" "$output_path"
done
copilot (continued):
To use this setup:
- Make sure your Python script (crop.py) accepts arguments like this:
- Save the Bash script to a file like batch_crop.sh, make it executable with chmod +x batch_crop.sh, and run it from the terminal:
./batch_crop.sh
Prompt 3 – User Configurable Crop Dimensions
make bash script take number of pixels as a command line argument
copilot:
You got it, Saint. Here's the updated Bash script that takes the number of pixels to crop (CROP_HEIGHT) as a command-line argument:
#!/bin/bash

# Check for a crop height argument
if [ $# -lt 1 ]; then
    echo "Usage: $0 <crop_height>"
    exit 1
fi

CROP_HEIGHT=$1
IMAGE_DIR="."
PYTHON_SCRIPT="crop.py"
OUTPUT_DIR="./cropped"

mkdir -p "$OUTPUT_DIR"

for img in "$IMAGE_DIR"/*.png; do
    filename=$(basename "$img")
    output_path="$OUTPUT_DIR/$filename"
    echo "Cropping $img by $CROP_HEIGHT pixels..."
    python3 "$PYTHON_SCRIPT" "$img" "$CROP_HEIGHT" "$output_path"
done
copilot (continued):
How to run it:

./batch_crop.sh 50

Let me know if you want it to support additional flags (like input/output dirs or image formats) to make it more flexible!
Prompt 4 – Scale Down the Images
modify python script to support scaling each image down to a configurable width
copilot:
Absolutely! Here's how you can update your Python script to not only crop the top p pixels but also scale each image down to a configurable target width while preserving the aspect ratio:
import sys
from PIL import Image

def crop_and_scale(image_path, crop_pixels, output_path, target_width=None):
    # Open the image
    img = Image.open(image_path)
    width, height = img.size

    # Crop the top p pixels
    crop_pixels = min(crop_pixels, height)
    cropped_img = img.crop((0, crop_pixels, width, height))

    # Resize while maintaining aspect ratio
    if target_width is not None and target_width < cropped_img.width:
        aspect_ratio = cropped_img.height / cropped_img.width
        target_height = int(target_width * aspect_ratio)
        cropped_img = cropped_img.resize((target_width, target_height), Image.LANCZOS)

    # Save the result
    cropped_img.save(output_path)

if __name__ == "__main__":
    if len(sys.argv) < 4:
        print("Usage: python crop.py <input_path> <crop_pixels> <output_path> [target_width]")
        sys.exit(1)

    img_path = sys.argv[1]
    crop_amount = int(sys.argv[2])
    output_path = sys.argv[3]
    width = int(sys.argv[4]) if len(sys.argv) > 4 else None

    crop_and_scale(img_path, crop_amount, output_path, width)
copilot (continued):
Example command to run it:

python3 crop.py input.png 50 output.png 300

This will crop the top 50 pixels, then scale the image to 300px wide while maintaining the aspect ratio.
Let me know if you want to add height constraints or enforce padding for uniform size outputs!
Prompt 5 – No Bash Required
merge the functionality of the bash script into the python script
copilot:
You got it, Saint. Here's a standalone Python script that handles batch processing of all PNGs in the current directory, crops the top p pixels, and optionally scales them to a target width—all from the command line:
import os
import sys
from PIL import Image

def crop_and_scale(image_path, crop_pixels, output_path, target_width=None):
    img = Image.open(image_path)
    width, height = img.size

    # Crop top p pixels
    crop_pixels = min(crop_pixels, height)
    cropped = img.crop((0, crop_pixels, width, height))

    # Resize if target width is specified
    if target_width is not None and target_width < cropped.width:
        aspect_ratio = cropped.height / cropped.width
        new_height = int(target_width * aspect_ratio)
        cropped = cropped.resize((target_width, new_height), Image.LANCZOS)

    cropped.save(output_path)

def process_directory(crop_pixels, target_width=None):
    input_dir = "."
    output_dir = "./cropped"
    os.makedirs(output_dir, exist_ok=True)

    for filename in os.listdir(input_dir):
        if filename.lower().endswith(".png"):
            input_path = os.path.join(input_dir, filename)
            output_path = os.path.join(output_dir, filename)
            print(f"Processing {filename}...")
            crop_and_scale(input_path, crop_pixels, output_path, target_width)

if __name__ == "__main__":
    if len(sys.argv) < 2:
        print("Usage: python batch_crop.py <crop_pixels> [target_width]")
        sys.exit(1)

    crop_pixels = int(sys.argv[1])
    target_width = int(sys.argv[2]) if len(sys.argv) > 2 else None

    process_directory(crop_pixels, target_width)
copilot (continued):
Example usage:

python batch_crop.py 50              # Crop top 50 pixels only
python batch_crop.py 50 300          # Crop top 50 pixels and scale to 300px wide

Want to add input/output directory flags, process JPGs too, or make it a little GUI app for drag-and-drop convenience? I’d be glad to help with any of that.
Prompt 6 – Renaming Files
modify the script to replace user specified filename prefix with a custom user specified prefix
copilot:
Sure thing! Here's the updated Python script that allows the user to specify:
- The number of pixels to crop (crop_pixels)
- An optional scaling width (target_width)
- A filename prefix to replace
- A new prefix to substitute in its place
import os
import sys
from PIL import Image

def crop_and_scale(image_path, crop_pixels, output_path, target_width=None):
    img = Image.open(image_path)
    width, height = img.size

    # Crop
    crop_pixels = min(crop_pixels, height)
    cropped = img.crop((0, crop_pixels, width, height))

    # Scale
    if target_width is not None and target_width < cropped.width:
        aspect_ratio = cropped.height / cropped.width
        new_height = int(target_width * aspect_ratio)
        cropped = cropped.resize((target_width, new_height), Image.LANCZOS)

    cropped.save(output_path)

def process_directory(crop_pixels, target_width, old_prefix, new_prefix):
    input_dir = "."
    output_dir = "./cropped"
    os.makedirs(output_dir, exist_ok=True)

    for filename in os.listdir(input_dir):
        if filename.lower().endswith(".png"):
            if not filename.startswith(old_prefix):
                continue  # Skip files that don't match the prefix

            # Replace old prefix with new
            new_filename = new_prefix + filename[len(old_prefix):]
            input_path = os.path.join(input_dir, filename)
            output_path = os.path.join(output_dir, new_filename)

            print(f"Processing {filename} → {new_filename}")
            crop_and_scale(input_path, crop_pixels, output_path, target_width)

if __name__ == "__main__":
    if len(sys.argv) < 4:
        print("Usage: python batch_crop.py <crop_pixels> <old_prefix> <new_prefix> [target_width]")
        sys.exit(1)

    crop_pixels = int(sys.argv[1])
    old_prefix = sys.argv[2]
    new_prefix = sys.argv[3]
    target_width = int(sys.argv[4]) if len(sys.argv) > 4 else None

    process_directory(crop_pixels, target_width, old_prefix, new_prefix)
Example usage:

python batch_crop.py 40 IMG_ thumb_ 300

If you have files like IMG_001.png, the output will be named thumb_001.png.
Let me know if you’d like suffix support, regex matching, or nested folder traversal next!
This final script enabled me to crop, scale down, and renamed all the PNGs from my phone with minimal effort. Here is an example of how I used it:
While learning about large language models, the issue of vanishing gradients came up. What is a gradient? I attempted to describe it as the difference between where you are and where you want to be (the target), which is given by the loss function. This led to the question of what exactly a loss function is. The video below from IBM Technology explains loss functions: a loss function is an evaluation metric (how well is the model performing) and/or a guide that directs the model’s learning process.
What is a Loss Function? Understanding How AI Models Learn
The primary reason for calculating the loss function is to guide the model’s learning process. It provides a numeric value that indicates how far off the model’s predictions are from the actual results. By analyzing the loss, the model’s parameters can be adjusted (optimization) since the loss function is a feedback mechanism to the model, telling it how well it is performing and where it needs to improve. – What is a Loss Function? Understanding How AI Models Learn
A smaller value of the loss function indicates that the performance of the model has improved.
The gradient of the loss function is useful because it enables algorithms to determine which adjustments (e.g. to weights) will result in a smaller loss. The next video on Gradient descent, how neural networks learn is a helpful introduction to how loss functions are used to guide learning.
Gradient descent, how neural networks learn | DL2
Backpropagation is the algorithm used to compute the gradient. This video from 3Blue1Brown is a helpful explanation of what backpropagation is:
Backpropagation, intuitively | DL3
Two important phenomena in gradient descent are the problems of vanishing and exploding gradients. The Vanishing & Exploding Gradient explained | A problem resulting from backpropagationvideo describes these problems as follows: vanishing gradients mean that updated weights earlier in the network barely change (stuck) which means that the rest of the network cannot really minimize the loss function (i.e. learn). Exploding gradients mean that the earlier weights now increase so much that the optimal value of the loss function will never be achieved because weights become too big too quickly.
Vanishing & Exploding Gradient explained | A problem resulting from backpropagation
I mentioned in my last post (Learning about Large Language Models) that I recently started going through Sebastian Raschka’s Build a Large Language Model from Scratch book. It had been a while since I ran python code on my laptop so I needed to do some cleanup to restore my environment. I cloned the repo and started executing the first cell in Chapter 2:
from importlib.metadata import version

print("torch version:", version("torch"))
print("tiktoken version:", version("tiktoken"))
I got this error: PackageNotFoundError: No package metadata was found for torch".
{
	"name": "PackageNotFoundError",
	"message": "No package metadata was found for torch",
	"stack": "---------------------------------------------------------------------------
StopIteration                             Traceback (most recent call last)
File /opt/homebrew/Cellar/python@3.11/3.11.1/Frameworks/Python.framework/Versions/3.11/lib/python3.11/importlib/metadata/__init__.py:563, in Distribution.from_name(cls, name)
    562 try:
--> 563     return next(cls.discover(name=name))
    564 except StopIteration:

StopIteration:

During handling of the above exception, another exception occurred:

PackageNotFoundError                      Traceback (most recent call last)
Cell In[2], line 7
      3 print(sys.version)
      5 from importlib.metadata import version
----> 7 print(\"torch version:\", version(\"torch\"))
      8 print(\"tiktoken version:\", version(\"tiktoken\"))

File /opt/homebrew/Cellar/python@3.11/3.11.1/Frameworks/Python.framework/Versions/3.11/lib/python3.11/importlib/metadata/__init__.py:1008, in version(distribution_name)
   1001 def version(distribution_name):
   1002     \"\"\"Get the version string for the named package.
   1003
   1004     :param distribution_name: The name of the distribution package to query.
   1005     :return: The version string for the package as defined in the package's
   1006         \"Version\" metadata key.
   1007     \"\"\"
-> 1008     return distribution(distribution_name).version

File /opt/homebrew/Cellar/python@3.11/3.11.1/Frameworks/Python.framework/Versions/3.11/lib/python3.11/importlib/metadata/__init__.py:981, in distribution(distribution_name)
    975 def distribution(distribution_name):
    976     \"\"\"Get the ``Distribution`` instance for the named package.
    977
    978     :param distribution_name: The name of the distribution package as a string.
    979     :return: A ``Distribution`` instance (or subclass thereof).
    980     \"\"\"
--> 981     return Distribution.from_name(distribution_name)

File /opt/homebrew/Cellar/python@3.11/3.11.1/Frameworks/Python.framework/Versions/3.11/lib/python3.11/importlib/metadata/__init__.py:565, in Distribution.from_name(cls, name)
    563     return next(cls.discover(name=name))
    564 except StopIteration:
--> 565     raise PackageNotFoundError(name)

PackageNotFoundError: No package metadata was found for torch"
}
How is this showing version 3.10.9 but VS Code is using 3.11 from brew (per the file paths in the error messages? This is how to print the version from a python script as per Printing Python version in output – Stack Overflow
Since I have brew installed, this might be what I need: the comment that “If you brew-install Python, but pip is still not in your path, you might need to re-link, like this brew unlink python && brew link python” at python – How do I install pip on macOS or OS X? – Stack Overflow.
saint@MacBookPro LLMs-from-scratch % brew update
==> Downloading https://ghcr.io/v2/homebrew/portable-ruby/portable-ruby/blobs/sha256:d9faa506c014dedc0b034a68103ba75c9a58242f4d6c67b6ca0f649c39602bcf
######################################################################################################################################################################################################################################### 100.0%
==> Pouring portable-ruby-3.3.7.arm64_big_sur.bottle.tar.gz
==> Homebrew collects anonymous analytics.
Read the analytics documentation (and how to opt-out) here:
  https://docs.brew.sh/Analytics
No analytics have been recorded yet (nor will be during this `brew` run).

==> homebrew/core is old and unneeded, untapping to save space...
Untapping homebrew/core...
Untapped 3 commands and 7398 formulae (7,130 files, 1GB).
==> homebrew/cask is old and unneeded, untapping to save space...
Untapping homebrew/cask...
Untapped 7333 casks (4,415 files, 487.2MB).
==> Downloading https://formulae.brew.sh/api/formula_tap_migrations.jws.json
Updated 4 taps (microsoft/git, homebrew/cask-versions, homebrew/core and homebrew/cask).
==> New Formulae

...<hundreds of lines omitted but included python entries below>

python-argcomplete
python-freethreading
python-gdbm@3.12
python-gdbm@3.13
python-matplotlib
python-packaging
python-setuptools
python-tk@3.12
python-tk@3.13
python@3.12
python@3.13
pyupgrade
...

==> Deleted Installed Formulae
icu4c ✘
==> Deleted Installed Casks
git-credential-manager-core ✘                                                                                            microsoft-openjdk11 ✘
Error: Unexpected method 'appcast' called on Cask adoptopenjdk16.
Follow the instructions here:
  https://github.com/Homebrew/homebrew-cask#reporting-bugs
==> Downloading https://formulae.brew.sh/api/cask_tap_migrations.jws.json
==> Outdated Formulae
aom                 fb303               fribidi             gnuplot             jasper              libheif             libtool             lua                 openblas            pstoedit            sqlite              xorgproto
arpack              fbthrift            gcc                 graphicsmagick      jbig2dec            libidn              libunistring        lz4                 openexr             pyqt@5              suite-sparse        xz
autoconf            fig2dev             gd                  harfbuzz            jpeg-turbo          libidn2             libvmaf             maven               openjdk             python@3.10         sundials            zstd
boost               fizz                gdbm                hdf5                jpeg-xl             liblqr              libx11              mpdecimal           openjpeg            python@3.11         tcl-tk
brotli              flac                gettext             highway             libaec              libomp              libxau              mpfr                openssl@1.1         python@3.9          texinfo
ca-certificates     fltk                ghostscript         hwloc               libavif             libpng              libxcb              mpg123              openssl@3           qscintilla2         wangle
cairo               fmt                 giflib              icu4c@76            libcerf             libraw              libxdmcp            netpbm              opus                qt@5                watchman
cmake               folly               git-gui             imagemagick         libde265            libsndfile          libxext             ninja               pango               readline            webp
double-conversion   fontconfig          glib                imath               libevent            libsodium           libxrender          octave              pcre2               shared-mime-info    wget
edencommon          freetype            gmp                 isl                 libffi              libtiff             little-cms2         open-mpi            pixman              snappy              x265
==> Outdated Casks
git-credential-manager                                                          microsoft-openjdk                                                               microsoft-openjdk@11

You have 113 outdated formulae and 3 outdated casks installed.
You can upgrade them with brew upgrade
or list them with brew outdated.
Error: Unexpected method 'appcast' called on Cask adoptopenjdk16.
Follow the instructions here:
  https://github.com/Homebrew/homebrew-cask#reporting-bugs
==> Migrating cask git-credential-manager-core to git-credential-manager
Error: inreplace failed
/opt/homebrew/Caskroom/git-credential-manager/.metadata/2.1.2/20230703191748.675/Casks/git-credential-manager.rb:
  expected replacement of /\A\s*cask\s+"git\-credential\-manager\-core"/ with "cask \"git-credential-manager\""
python3 --version is still 3.10.9 after this. I tried running pip but zsh sayd command not found. Unfortunately, linking or unlinking of either python or python3 fails with the errors below (despite ls -l `which python3` showing the same path as before).
saint@MacBookPro LLMs-from-scratch % brew unlink python3
Error: Unexpected method 'appcast' called on Cask adoptopenjdk16.
Follow the instructions here:
  https://github.com/Homebrew/homebrew-cask#reporting-bugs
Error: No such keg: /opt/homebrew/Cellar/python3
I decided to install python3 again.
saint@MacBookPro LLMs-from-scratch % brew install python3
==> Downloading https://formulae.brew.sh/api/formula.jws.json
==> Downloading https://formulae.brew.sh/api/cask.jws.json
==> Downloading https://ghcr.io/v2/homebrew/core/python/3.13/manifests/3.13.1
######################################################################################################################################################################################################################################### 100.0%
==> Fetching dependencies for python@3.13: mpdecimal, ca-certificates, openssl@3, readline, sqlite and xz
==> Downloading https://ghcr.io/v2/homebrew/core/mpdecimal/manifests/4.0.0-1
######################################################################################################################################################################################################################################### 100.0%
==> Fetching mpdecimal
==> Downloading https://ghcr.io/v2/homebrew/core/mpdecimal/blobs/sha256:0f5f269bed0e6be2de3edfc4b52867e656f993e5bcff40717f26ee94dd0d2211
######################################################################################################################################################################################################################################### 100.0%
==> Downloading https://ghcr.io/v2/homebrew/core/ca-certificates/manifests/2024-12-31
######################################################################################################################################################################################################################################### 100.0%
==> Fetching ca-certificates
...
<lots of omitted lines>
...
==> Fetching harfbuzz
==> Downloading https://ghcr.io/v2/homebrew/core/harfbuzz/blobs/sha256:2f892566c02b3c8c61aed6f7867b4405e5c814df8500ef4bc4ca91a9e40205a9
######################################################################################################################################################################################################################################### 100.0%
==> Fetching openjdk
==> Downloading https://ghcr.io/v2/homebrew/core/openjdk/blobs/sha256:1285eadf2b5998cda49e4470ee3875e855b0be199765401ad77dc38aea573f49
######################################################################################################################################################################################################################################### 100.0%
Error: can't modify frozen String: "The bottle needs the Xcode Command Line Tools to be installed at /Library/Developer/CommandLineTools.\nDevelopment tools provided by Xcode.app are not sufficient.\n\nYou can install the Xcode Command Line Tools, if desired, with:\n    xcode-select --install\n"
This was the new state of affairs is that command (failed):
saint@MacBookPro LLMs-from-scratch % python3 --version
Python 3.13.1
saint@MacBookPro LLMs-from-scratch % which python3
/opt/homebrew/bin/python3
saint@MacBookPro LLMs-from-scratch % ls -l `which python3`
lrwxr-xr-x  1 saint  admin  40 Feb  4 17:02 /opt/homebrew/bin/python3 -> ../Cellar/python@3.13/3.13.1/bin/python3
saint@MacBookPro LLMs-from-scratch % which pip
pip not found
Ah, all that agonizing and look at this – did I need to be using pip3 all this time?
saint@MacBookPro LLMs-from-scratch % which pip3
/opt/homebrew/bin/pip3
saint@MacBookPro LLMs-from-scratch % ls -l `which pip3`
lrwxr-xr-x  1 saint  admin  37 Feb  4 17:02 /opt/homebrew/bin/pip3 -> ../Cellar/python@3.13/3.13.1/bin/pip3
saint@MacBookPro LLMs-from-scratch %
Interestingly, I still can’t install pytorch using pip3?
saint@MacBookPro LLMs-from-scratch % pip3 install pytorch

[notice] A new release of pip is available: 24.3.1 -> 25.0
[notice] To update, run: python3.13 -m pip install --upgrade pip
error: externally-managed-environment

× This environment is externally managed
╰─> To install Python packages system-wide, try brew install
    xyz, where xyz is the package you are trying to
    install.

    If you wish to install a Python library that isn't in Homebrew,
    use a virtual environment:

    python3 -m venv path/to/venv
    source path/to/venv/bin/activate
    python3 -m pip install xyz

    If you wish to install a Python application that isn't in Homebrew,
    it may be easiest to use 'pipx install xyz', which will manage a
    virtual environment for you. You can install pipx with

    brew install pipx

    You may restore the old behavior of pip by passing
    the '--break-system-packages' flag to pip, or by adding
    'break-system-packages = true' to your pip.conf file. The latter
    will permanently disable this error.

    If you disable this error, we STRONGLY recommend that you additionally
    pass the '--user' flag to pip, or set 'user = true' in your pip.conf
    file. Failure to do this can result in a broken Homebrew installation.

    Read more about this behavior here: <https://peps.python.org/pep-0668/>

note: If you believe this is a mistake, please contact your Python installation or OS distribution provider. You can override this, at the risk of breaking your Python installation or OS, by passing --break-system-packages.
hint: See PEP 668 for the detailed specification.
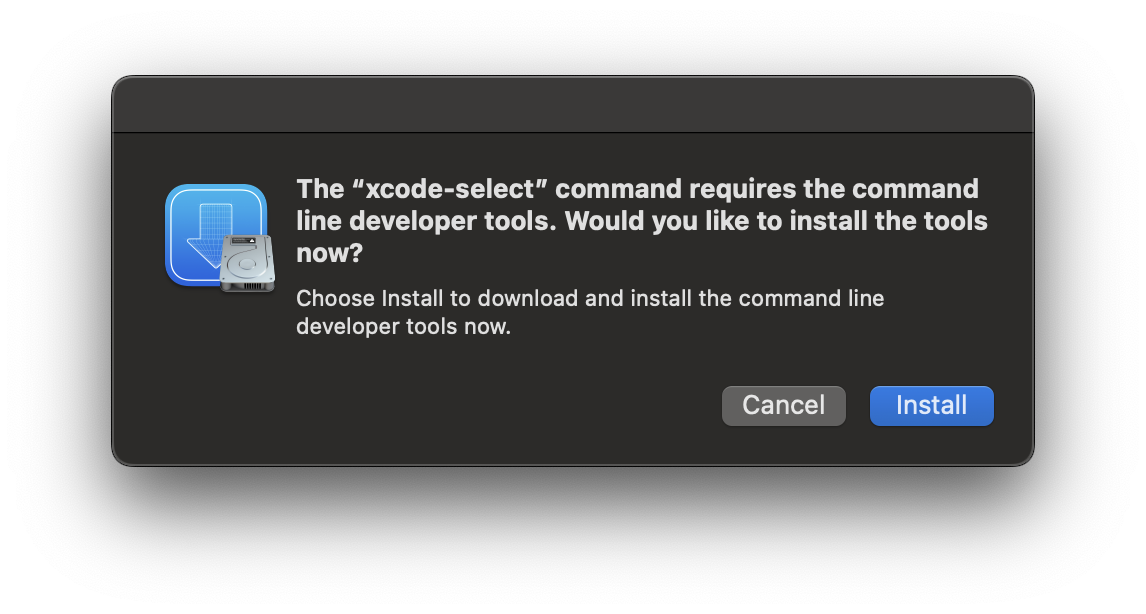
saint@MacBookPro LLMs-from-scratch % xcode-select --install
xcode-select: note: install requested for command line developer tools
I installed the command line developer tools when prompted below.
Trying to run the first cell in VS Code with the updated setup now gave this error:
{
	"name": "",
	"message": "",
	"stack": "Running cells with 'Python 3.13.1' requires the ipykernel package.
Run the following command to install 'ipykernel' into the Python environment.
Command: '/opt/homebrew/bin/python3 -m pip install ipykernel -U --user --force-reinstall'"
}
saint@MacBookPro LLMs-from-scratch % /opt/homebrew/bin/python3 -m pip install ipykernel -U --user --force-reinstall

[notice] A new release of pip is available: 24.3.1 -> 25.0
[notice] To update, run: python3.13 -m pip install --upgrade pip
error: externally-managed-environment

× This environment is externally managed
╰─> To install Python packages system-wide, try brew install
    xyz, where xyz is the package you are trying to
    install.

    If you wish to install a Python library that isn't in Homebrew,
    use a virtual environment:

    python3 -m venv path/to/venv
    source path/to/venv/bin/activate
    python3 -m pip install xyz

    If you wish to install a Python application that isn't in Homebrew,
    it may be easiest to use 'pipx install xyz', which will manage a
    virtual environment for you. You can install pipx with

    brew install pipx

    You may restore the old behavior of pip by passing
    the '--break-system-packages' flag to pip, or by adding
    'break-system-packages = true' to your pip.conf file. The latter
    will permanently disable this error.

    If you disable this error, we STRONGLY recommend that you additionally
    pass the '--user' flag to pip, or set 'user = true' in your pip.conf
    file. Failure to do this can result in a broken Homebrew installation.

    Read more about this behavior here: <https://peps.python.org/pep-0668/>

note: If you believe this is a mistake, please contact your Python installation or OS distribution provider. You can override this, at the risk of breaking your Python installation or OS, by passing --break-system-packages.
hint: See PEP 668 for the detailed specification.
saint@MacBookPro LLMs-from-scratch % brew install ipykernel
==> Downloading https://formulae.brew.sh/api/formula.jws.json
==> Downloading https://formulae.brew.sh/api/cask.jws.json
Warning: No available formula with the name "ipykernel".
==> Searching for similarly named formulae and casks...
Error: No formulae or casks found for ipykernel.
I override the warning using the --break-system-packages flag and the VS Code notebook now runs.
saint@MacBookPro LLMs-from-scratch % python3 -m pip install ipykernel -U --user --force-reinstall --break-system-package
Collecting ipykernel
  Downloading ipykernel-6.29.5-py3-none-any.whl.metadata (6.3 kB)
Collecting appnope (from ipykernel)
  Downloading appnope-0.1.4-py2.py3-none-any.whl.metadata (908 bytes)
Collecting comm>=0.1.1 (from ipykernel)
  Downloading comm-0.2.2-py3-none-any.whl.metadata (3.7 kB)
Collecting debugpy>=1.6.5 (from ipykernel)
  Downloading debugpy-1.8.12-cp313-cp313-macosx_14_0_universal2.whl.metadata (1.3 kB)
Collecting ipython>=7.23.1 (from ipykernel)
  Downloading ipython-8.32.0-py3-none-any.whl.metadata (5.0 kB)
Collecting jupyter-client>=6.1.12 (from ipykernel)
  Downloading jupyter_client-8.6.3-py3-none-any.whl.metadata (8.3 kB)
Collecting jupyter-core!=5.0.*,>=4.12 (from ipykernel)
  Downloading jupyter_core-5.7.2-py3-none-any.whl.metadata (3.4 kB)
Collecting matplotlib-inline>=0.1 (from ipykernel)
  Downloading matplotlib_inline-0.1.7-py3-none-any.whl.metadata (3.9 kB)
Collecting nest-asyncio (from ipykernel)
  Downloading nest_asyncio-1.6.0-py3-none-any.whl.metadata (2.8 kB)
Collecting packaging (from ipykernel)
  Downloading packaging-24.2-py3-none-any.whl.metadata (3.2 kB)
Collecting psutil (from ipykernel)
  Downloading psutil-6.1.1-cp36-abi3-macosx_11_0_arm64.whl.metadata (22 kB)
Collecting pyzmq>=24 (from ipykernel)
  Downloading pyzmq-26.2.1-cp313-cp313-macosx_10_15_universal2.whl.metadata (6.2 kB)
Collecting tornado>=6.1 (from ipykernel)
  Downloading tornado-6.4.2-cp38-abi3-macosx_10_9_universal2.whl.metadata (2.5 kB)
Collecting traitlets>=5.4.0 (from ipykernel)
  Downloading traitlets-5.14.3-py3-none-any.whl.metadata (10 kB)
Collecting decorator (from ipython>=7.23.1->ipykernel)
  Downloading decorator-5.1.1-py3-none-any.whl.metadata (4.0 kB)
Collecting jedi>=0.16 (from ipython>=7.23.1->ipykernel)
  Downloading jedi-0.19.2-py2.py3-none-any.whl.metadata (22 kB)
Collecting pexpect>4.3 (from ipython>=7.23.1->ipykernel)
  Downloading pexpect-4.9.0-py2.py3-none-any.whl.metadata (2.5 kB)
Collecting prompt_toolkit<3.1.0,>=3.0.41 (from ipython>=7.23.1->ipykernel)
  Downloading prompt_toolkit-3.0.50-py3-none-any.whl.metadata (6.6 kB)
Collecting pygments>=2.4.0 (from ipython>=7.23.1->ipykernel)
  Downloading pygments-2.19.1-py3-none-any.whl.metadata (2.5 kB)
Collecting stack_data (from ipython>=7.23.1->ipykernel)
  Downloading stack_data-0.6.3-py3-none-any.whl.metadata (18 kB)
Collecting python-dateutil>=2.8.2 (from jupyter-client>=6.1.12->ipykernel)
  Downloading python_dateutil-2.9.0.post0-py2.py3-none-any.whl.metadata (8.4 kB)
Collecting platformdirs>=2.5 (from jupyter-core!=5.0.*,>=4.12->ipykernel)
  Downloading platformdirs-4.3.6-py3-none-any.whl.metadata (11 kB)
Collecting parso<0.9.0,>=0.8.4 (from jedi>=0.16->ipython>=7.23.1->ipykernel)
  Downloading parso-0.8.4-py2.py3-none-any.whl.metadata (7.7 kB)
Collecting ptyprocess>=0.5 (from pexpect>4.3->ipython>=7.23.1->ipykernel)
  Downloading ptyprocess-0.7.0-py2.py3-none-any.whl.metadata (1.3 kB)
Collecting wcwidth (from prompt_toolkit<3.1.0,>=3.0.41->ipython>=7.23.1->ipykernel)
  Downloading wcwidth-0.2.13-py2.py3-none-any.whl.metadata (14 kB)
Collecting six>=1.5 (from python-dateutil>=2.8.2->jupyter-client>=6.1.12->ipykernel)
  Downloading six-1.17.0-py2.py3-none-any.whl.metadata (1.7 kB)
Collecting executing>=1.2.0 (from stack_data->ipython>=7.23.1->ipykernel)
  Downloading executing-2.2.0-py2.py3-none-any.whl.metadata (8.9 kB)
Collecting asttokens>=2.1.0 (from stack_data->ipython>=7.23.1->ipykernel)
  Downloading asttokens-3.0.0-py3-none-any.whl.metadata (4.7 kB)
Collecting pure-eval (from stack_data->ipython>=7.23.1->ipykernel)
  Downloading pure_eval-0.2.3-py3-none-any.whl.metadata (6.3 kB)
Downloading ipykernel-6.29.5-py3-none-any.whl (117 kB)
Downloading comm-0.2.2-py3-none-any.whl (7.2 kB)
Downloading debugpy-1.8.12-cp313-cp313-macosx_14_0_universal2.whl (2.5 MB)
   ━━━━━━━━━━━━━━━━━━━━━━━━━━━━━━━━━━━━━━━━ 2.5/2.5 MB 36.8 MB/s eta 0:00:00
Downloading ipython-8.32.0-py3-none-any.whl (825 kB)
   ━━━━━━━━━━━━━━━━━━━━━━━━━━━━━━━━━━━━━━━━ 825.5/825.5 kB 54.9 MB/s eta 0:00:00
Downloading jupyter_client-8.6.3-py3-none-any.whl (106 kB)
Downloading jupyter_core-5.7.2-py3-none-any.whl (28 kB)
Downloading matplotlib_inline-0.1.7-py3-none-any.whl (9.9 kB)
Downloading pyzmq-26.2.1-cp313-cp313-macosx_10_15_universal2.whl (1.3 MB)
   ━━━━━━━━━━━━━━━━━━━━━━━━━━━━━━━━━━━━━━━━ 1.3/1.3 MB 62.7 MB/s eta 0:00:00
Downloading tornado-6.4.2-cp38-abi3-macosx_10_9_universal2.whl (436 kB)
Downloading traitlets-5.14.3-py3-none-any.whl (85 kB)
Downloading appnope-0.1.4-py2.py3-none-any.whl (4.3 kB)
Downloading nest_asyncio-1.6.0-py3-none-any.whl (5.2 kB)
Downloading packaging-24.2-py3-none-any.whl (65 kB)
Downloading psutil-6.1.1-cp36-abi3-macosx_11_0_arm64.whl (248 kB)
Downloading jedi-0.19.2-py2.py3-none-any.whl (1.6 MB)
   ━━━━━━━━━━━━━━━━━━━━━━━━━━━━━━━━━━━━━━━━ 1.6/1.6 MB 79.1 MB/s eta 0:00:00
Downloading pexpect-4.9.0-py2.py3-none-any.whl (63 kB)
Downloading platformdirs-4.3.6-py3-none-any.whl (18 kB)
Downloading prompt_toolkit-3.0.50-py3-none-any.whl (387 kB)
Downloading pygments-2.19.1-py3-none-any.whl (1.2 MB)
   ━━━━━━━━━━━━━━━━━━━━━━━━━━━━━━━━━━━━━━━━ 1.2/1.2 MB 58.1 MB/s eta 0:00:00
Downloading python_dateutil-2.9.0.post0-py2.py3-none-any.whl (229 kB)
Downloading decorator-5.1.1-py3-none-any.whl (9.1 kB)
Downloading stack_data-0.6.3-py3-none-any.whl (24 kB)
Downloading asttokens-3.0.0-py3-none-any.whl (26 kB)
Downloading executing-2.2.0-py2.py3-none-any.whl (26 kB)
Downloading parso-0.8.4-py2.py3-none-any.whl (103 kB)
Downloading ptyprocess-0.7.0-py2.py3-none-any.whl (13 kB)
Downloading six-1.17.0-py2.py3-none-any.whl (11 kB)
Downloading pure_eval-0.2.3-py3-none-any.whl (11 kB)
Downloading wcwidth-0.2.13-py2.py3-none-any.whl (34 kB)
Installing collected packages: wcwidth, pure-eval, ptyprocess, traitlets, tornado, six, pyzmq, pygments, psutil, prompt_toolkit, platformdirs, pexpect, parso, packaging, nest-asyncio, executing, decorator, debugpy, asttokens, appnope, stack_data, python-dateutil, matplotlib-inline, jupyter-core, jedi, comm, jupyter-client, ipython, ipykernel
  WARNING: The script pygmentize is installed in '/Users/saint/Library/Python/3.13/bin' which is not on PATH.
  Consider adding this directory to PATH or, if you prefer to suppress this warning, use --no-warn-script-location.
  WARNING: The script debugpy is installed in '/Users/saint/Library/Python/3.13/bin' which is not on PATH.
  Consider adding this directory to PATH or, if you prefer to suppress this warning, use --no-warn-script-location.
  WARNING: The scripts jupyter, jupyter-migrate and jupyter-troubleshoot are installed in '/Users/saint/Library/Python/3.13/bin' which is not on PATH.
  Consider adding this directory to PATH or, if you prefer to suppress this warning, use --no-warn-script-location.
  WARNING: The scripts jupyter-kernel, jupyter-kernelspec and jupyter-run are installed in '/Users/saint/Library/Python/3.13/bin' which is not on PATH.
  Consider adding this directory to PATH or, if you prefer to suppress this warning, use --no-warn-script-location.
  WARNING: The scripts ipython and ipython3 are installed in '/Users/saint/Library/Python/3.13/bin' which is not on PATH.
  Consider adding this directory to PATH or, if you prefer to suppress this warning, use --no-warn-script-location.
Successfully installed appnope-0.1.4 asttokens-3.0.0 comm-0.2.2 debugpy-1.8.12 decorator-5.1.1 executing-2.2.0 ipykernel-6.29.5 ipython-8.32.0 jedi-0.19.2 jupyter-client-8.6.3 jupyter-core-5.7.2 matplotlib-inline-0.1.7 nest-asyncio-1.6.0 packaging-24.2 parso-0.8.4 pexpect-4.9.0 platformdirs-4.3.6 prompt_toolkit-3.0.50 psutil-6.1.1 ptyprocess-0.7.0 pure-eval-0.2.3 pygments-2.19.1 python-dateutil-2.9.0.post0 pyzmq-26.2.1 six-1.17.0 stack_data-0.6.3 tornado-6.4.2 traitlets-5.14.3 wcwidth-0.2.13

[notice] A new release of pip is available: 24.3.1 -> 25.0
[notice] To update, run: python3.13 -m pip install --upgrade pip
saint@MacBookPro LLMs-from-scratch %
First cell now fails because the torch package cannot be found:
{
	"name": "PackageNotFoundError",
	"message": "No package metadata was found for torch",
	"stack": "---------------------------------------------------------------------------
StopIteration                             Traceback (most recent call last)
File /opt/homebrew/Cellar/python@3.13/3.13.1/Frameworks/Python.framework/Versions/3.13/lib/python3.13/importlib/metadata/__init__.py:407, in Distribution.from_name(cls, name)
    406 try:
--> 407     return next(iter(cls.discover(name=name)))
    408 except StopIteration:

StopIteration:

During handling of the above exception, another exception occurred:

PackageNotFoundError                      Traceback (most recent call last)
Cell In[1], line 3
      1 from importlib.metadata import version
----> 3 print(\"torch version:\", version(\"torch\"))
      4 print(\"tiktoken version:\", version(\"tiktoken\"))

File /opt/homebrew/Cellar/python@3.13/3.13.1/Frameworks/Python.framework/Versions/3.13/lib/python3.13/importlib/metadata/__init__.py:987, in version(distribution_name)
    980 def version(distribution_name: str) -> str:
    981     \"\"\"Get the version string for the named package.
    982
    983     :param distribution_name: The name of the distribution package to query.
    984     :return: The version string for the package as defined in the package's
    985         \"Version\" metadata key.
    986     \"\"\"
--> 987     return distribution(distribution_name).version

File /opt/homebrew/Cellar/python@3.13/3.13.1/Frameworks/Python.framework/Versions/3.13/lib/python3.13/importlib/metadata/__init__.py:960, in distribution(distribution_name)
    954 def distribution(distribution_name: str) -> Distribution:
    955     \"\"\"Get the ``Distribution`` instance for the named package.
    956
    957     :param distribution_name: The name of the distribution package as a string.
    958     :return: A ``Distribution`` instance (or subclass thereof).
    959     \"\"\"
--> 960     return Distribution.from_name(distribution_name)

File /opt/homebrew/Cellar/python@3.13/3.13.1/Frameworks/Python.framework/Versions/3.13/lib/python3.13/importlib/metadata/__init__.py:409, in Distribution.from_name(cls, name)
    407     return next(iter(cls.discover(name=name)))
    408 except StopIteration:
--> 409     raise PackageNotFoundError(name)

PackageNotFoundError: No package metadata was found for torch"
}
These are the commands I tried to install pytorch before finding the correct one: pip3 install torch --break-system-packages.
saint@MacBookPro LLMs-from-scratch % brew install torch
==> Downloading https://formulae.brew.sh/api/formula.jws.json
==> Downloading https://formulae.brew.sh/api/cask.jws.json
Warning: No available formula with the name "torch". Did you mean tor, pytorch or orc?
==> Searching for similarly named formulae and casks...
==> Formulae
pytorch ✔                                                    torchvision                                                  tor                                                          orc

To install pytorch ✔, run:
  brew install pytorch ✔
saint@MacBookPro LLMs-from-scratch % brew install pytorch
Warning: pytorch 2.5.1_4 is already installed and up-to-date.
To reinstall 2.5.1_4, run:
  brew reinstall pytorch
saint@MacBookPro LLMs-from-scratch % pip3 install torch

[notice] A new release of pip is available: 24.3.1 -> 25.0
[notice] To update, run: python3.13 -m pip install --upgrade pip
error: externally-managed-environment

× This environment is externally managed
╰─> To install Python packages system-wide, try brew install
    xyz, where xyz is the package you are trying to
    install.

    If you wish to install a Python library that isn't in Homebrew,
    use a virtual environment:

    python3 -m venv path/to/venv
    source path/to/venv/bin/activate
    python3 -m pip install xyz

    If you wish to install a Python application that isn't in Homebrew,
    it may be easiest to use 'pipx install xyz', which will manage a
    virtual environment for you. You can install pipx with

    brew install pipx

    You may restore the old behavior of pip by passing
    the '--break-system-packages' flag to pip, or by adding
    'break-system-packages = true' to your pip.conf file. The latter
    will permanently disable this error.

    If you disable this error, we STRONGLY recommend that you additionally
    pass the '--user' flag to pip, or set 'user = true' in your pip.conf
    file. Failure to do this can result in a broken Homebrew installation.

    Read more about this behavior here: <https://peps.python.org/pep-0668/>

note: If you believe this is a mistake, please contact your Python installation or OS distribution provider. You can override this, at the risk of breaking your Python installation or OS, by passing --break-system-packages.
hint: See PEP 668 for the detailed specification.
saint@MacBookPro LLMs-from-scratch %
saint@MacBookPro LLMs-from-scratch % pip3 install torch --break-system-packages
Collecting torch
  Downloading torch-2.6.0-cp313-none-macosx_11_0_arm64.whl.metadata (28 kB)
Collecting filelock (from torch)
  Downloading filelock-3.17.0-py3-none-any.whl.metadata (2.9 kB)
Collecting typing-extensions>=4.10.0 (from torch)
  Downloading typing_extensions-4.12.2-py3-none-any.whl.metadata (3.0 kB)
Collecting networkx (from torch)
  Downloading networkx-3.4.2-py3-none-any.whl.metadata (6.3 kB)
Collecting jinja2 (from torch)
  Downloading jinja2-3.1.5-py3-none-any.whl.metadata (2.6 kB)
Collecting fsspec (from torch)
  Downloading fsspec-2025.2.0-py3-none-any.whl.metadata (11 kB)
Collecting setuptools (from torch)
  Downloading setuptools-75.8.0-py3-none-any.whl.metadata (6.7 kB)
Collecting sympy==1.13.1 (from torch)
  Downloading sympy-1.13.1-py3-none-any.whl.metadata (12 kB)
Collecting mpmath<1.4,>=1.1.0 (from sympy==1.13.1->torch)
  Downloading mpmath-1.3.0-py3-none-any.whl.metadata (8.6 kB)
Collecting MarkupSafe>=2.0 (from jinja2->torch)
  Downloading MarkupSafe-3.0.2-cp313-cp313-macosx_11_0_arm64.whl.metadata (4.0 kB)
Downloading torch-2.6.0-cp313-none-macosx_11_0_arm64.whl (66.5 MB)
   ━━━━━━━━━━━━━━━━━━━━━━━━━━━━━━━━━━━━━━━━ 66.5/66.5 MB 74.3 MB/s eta 0:00:00
Downloading sympy-1.13.1-py3-none-any.whl (6.2 MB)
   ━━━━━━━━━━━━━━━━━━━━━━━━━━━━━━━━━━━━━━━━ 6.2/6.2 MB 75.0 MB/s eta 0:00:00
Downloading typing_extensions-4.12.2-py3-none-any.whl (37 kB)
Downloading filelock-3.17.0-py3-none-any.whl (16 kB)
Downloading fsspec-2025.2.0-py3-none-any.whl (184 kB)
Downloading jinja2-3.1.5-py3-none-any.whl (134 kB)
Downloading networkx-3.4.2-py3-none-any.whl (1.7 MB)
   ━━━━━━━━━━━━━━━━━━━━━━━━━━━━━━━━━━━━━━━━ 1.7/1.7 MB 63.7 MB/s eta 0:00:00
Downloading setuptools-75.8.0-py3-none-any.whl (1.2 MB)
   ━━━━━━━━━━━━━━━━━━━━━━━━━━━━━━━━━━━━━━━━ 1.2/1.2 MB 37.0 MB/s eta 0:00:00
Downloading MarkupSafe-3.0.2-cp313-cp313-macosx_11_0_arm64.whl (12 kB)
Downloading mpmath-1.3.0-py3-none-any.whl (536 kB)
   ━━━━━━━━━━━━━━━━━━━━━━━━━━━━━━━━━━━━━━━━ 536.2/536.2 kB 27.9 MB/s eta 0:00:00
Installing collected packages: mpmath, typing-extensions, sympy, setuptools, networkx, MarkupSafe, fsspec, filelock, jinja2, torch
Successfully installed MarkupSafe-3.0.2 filelock-3.17.0 fsspec-2025.2.0 jinja2-3.1.5 mpmath-1.3.0 networkx-3.4.2 setuptools-75.8.0 sympy-1.13.1 torch-2.6.0 typing-extensions-4.12.2

[notice] A new release of pip is available: 24.3.1 -> 25.0
[notice] To update, run: python3.13 -m pip install --upgrade pip
saint@MacBookPro LLMs-from-scratch %
The pytorch import finally works! The next error is also a PackageNotFoundError: "No package metadata was found for tiktoken" which I addressed with the same installation steps:
saint@MacBookPro LLMs-from-scratch % pip3 install tiktoken

[notice] A new release of pip is available: 24.3.1 -> 25.0
[notice] To update, run: python3.13 -m pip install --upgrade pip
error: externally-managed-environment

× This environment is externally managed
╰─> To install Python packages system-wide, try brew install
    xyz, where xyz is the package you are trying to
    install.

    If you wish to install a Python library that isn't in Homebrew,
    use a virtual environment:

    python3 -m venv path/to/venv
    source path/to/venv/bin/activate
    python3 -m pip install xyz

    If you wish to install a Python application that isn't in Homebrew,
    it may be easiest to use 'pipx install xyz', which will manage a
    virtual environment for you. You can install pipx with

    brew install pipx

    You may restore the old behavior of pip by passing
    the '--break-system-packages' flag to pip, or by adding
    'break-system-packages = true' to your pip.conf file. The latter
    will permanently disable this error.

    If you disable this error, we STRONGLY recommend that you additionally
    pass the '--user' flag to pip, or set 'user = true' in your pip.conf
    file. Failure to do this can result in a broken Homebrew installation.

    Read more about this behavior here: <https://peps.python.org/pep-0668/>

note: If you believe this is a mistake, please contact your Python installation or OS distribution provider. You can override this, at the risk of breaking your Python installation or OS, by passing --break-system-packages.
hint: See PEP 668 for the detailed specification.
saint@MacBookPro LLMs-from-scratch %
saint@MacBookPro LLMs-from-scratch % pip3 install tiktoken --break-system-packages
Collecting tiktoken
  Downloading tiktoken-0.8.0-cp313-cp313-macosx_11_0_arm64.whl.metadata (6.6 kB)
Collecting regex>=2022.1.18 (from tiktoken)
  Downloading regex-2024.11.6-cp313-cp313-macosx_11_0_arm64.whl.metadata (40 kB)
Collecting requests>=2.26.0 (from tiktoken)
  Downloading requests-2.32.3-py3-none-any.whl.metadata (4.6 kB)
Collecting charset-normalizer<4,>=2 (from requests>=2.26.0->tiktoken)
  Downloading charset_normalizer-3.4.1-cp313-cp313-macosx_10_13_universal2.whl.metadata (35 kB)
Collecting idna<4,>=2.5 (from requests>=2.26.0->tiktoken)
  Downloading idna-3.10-py3-none-any.whl.metadata (10 kB)
Collecting urllib3<3,>=1.21.1 (from requests>=2.26.0->tiktoken)
  Downloading urllib3-2.3.0-py3-none-any.whl.metadata (6.5 kB)
Collecting certifi>=2017.4.17 (from requests>=2.26.0->tiktoken)
  Downloading certifi-2025.1.31-py3-none-any.whl.metadata (2.5 kB)
Downloading tiktoken-0.8.0-cp313-cp313-macosx_11_0_arm64.whl (982 kB)
   ━━━━━━━━━━━━━━━━━━━━━━━━━━━━━━━━━━━━━━━━ 982.8/982.8 kB 24.2 MB/s eta 0:00:00
Downloading regex-2024.11.6-cp313-cp313-macosx_11_0_arm64.whl (284 kB)
Downloading requests-2.32.3-py3-none-any.whl (64 kB)
Downloading certifi-2025.1.31-py3-none-any.whl (166 kB)
Downloading charset_normalizer-3.4.1-cp313-cp313-macosx_10_13_universal2.whl (195 kB)
Downloading idna-3.10-py3-none-any.whl (70 kB)
Downloading urllib3-2.3.0-py3-none-any.whl (128 kB)
Installing collected packages: urllib3, regex, idna, charset-normalizer, certifi, requests, tiktoken
Successfully installed certifi-2025.1.31 charset-normalizer-3.4.1 idna-3.10 regex-2024.11.6 requests-2.32.3 tiktoken-0.8.0 urllib3-2.3.0

[notice] A new release of pip is available: 24.3.1 -> 25.0
[notice] To update, run: python3.13 -m pip install --upgrade pip
saint@MacBookPro LLMs-from-scratch %
Finally, my machine is in a state that can run the code in the Jupyter notebook! This is such a brittle environment. I need to switch to a managed environment to avoid this type of mess.
While digging around in Bugzilla (as is now my usual daily custom), I came across Bug 580468 – JM: Tune Trace JIT Heuristics. It was interesting following the discussion since it was a perfect illustration of the principles being taught in CS470. Therefore, I wrote up this brief summary of the bug discussion to reinforce to myself how practical these issues are: Practical AI.