Setting up Apache Hadoop
As part of my Dynamic Big Data course, I have to set up a distributed file system to experiment with various mapreduce concepts. Let’s use Hadoop since it’s widely adopted. Thankfully, there are instructions on how to set up Apache Hadoop – we’re starting with a single cluster for now.
Once installation is complete, log onto the Ubuntu OS. Set up shared folders and enable the bidirectional clipboard as follows:
- From the VirtualBox Devices menu, choose Insert Guest Additions CD image… A prompt will be displayed stating that “VBOXADDITIONS_5.1.26_117224” contains software intended to be automatically started. Just click on the Run button to continue and enter the root password. When the guest additions installer completes, press Return to close the window when prompted.
- From the VirtualBox Devices menu, choose Shared Clipboard > Bidirectional. This enables two way clipboard functionality between the guest and host.
- From the VirtualBox Devices menu, choose Shared Folders > Shared Folders Settings… Click on the add Shared Folder button and enter a path to a folder on the host that you would like to be shared. Optionally select Auto-mount and Make Permanent.
- Open a terminal window. Enter these commands to mount the shared folder (assuming you named it vmshare in step 3 above):
mkdir ~/vmshare
sudo mount -t vboxsf -o uid=$UID,gid=$(id -g) vmshare ~/vmshare
To start installing the software we need, enter these commands:
sudo apt-get update
sudo apt install default-jdk
Next, get a copy of the Hadoop binaries from an Apache download mirror.
cd ~/Downloads
wget http://apache.cs.utah.edu/hadoop/common/hadoop-2.7.4/hadoop-2.7.4.tar.gz
mkdir ~/hadoop-2.7.4
tar xvzf hadoop-2.7.4.tar.gz -C ~/
cd ~/hadoop-2.7.4
The Apache Single Node Cluster Tutorial says to
export JAVA_HOME=/usr/java/latest
in the etc/hadoop/hadoop-env.sh script. On this Ubuntu setup, we end up needing to
export JAVA_HOME=/usr/lib/jvm/java-8-openjdk-amd64/
If you skip setting up this export, running bin/hadoop will give this error:
Error: JAVA_HOME is not set and could not be found.
Note: I found that setting JAVA_HOME=/usr caused subsequent processes (like generating Eclipse projects from the source using mvn) to fail even though the steps in the tutorial worked just fine.
To verify that Hadoop is now configured and ready to run (in a non-distributed mode as a single Java process), execute the commands listed in the tutorial.
$ mkdir input
$ cp etc/hadoop/*.xml input
$ bin/hadoop jar share/hadoop/mapreduce/hadoop-mapreduce-examples-2.7.4.jar grep input output 'dfs[a-z.]+'
$ cat output/*
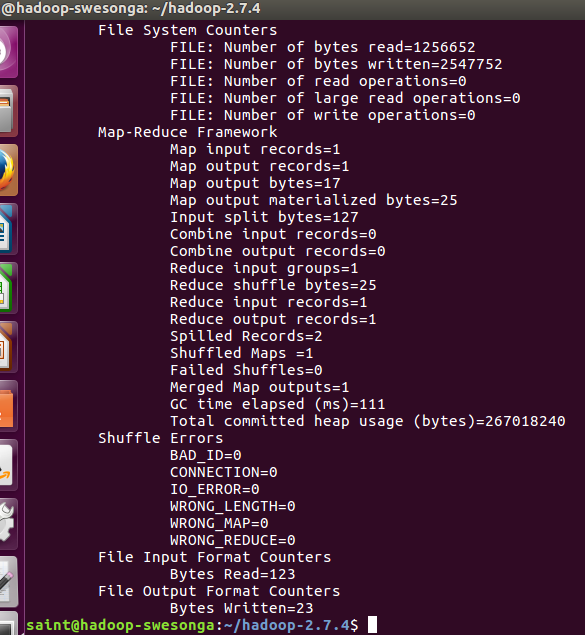
The bin/hadoop jar command runs the code in the .jar file, specifically the code in Grep.java, passing it the last 3 arguments. The output should resemble this summary:
If you’re interested in the details of this example (e.g. to inspect Grep.java), examine the src subfolder. If you don’t need the binaries and just want to look at the code, you can wget it from a download mirror, e.g.:
wget http://apache.cs.utah.edu/hadoop/common/stable/hadoop-2.7.4-src.tar.gz

Leave a Reply