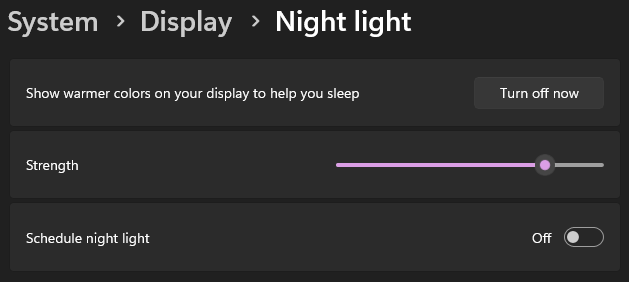
I have been trying to enable the Night Light on my Windows 11 desktop but nothing happens when toggling the “Turn on now” and “Turn off now” buttons. It would be nice if they at least provided an error message explaining that they couldn’t do what you asked. The “Strength” slider doesn’t do anything either.
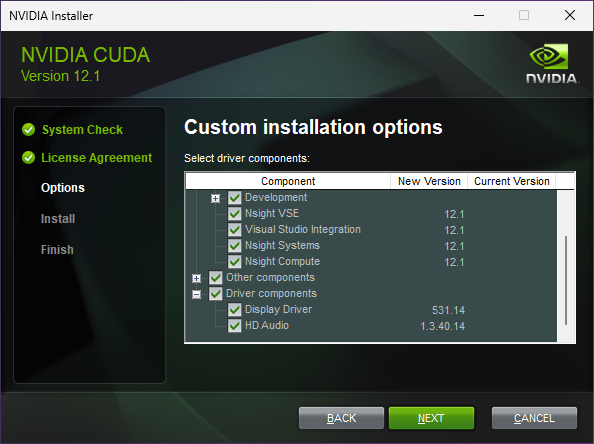
I download the latest CUDA Toolkit (12.1.0, Feb 2023) and install all available components. The driver version 531.14 should be installed based on this selection.
NVIDIA Installer
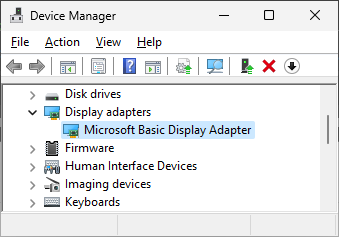
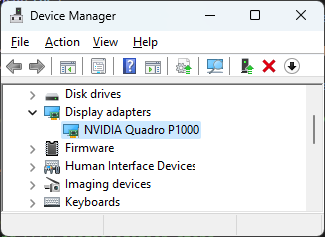
When the installation completes, the scale of my screen has increased from 100% to the recommended 300% and the night light is now on (even before closing the installer)! Ironically, the NVIDIA Installer window now looks horrific at the 300% scale! The Device Manager now shows the graphics card name.
nVidia Display Adapter in Device Manager
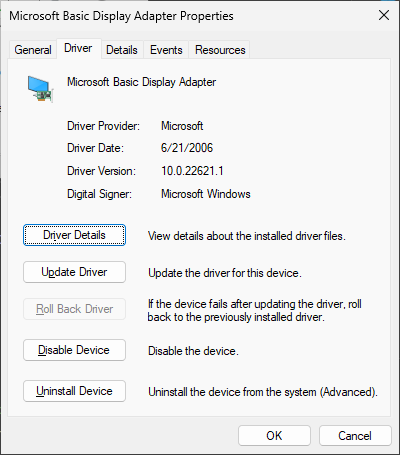
NVIDIA Quadro P1000 Properties
I also notice that the window corners are now rounded. I had tried running an OpenGL program and I had no idea why glfwCreateWindow returned NULL – it’s now obvious that there was no appropriate device driver.
I recently had a Windows 11 device that was disabled by IT. The process of getting assistance exposed me to the types of Windows tools I never use: administration tools. IT would have me launch Quick Assist and give them control of my computer. This is when I was learning of the existence of tools like dsregcmd /status, which turn out to be well documented, e.g. see Troubleshoot hybrid Azure Active Directory-joined devices – Microsoft Entra | Microsoft Learn.
The last resort was to reset my device. After years of dumping stuff all over my hard drives, I was forced to do some cleanup to ensure I didn’t lose anything valuable. Going forward, everything will now be well organized so that whatever isn’t on OneDrive should be fine to lose. Ironically, the device reset tool could not let me sign in, which I needed to do to reset the device. We tried using the Reset this PC tool but it could not find the recovery partition.
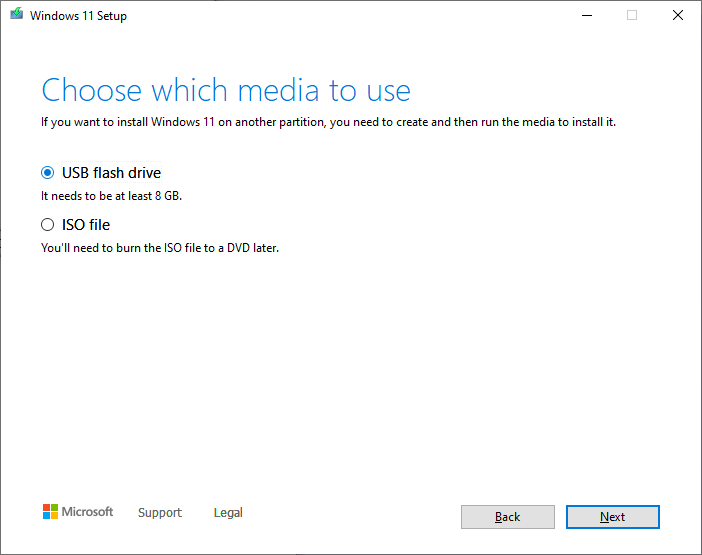
As a last resort, I went to Download Windows 11 (microsoft.com) and downloaded the media creation tool to make a bootable USB drive (the Create Windows 11 Installation Media section). I picked up a 128GB onn stick from Target.
I discovered that setup wouldn’t proceed if the selected disk still had BitLocker enabled. After turning off BitLocker, I formatted my disks and got a fresh installation going. Now that I have so much disk space available, I have no idea why my disk was almost full – I’m not yet missing anything but time will tell if I erased something valuable. The last bit was Windows activation. This is supposed to happen automatically but since it didn’t, we had to use the Slmgr.vbs script.
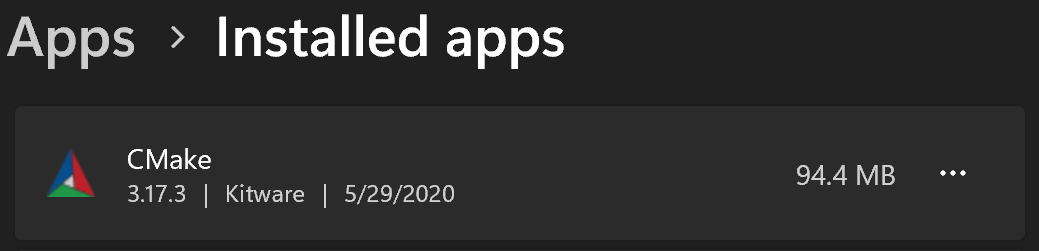
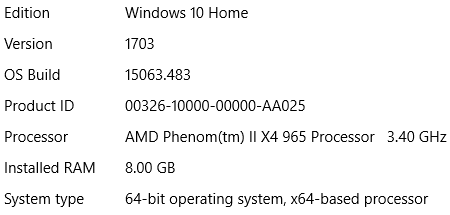
I was recently looking into services that use MySQL. I realized that I’d never looked at, let alone built, the source code for this product. My desktop computer runs Windows 10, which is one of the supported Windows client platforms (all of which are x86-64 only) as per MySQL :: Supported Platforms: MySQL Database. The instructions for building MySQL look straightforward: MySQL :: Building MySQL from Source :: 3 Installing MySQL Using a Development Source Tree. I chose to make the build directory a sibling to the mysql-server source tree (less stuff shows up in the VS Code tree this way).
Prerequisites
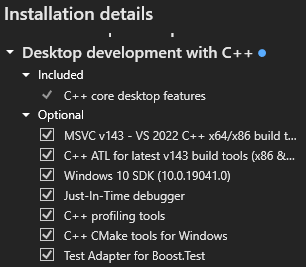
Visual Studio 2022 with the “Desktop development with C++” workload.
Run the commands below to get and build the sources in a Developer Command Prompt. You will need to adjust the path to the OpenSSL root directory to match the location of your OpenSSL installation/build.
git clone https://github.com/mysql/mysql-server
mkdir bld
cd bld
cmake ../mysql-server -G "Visual Studio 17 2022 Win64" -DCMAKE_INSTALL_PREFIX=../install -DWITH_DEBUG=1
The first error reveals that you can’t specify the architecture when using Visual Studio 2022:
CMake Error: Could not create named generator Visual Studio 17 2022 Win64
Generators
* Visual Studio 17 2022 = Generates Visual Studio 2022 project files.
Use -A option to specify architecture.
Visual Studio 16 2019 = Generates Visual Studio 2019 project files.
Use -A option to specify architecture.
Visual Studio 15 2017 [arch] = Generates Visual Studio 2017 project files.
Optional [arch] can be "Win64" or "ARM".
Visual Studio 14 2015 [arch] = Generates Visual Studio 2015 project files.
Optional [arch] can be "Win64" or "ARM".
Visual Studio 12 2013 [arch] = Generates Visual Studio 2013 project files.
Optional [arch] can be "Win64" or "ARM".
Visual Studio 11 2012 [arch] = Deprecated. Generates Visual Studio 2012
project files. Optional [arch] can be
"Win64" or "ARM".
Visual Studio 9 2008 [arch] = Generates Visual Studio 2008 project files.
Optional [arch] can be "Win64" or "IA64".
Borland Makefiles = Generates Borland makefiles..
...
Dropping the architecture still results in an error:
-- Looked for boost/version.hpp in and
-- BOOST_INCLUDE_DIR BOOST_INCLUDE_DIR-NOTFOUND
-- LOCAL_BOOST_DIR
-- LOCAL_BOOST_ZIP
-- Could not find (the correct version of) boost.
-- MySQL currently requires boost_1_77_0
CMake Error at cmake/boost.cmake:108 (MESSAGE):
You can download it with -DDOWNLOAD_BOOST=1 -DWITH_BOOST=<directory>
This CMake script will look for boost in <directory>. If it is not there,
it will download and unpack it (in that directory) for you.
You can also download boost manually, from
https://boostorg.jfrog.io/artifactory/main/release/1.77.0/source/boost_1_77_0.tar.bz2
If you are inside a firewall, you may need to use an https proxy:
export https_proxy=http://example.com:80
Call Stack (most recent call first):
cmake/boost.cmake:277 (COULD_NOT_FIND_BOOST)
CMakeLists.txt:1542 (INCLUDE)
The instructions do not outline how to get the dependencies so we need to add the recommended arguments.
git clone https://github.com/mysql/mysql-server
mkdir bld
cd bld
cmake ../mysql-server -G "Visual Studio 17 2022" -DCMAKE_INSTALL_PREFIX=../install -DWITH_DEBUG=1 -DDOWNLOAD_BOOST=1 -DWITH_BOOST=../boost
Next error is because CMake cannot find OpenSSL.
-- OPENSSL_WIN32 OPENSSL_WIN32-NOTFOUND
-- OPENSSL_WIN64 OPENSSL_WIN64-NOTFOUND
-- Could NOT find OpenSSL, try to set the path to OpenSSL root folder in the system variable OPENSSL_ROOT_DIR (missing: OPENSSL_CRYPTO_LIBRARY OPENSSL_INCLUDE_DIR)
--
Could not find system OpenSSL
Make sure you have specified a supported SSL version.
Valid options are :
openssl[0-9]+ (use alternative system library)
yes (synonym for system)
</path/to/custom/openssl/installation>
CMake Error at cmake/ssl.cmake:87 (MESSAGE):
Please see https://wiki.openssl.org/index.php/Binaries
Call Stack (most recent call first):
cmake/ssl.cmake:331 (FATAL_SSL_NOT_FOUND_ERROR)
CMakeLists.txt:1766 (MYSQL_CHECK_SSL)
Needs to be in an admin shell. Note: using bison as the package name fails with an error that the package was not found with the source(s) listed: https://community.chocolatey.org/api/v2/.
Chocolatey v1.2.1
Installing the following packages:
winflexbison3
By installing, you accept licenses for the packages.
Progress: Downloading winflexbison3 2.5.24.20210105... 100%
winflexbison3 v2.5.24.20210105 [Approved]
winflexbison3 package files install completed. Performing other installation steps.
The package winflexbison3 wants to run 'chocolateyInstall.ps1'.
Note: If you don't run this script, the installation will fail.
Note: To confirm automatically next time, use '-y' or consider:
choco feature enable -n allowGlobalConfirmation
Do you want to run the script?([Y]es/[A]ll - yes to all/[N]o/[P]rint): y
Downloading winflexbison3
from 'https://github.com/lexxmark/winflexbison/releases/download/v2.5.24/win_flex_bison-2.5.24.zip'
Progress: 100% - Completed download of C:\Users\saint\AppData\Local\Temp\chocolatey\winflexbison3\2.5.24.20210105\win_flex_bison-2.5.24.zip (1018.19 KB).
Download of win_flex_bison-2.5.24.zip (1018.19 KB) completed.
Hashes match.
Extracting C:\Users\saint\AppData\Local\Temp\chocolatey\winflexbison3\2.5.24.20210105\win_flex_bison-2.5.24.zip to C:\ProgramData\chocolatey\lib\winflexbison3\tools...
C:\ProgramData\chocolatey\lib\winflexbison3\tools
ShimGen has successfully created a shim for win_bison.exe
ShimGen has successfully created a shim for win_flex.exe
The install of winflexbison3 was successful.
Software installed to 'C:\ProgramData\chocolatey\lib\winflexbison3\tools'
Chocolatey installed 1/1 packages.
See the log for details (C:\ProgramData\chocolatey\logs\chocolatey.log).
The sql_yacc.h error does not go away until I nuke the bld directory and rerun cmake. Now I can build the sources:
devenv MySQL.sln /build debug
The build takes just under 22 minutes. Some of the sources being built are about Java. It would be interesting to know what the Java-related scenarios are.
Microsoft Visual Studio 2022 Version 17.4.4.
Copyright (C) Microsoft Corp. All rights reserved.
Invalid project
Use:
devenv [solutionfile | projectfile | folder | anyfile.ext] [switches]
I’ll just package the build and see what happens. The package is created after about 13 minutes and includes all the PDBs and test programs.
38>CMake Warning at C:/repos/sql/mysql-server/cmake/rpath_remove.cmake:47 (MESSAGE):
38> Could not find debug version of mysqld
38>Call Stack (most recent call first):
38> C:/repos/sql/bld/sql/cmake_install.cmake:66 (include)
38> C:/repos/sql/bld/cmake_install.cmake:161 (include)
38>
38>
38>CPack: Create package
38>CPack: - package: C:/repos/sql/bld/mysql-8.0.32-winx64.zip generated.
========== Build: 38 succeeded, 0 failed, 604 up-to-date, 0 skipped ==========
========== Elapsed 12:26.639 ==========
Looking up instructions for starting MySQL leads me to 1.4.6 Starting MySQL from the Windows Command Line, which says to run mysqld. The error about failing to set the datadir now shows the importance of the devenv command that failed.
2023-03-18T15:52:59.976521Z 0 [System] [MY-010116] [Server] C:\repos\sql\builds\mysql-8.0.32-winx64\bin\mysqld.exe (mysqld 8.0.32-debug) starting as process 19864
2023-03-18T15:52:59.979352Z 0 [Warning] [MY-010091] [Server] Can't create test file C:\repos\sql\builds\mysql-8.0.32-winx64\data\mysqld_tmp_file_case_insensitive_test.lower-test
2023-03-18T15:52:59.979444Z 0 [Warning] [MY-010091] [Server] Can't create test file C:\repos\sql\builds\mysql-8.0.32-winx64\data\mysqld_tmp_file_case_insensitive_test.lower-test
2023-03-18T15:52:59.979795Z 0 [ERROR] [MY-013276] [Server] Failed to set datadir to 'C:\repos\sql\builds\mysql-8.0.32-winx64\data\' (OS errno: 2 - No such file or directory)
2023-03-18T15:52:59.980190Z 0 [ERROR] [MY-010119] [Server] Aborting
2023-03-18T15:52:59.980475Z 0 [System] [MY-010910] [Server] C:\repos\sql\builds\mysql-8.0.32-winx64\bin\mysqld.exe: Shutdown complete (mysqld 8.0.32-debug) Source distribution.
cd \repos\sql\builds\mysql-8.0.32-winx64
bin\mysqld --initialize-insecure --console
The logs show success and sure enough, mysqld now starts successfully. Doesn’t do anything though (as per my Process Monitor filter).
2023-03-18T23:14:36.283952Z 0 [System] [MY-013169] [Server] C:\repos\sql\builds\mysql-8.0.32-winx64\bin\mysqld.exe (mysqld 8.0.32-debug) initializing of server in progress as process 14960
2023-03-18T23:14:36.362131Z 1 [System] [MY-013576] [InnoDB] InnoDB initialization has started.
2023-03-18T23:14:36.918736Z 1 [System] [MY-013577] [InnoDB] InnoDB initialization has ended.
2023-03-18T23:14:40.521689Z 6 [Warning] [MY-010453] [Server] root@localhost is created with an empty password ! Please consider switching off the --initialize-insecure option.
mysql: [Warning] Using a password on the command line interface can be insecure.
Welcome to the MySQL monitor.  Commands end with ; or \g.
Your MySQL connection id is 8
Server version: 8.0.32-debug Source distribution

Copyright (c) 2000, 2023, Oracle and/or its affiliates.

Oracle is a registered trademark of Oracle Corporation and/or its
affiliates. Other names may be trademarks of their respective
owners.

Type 'help;' or '\h' for help. Type '\c' to clear the current input statement.

mysql>
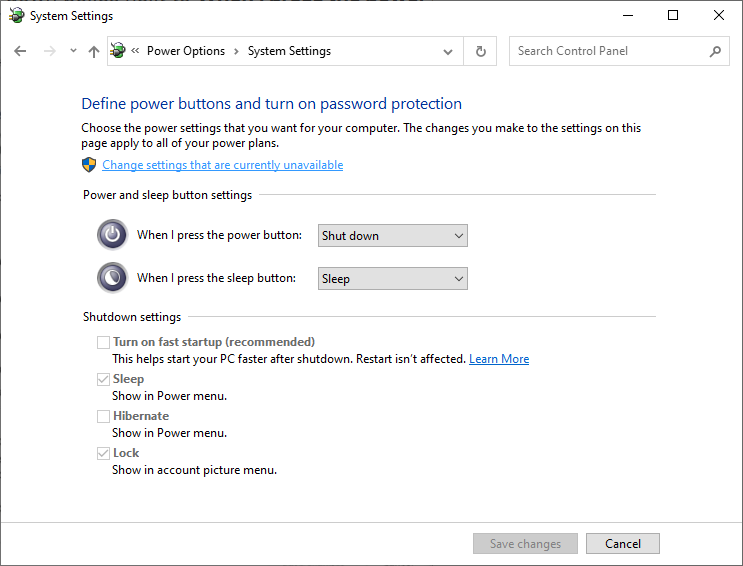
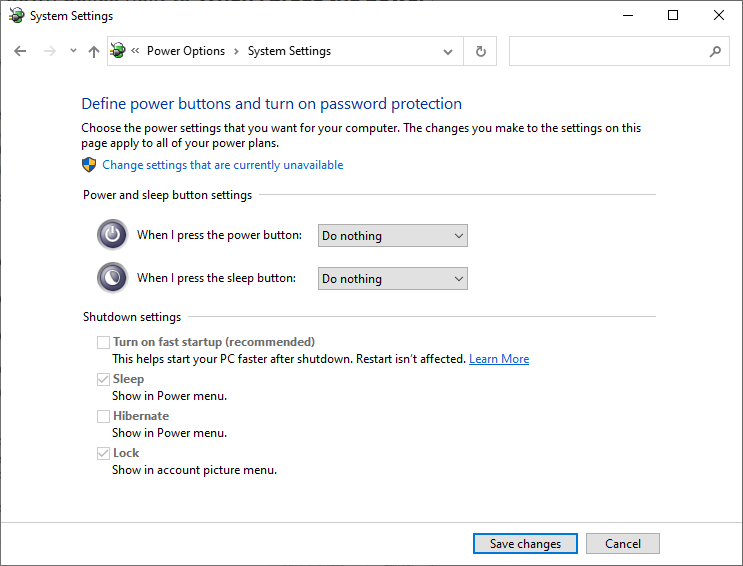
My almost 2-year-old walked into my office this evening and pressed the shiny flashing button at the top of my desktop PC. Unfortunately, that turns out to also be the power button. And there went all my applications and the documents I was working on… I didn’t lose much (other than my cool) but this experience motivated me to venture into a corner of Windows I had not considered using. This
Power and sleep button settings
… has now become…
Power and sleep button settings showing disabled buttons
One of my colleagues shared this simple Java program with me.
import java.io.IOException;
import java.io.RandomAccessFile;
import java.nio.channels.FileChannel;

public class TruncateFile {
    public static void main(String[] args) throws IOException {
        RandomAccessFile file = new RandomAccessFile("data.txt", "rw");
        FileChannel channel = file.getChannel();
        channel.map(FileChannel.MapMode.READ_WRITE, 0, 10);
        channel.truncate(9);
    }
}
This program can be launched using source-file mode for convenience: /c/java/binaries/jdk/x64/jdk-19.0.1+10/bin/java.exe TruncateFile.java. It failed with the exception below:
Exception in thread "main" java.io.IOException: The requested operation cannot be performed on a file with a user-mapped section open
        at java.base/sun.nio.ch.FileDispatcherImpl.truncate0(Native Method)
        at java.base/sun.nio.ch.FileDispatcherImpl.truncate(FileDispatcherImpl.java:90)
        at java.base/sun.nio.ch.FileChannelImpl.truncate(FileChannelImpl.java:490)
        at TruncateFile.main(TruncateFile.java:10)
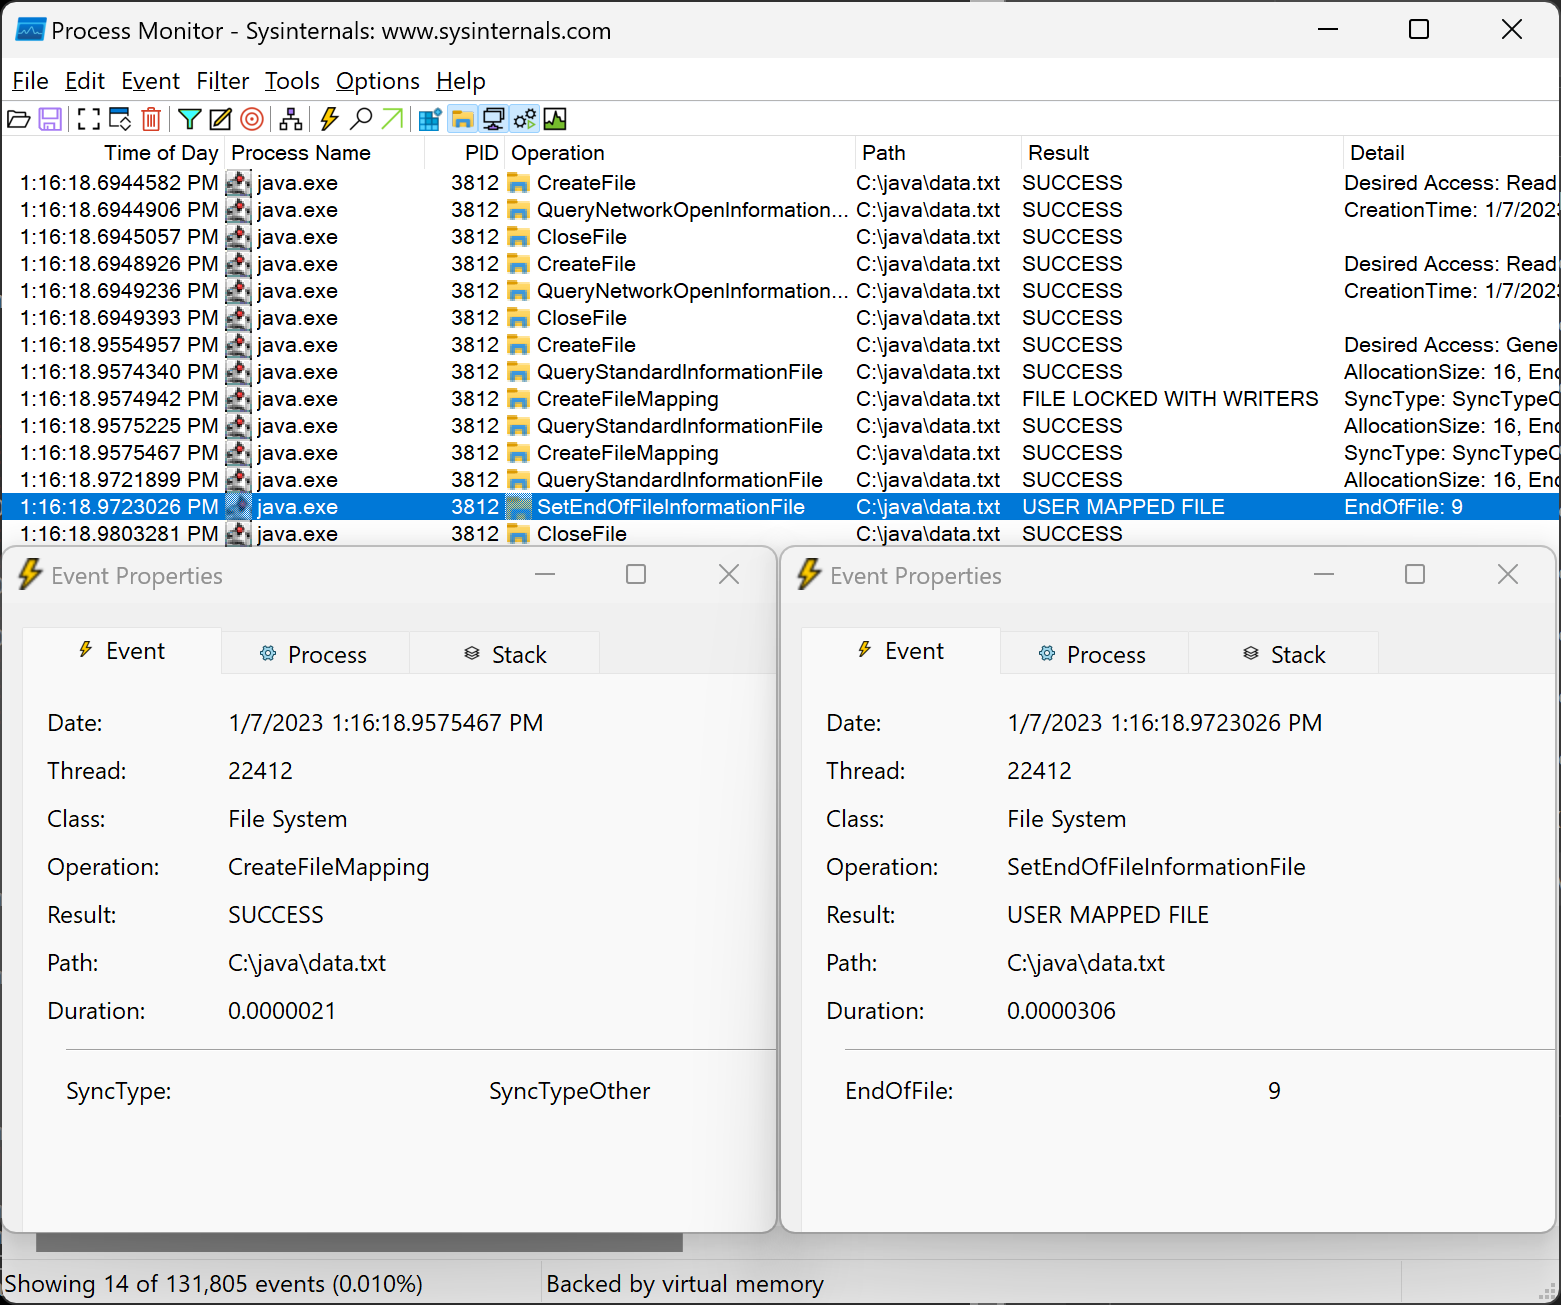
Why does it fail on Windows? I launched Process Monitor, started capturing events, and then ran the above java.exe command and finally stopped capturing events. The SetFileInformationByHandle function failed as indicated by the USER MAPPED FILE entry in its result column.
Process Monitor File Truncation Events
I created a Windows console application, TruncateFile, to also map a file and truncate it using the SetFileInformationByHandle function and therefore get some insight into whether this behavior is the result of a Java bug. Mapping the file using the CreateFileMappingW function indeed fails with ERROR_USER_MAPPED_FILE (The requested operation cannot be performed on a file with a user-mapped section open). This does appear to be a Windows limitation. It is likely the issue another user ran into at Memory mapped file truncation on windows – Stack Overflow.
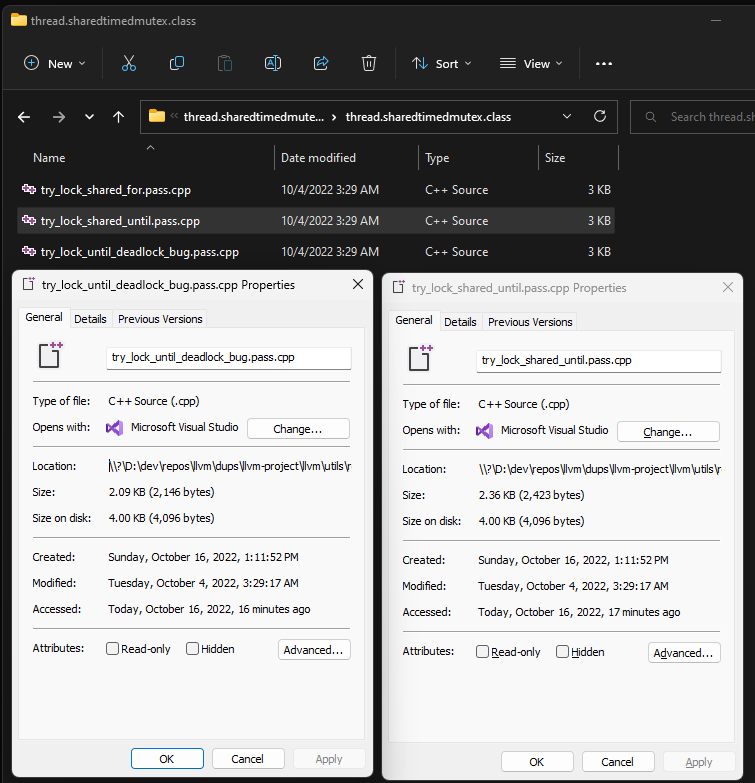
llvm_package_15.0.2\llvm-project-llvmorg-15.0.2\libcxx\test\std\thread\thread.mutex\thread.mutex.requirements\thread.sharedtimedmutex.requirements\thread.sharedtimedmutex.class\try_lock_shared_for.pass.cpp - The system cannot find the path specified.
llvm_package_15.0.2\llvm-project-llvmorg-15.0.2\libcxx\test\std\thread\thread.mutex\thread.mutex.requirements\thread.sharedtimedmutex.requirements\thread.sharedtimedmutex.class\try_lock_shared_until.pass.cpp - The system cannot find the path specified.
llvm_package_15.0.2\llvm-project-llvmorg-15.0.2\libcxx\test\std\thread\thread.mutex\thread.mutex.requirements\thread.sharedtimedmutex.requirements\thread.sharedtimedmutex.class\try_lock_until_deadlock_bug.pass.cpp - The system cannot find the path specified.
These files still exist on disk though! They are displayed if you dir their containing directory but are not found if you dir their full paths! They cannot be deleted using del either. Interestingly, pressing tab after the directory path will autocomplete the file names.
C:\> dir D:\dev\repos\llvm\dups\llvm-project\llvm\utils\release\llvm_package_15.0.2\llvm-project-llvmorg-15.0.2\libcxx\test\std\thread\thread.mutex\thread.mutex.requirements\thread.sharedtimedmutex.requirements\thread.sharedtimedmutex.class\
 Volume in drive D is DATAVOL1
 Volume Serial Number is 8800-8693

 Directory of D:\dev\repos\llvm\dups\llvm-project\llvm\utils\release\llvm_package_15.0.2\llvm-project-llvmorg-15.0.2\libcxx\test\std\thread\thread.mutex\thread.mutex.requirements\thread.sharedtimedmutex.requirements\thread.sharedtimedmutex.class

10/16/2022  01:22 PM    <DIR>          .
10/04/2022  03:29 AM    <DIR>          ..
10/04/2022  03:29 AM             2,461 try_lock_shared_for.pass.cpp
10/04/2022  03:29 AM             2,423 try_lock_shared_until.pass.cpp
10/04/2022  03:29 AM             2,146 try_lock_until_deadlock_bug.pass.cpp
               3 File(s)          7,030 bytes

C:\> dir D:\dev\repos\llvm\dups\llvm-project\llvm\utils\release\llvm_package_15.0.2\llvm-project-llvmorg-15.0.2\libcxx\test\std\thread\thread.mutex\thread.mutex.requirements\thread.sharedtimedmutex.requirements\thread.sharedtimedmutex.class\try_lock_shared_for.pass.cpp
 Volume in drive D is DATADRIVE1
 Volume Serial Number is 548C-FFC9

 Directory of D:\dev\repos\llvm\dups\llvm-project\llvm\utils\release\llvm_package_15.0.2\llvm-project-llvmorg-15.0.2\libcxx\test\std\thread\thread.mutex\thread.mutex.requirements\thread.sharedtimedmutex.requirements\thread.sharedtimedmutex.class

File Not Found

C:\> del D:\dev\repos\llvm\dups\llvm-project\llvm\utils\release\llvm_package_15.0.2\llvm-project-llvmorg-15.0.2\libcxx\test\std\thread\thread.mutex\thread.mutex.requirements\thread.sharedtimedmutex.requirements\thread.sharedtimedmutex.class\try_lock_shared_for.pass.cpp
The system cannot find the path specified.
These files can be viewed in file explorer. Something that caught my eye when examining their properties is that their locations started with the \\?\ prefix! That seems unusual for files on my local drive.
File Locations Starting with \\?\
Resource monitor does not show any images with associated handles when searching for “try_lock”. Neither does searching for “\?\D:\dev\repos\llvm\”. I tried using Process Explorer’s “Find Handle or DLL…” command as well. There also don’t appear to be any child processes for the cmd.exe process I was using (a Developer 2019 Command Prompt).
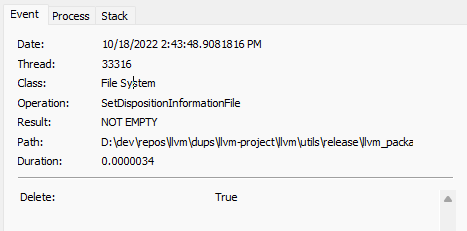
Next idea, open Process Monitor and see what’s happening when dir and rmdir are executed. I used the Path contains thread.sharedtimedmutex.class filter. The deletes are showing up as SetDispositionInformationFile events and seem to be using the RemoveDirectoryW function.
The RemoveDirectory function marks a directory for deletion on close. Therefore, the directory is not removed until the last handle to the directory is closed.
Notice the NOT EMPTY result of the SetDispositionInformationFile event. I believe this comes from RemoveDirectoryW. There’s the question of how the 3 files are printed to the command line. The FindNextFile API is used to search for files.
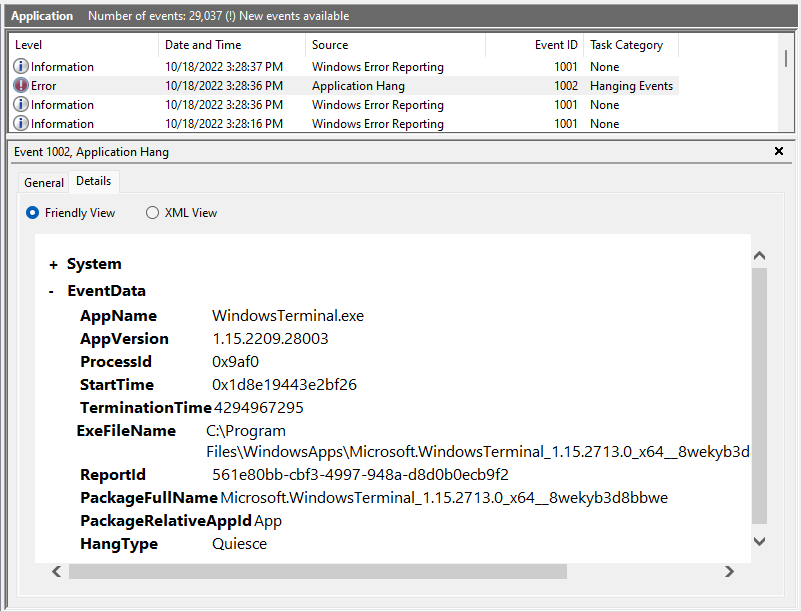
Ah, in the middle of this investigation, PowerShell.exe dies and so does Windows Terminal. All my tabs, everything, gone! Aaaargh… Windows Event Viewer has an Information level event showing that powershell.exe crashed due to a System.InvalidOperationException. This is then followed by another Information event with the WER source and P1 problem signature Microsoft.WindowsTerminal_1.15.2713.0_x64__8wekyb3d8bbwe. Then comes the Error level event with the Application Hang source and General explanation that “The program WindowsTerminal.exe version 1.15.2209.28003 stopped interacting with Windows and was closed. To see if more information about the problem is available, check the problem history in the Security and Maintenance control panel.” The ExeFileName is cut off below but simply append “\WindowsTerminal.exe” to the package name to reconstruct it. Looks like I need to avoid PowerShell. And why is there no crash dump created for it???
One upside of this crash is that it lets me confirm that it is not the cmd.exe process that is hanging onto those files. I terminate explorer.exe and when I run new task in Task Manager, it asks me to create a Windows Hello pin. What is happening?? Now moving on to opening these files: Notepad++ acts as though nothing happened when you File->Open and select one of them. Notepad opens it though! Running cat in Git Bash also dumps its contents:
cat /d/dev/repos/llvm/dups/llvm-project/llvm/utils/release/llvm_package_15.0.2/llvm-project-llvmorg-15.0.2/libcxx/test/std/thread/thread.mutex/thread.mutex.requirements/thread.sharedtimedmutex.requirements/thread.sharedtimedmutex.class/try_lock_shared_for.pass.cpp
//===----------------------------------------------------------------------===//
//
// Part of the LLVM Project, under the Apache License v2.0 with LLVM Exceptions.
// See https://llvm.org/LICENSE.txt for license information.
...
I’m suspecting Windows Defender but don’t have any definitive proof. According to Enable attack surface reduction (ASR) rules, this command in an admin powershell should do the trick if the problem was Windows Defender:
Well, looks like rm from Git Bash works just fine as does deleting from file explorer. Unfortunately, this unsolved issue is probably going to continue to cause pain in command prompt batch files like the LLVM build script.
This command fails after about an hour, and git svn clone https://svn.code.sf.net/p/nsis/code/ times out after getting r960. Not sure why these folks aren’t on GitHub.
D:\dev\repos> python -m pip install --user scons
Collecting scons
  Downloading SCons-4.4.0-py3-none-any.whl (4.2 MB)
     ━━━━━━━━━━━━━━━━━━━━━━━━━━━━━━━━━━━━━━━━ 4.2/4.2 MB 11.7 MB/s eta 0:00:00
Requirement already satisfied: setuptools in c:\python310\lib\site-packages (from scons) (58.1.0)
Installing collected packages: scons
  WARNING: The scripts scons-configure-cache.exe, scons.exe and sconsign.exe are installed in '%APPDATA%\Python\Python310\Scripts' which is not on PATH.
  Consider adding this directory to PATH or, if you prefer to suppress this warning, use --no-warn-script-location.
Successfully installed scons-4.4.0

[notice] A new release of pip available: 22.2 -> 22.2.2
[notice] To update, run: python.exe -m pip install --upgrade pip

D:\dev\repos> python -m pip uninstall scons
Found existing installation: SCons 4.4.0
Uninstalling SCons-4.4.0:
  Would remove:
    %APPDATA%\python\python310\scripts\scons-configure-cache.exe
    %APPDATA%\python\python310\scripts\scons.exe
    %APPDATA%\python\python310\scripts\sconsign.exe
    %APPDATA%\python\python310\site-packages\scons-4.4.0.dist-info\*
    %APPDATA%\python\python310\site-packages\scons\*
    %APPDATA%\python\scons-time.1
    %APPDATA%\python\scons.1
    %APPDATA%\python\sconsign.1
Proceed (Y/n)? y
  Successfully uninstalled SCons-4.4.0

D:\dev\repos> python -m pip install scons
Collecting scons
  Using cached SCons-4.4.0-py3-none-any.whl (4.2 MB)
Requirement already satisfied: setuptools in c:\python310\lib\site-packages (from scons) (58.1.0)
Installing collected packages: scons
Successfully installed scons-4.4.0

D:\dev\repos> where scons
C:\Python310\Scripts\scons.exe
The next prerequisite is zlib. Instead of downloading binaries from the unsecured site linked to, I decided to build the zlib sources myself. I only built the 64-bit version but turns out they are serious about setting ZLIB_W32:
D:\dev\repos\nsis\nsis-3.08-src> scons UNICODE=yes
scons: Reading SConscript files ...
Mkdir("build\urelease\config")
WARNING: VER_PACKED not set, defaulting to 0x03007666!
Delete("nsis-29-Sep-2022.cvs")
Delete(".instdist")
Delete(".test")
Using Microsoft tools configuration (14.3)
Checking for memset requirement... yes
Checking for memcpy requirement... no
Checking for C library gdi32... yes
Checking for C library user32... yes
Checking for C library pthread... no
Checking for C library iconv... no
Checking for C library shlwapi... yes
Checking for C library oleaut32... yes
Checking for C library version... yes
Checking for C library shell32... yes
Checking for C library version... yes
Please specify folder of zlib for Win32 via ZLIB_W32
Copying the DLL is not sufficient. To see why the error below occurs, consult config.log.
...
Checking for C library zdll... no
Checking for C library z... no
zlib (win32) is missing!
For example, config.log ends with C:\dev\software\zlib\win32\zlib.h(34): fatal error C1083: Cannot open include file: 'zconf.h': No such file or directory because I copied only zlib.h. I notice in config.log that it’s trying to also link using zdll.lib. Fix this by running:
cd /d D:\dev\repos\zlib
copy zlib.h C:\dev\software\zlib\win32\
copy zconf.h C:\dev\software\zlib\win32\
copy contrib\vstudio\vc14\x86\ZlibDllRelease\zlibwapi.lib C:\dev\software\zlib\win32\zdll.lib
set ZLIB_W32=C:\dev\software\zlib\win32\
Compilation now fails due to unresolved external symbols:
link /nologo /nocoffgrpinfo /map /subsystem:console,5.01 /STACK:2097152 /OUT:build\urelease\makensis\makensis.exe /LIBPATH:C:\dev\software\zlib\win32 gdi32.lib user32.lib shlwapi.lib oleaut32.lib version.lib shell32.lib version.lib zdll.lib build\urelease\makensis\build.obj build\urelease\makensis\clzma.obj build\urelease\makensis\crc32.obj build\urelease\makensis\DialogTemplate.obj build\urelease\makensis\dirreader.obj build\urelease\makensis\fileform.obj build\urelease\makensis\growbuf.obj build\urelease\makensis\icon.obj build\urelease\makensis\lang.obj build\urelease\makensis\lineparse.obj build\urelease\makensis\makenssi.obj build\urelease\makensis\manifest.obj build\urelease\makensis\mmap.obj build\urelease\makensis\Plugins.obj build\urelease\makensis\ResourceEditor.obj build\urelease\makensis\ResourceVersionInfo.obj build\urelease\makensis\BinInterop.obj build\urelease\makensis\script.obj build\urelease\makensis\scriptpp.obj build\urelease\makensis\ShConstants.obj build\urelease\makensis\strlist.obj build\urelease\makensis\tokens.obj build\urelease\makensis\tstring.obj build\urelease\makensis\utf.obj build\urelease\makensis\util.obj build\urelease\makensis\winchar.obj build\urelease\makensis\writer.obj build\urelease\makensis\bzip2\blocksort.obj build\urelease\makensis\bzip2\bzlib.obj build\urelease\makensis\bzip2\compress.obj build\urelease\makensis\bzip2\huffman.obj build\urelease\makensis\7zip\7zGuids.obj build\urelease\makensis\7zip\7zip\Common\OutBuffer.obj build\urelease\makensis\7zip\7zip\Common\StreamUtils.obj build\urelease\makensis\7zip\7zip\Compress\LZ\LZInWindow.obj build\urelease\makensis\7zip\7zip\Compress\LZMA\LZMAEncoder.obj build\urelease\makensis\7zip\7zip\Compress\RangeCoder\RangeCoderBit.obj build\urelease\makensis\7zip\Common\Alloc.obj build\urelease\makensis\7zip\Common\CRC.obj
build.obj : error LNK2019: unresolved external symbol _deflate referenced in function "public: virtual int __thiscall CZlib::Compress(bool)" (?Compress@CZlib@@UAEH_N@Z)
build.obj : error LNK2019: unresolved external symbol _deflateEnd referenced in function "public: virtual int __thiscall CZlib::End(void)" (?End@CZlib@@UAEHXZ)
build.obj : error LNK2019: unresolved external symbol _deflateInit2_ referenced in function "public: virtual int __thiscall CZlib::Init(int,unsigned int)" (?Init@CZlib@@UAEHHI@Z)
build\urelease\makensis\makensis.exe : fatal error LNK1120: 3 unresolved externals
scons: *** [build\urelease\makensis\makensis.exe] Error 1120
scons: building terminated because of errors.
Run dumpbin /headers zlibwapi.lib to examine the symbols in the lib file. Each of these does appear in a slightly different decorated form. For the declaration ZEXTERN int ZEXPORT deflateEnd OF((z_streamp strm)); in zlib.h we see the Name mangling below. This looks like __stdcall, coming from the expansion of ZEXPORT in zconf.h.
  Version      : 0
  Machine      : 14C (x86)
  TimeDateStamp: 6336126F Thu Sep 29 15:47:27 2022
  SizeOfData   : 0000001B
  DLL name     : zlibwapi.dll
  Symbol name  : _deflateEnd@4
  Type         : code
  Name type    : ordinal
  Ordinal      : 6
Just by chance, I CTRL+click on the deflateEnd method on the line int ret = deflateEnd(stream); in nsis-3.08-src/Source/czlib.h and it opens ZLIB.H in nsis-3.08-src/Source/zlib/. This file has been here the whole time, with the other header file I manually copied (and others that I might have needed to)! This header is directly included by Source\exehead\fileform.c, for example, so the build will fail if this folder is removed. (is this a bug though?)
In the NSIS sources, ZEXPORT is defined without a value. The link error is therefore caused by the use of _cdecl in the NSIS sources and __stdcall in the zlib source code I built. I end up changing the latter and rebuilding since the change in the former doesn’t seem to fix the build error and I don’t have time to investigate that. More specifically, I change line 355 of zconf.h to define ZEXPORT _cdecl. Now the build succeeds and this command create an installation:
I can run D:\dev\repos\nsis\local-install\makensisw.exe once but it is then blocked by Windows Defender. I guess I’ll have to review Troubleshoot problems with attack surface reduction rules. To create a debug build, use this command line:
hsdis is a plugin for disassembling code dynamically generated by the Java Virtual Machine. On Linux & MacOS, it uses GNU binutils. Support for the LLVM disassembly backend was recently added to hsdis in https://github.com/openjdk/jdk/pull/7531. This was motivated by the fact that GNU binutils is not distributed with the JDK (due to licensing reasons mentioned at https://github.com/openjdk/jdk/pull/5920#issuecomment-942398786) and the LLVM disassembly may be preferrable in certain circumstances. Unfortunately, the official Windows LLVM distribution does not have the header files necessary to build the hotspot disassembler. This prevents Windows developers from easily using the LLVM disassembler backend because they now have to build LLVM themselves as well – see hsdis LLVM backend for Windows ARM64 and Building LLVM for Windows ARM64, for example. In this post, we investigate why the LLVM Windows build does not have the necessary header files. The llvm-c directory in Windows build contains these 2 files only:
C:\Program Files\LLVM\include\llvm-c>dir
 Volume in drive C is OSDisk
 Volume Serial Number is c070-2ac0

 Directory of C:\Program Files\LLVM\include\llvm-c

01/08/2022  11:54 AM    <DIR>          .
01/08/2022  11:54 AM    <DIR>          ..
09/24/2021  10:18 AM            29,760 lto.h
09/24/2021  10:18 AM             9,632 Remarks.h
               2 File(s)         39,392 bytes
               2 Dir(s)  62,273,200,128 bytes free
I created a local LLVM build (see Building LLVM with CMake) and confirmed that it has all the header files.
C:\dev\repos\llvm-project\build_llvm\install_local\include\llvm-c>dir /w
 Volume in drive C is OSDisk
 Volume Serial Number is 0087-4c48

 Directory of C:\dev\repos\llvm-project\build_llvm\install_local\include\llvm-c

[.]                   [..]                  Analysis.h
BitReader.h           BitWriter.h           blake3.h
Comdat.h              Core.h                DataTypes.h
DebugInfo.h           Deprecated.h          Disassembler.h
DisassemblerTypes.h   Error.h               ErrorHandling.h
ExecutionEngine.h     ExternC.h             Initialization.h
IRReader.h            Linker.h              LLJIT.h
lto.h                 Object.h              Orc.h
OrcEE.h               Remarks.h             Support.h
Target.h              TargetMachine.h       [Transforms]
Types.h
              28 File(s)        382,361 bytes
               3 Dir(s)  59,158,138,880 bytes free
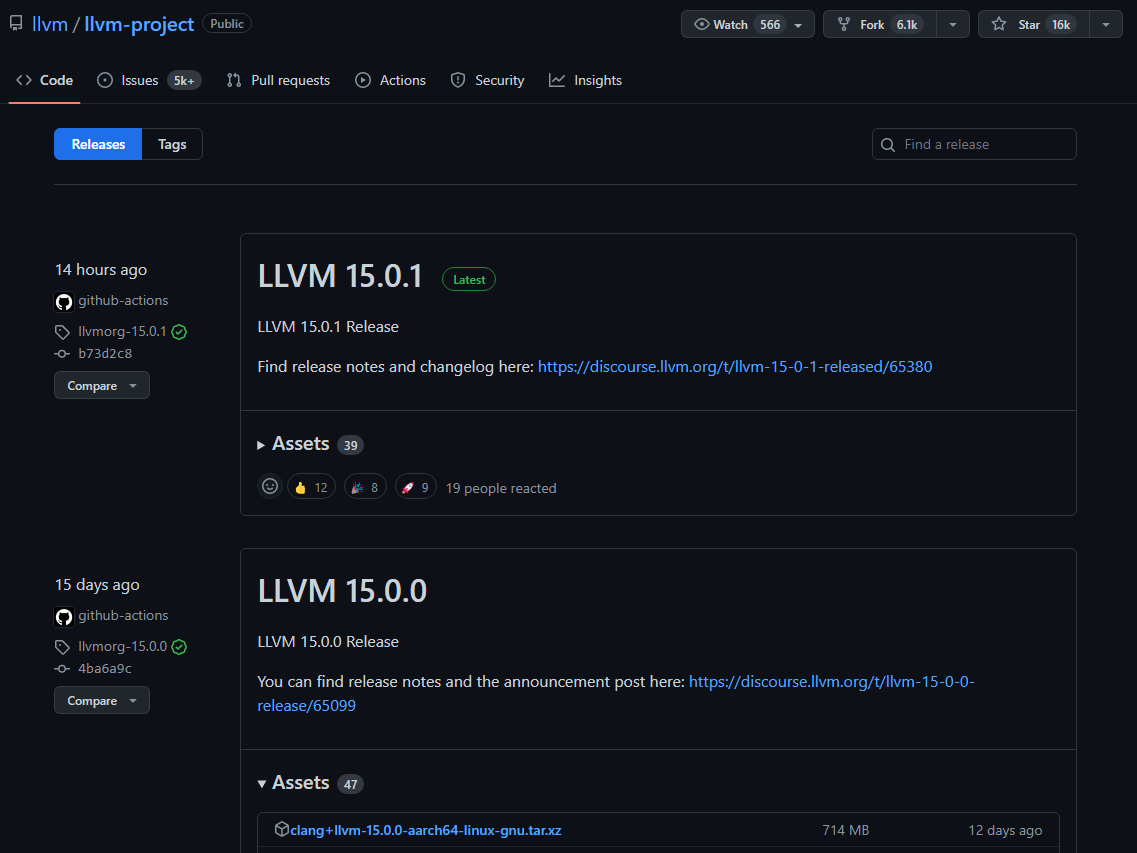
Does this problem still exist in the latest Windows LLVM release? I went to Releases · llvm/llvm-project (github.com) to find the latest LLVM installer for Windows but couldn’t find it. Turns out it’s because the 15.0.1 release is only 14 hours old so some of the assets probably haven’t been uploaded. Notice that 15.0.0 has 47 assets. I can successfully download and install LLVM-15.0.0-win64.exe and see that the header files are still missing.
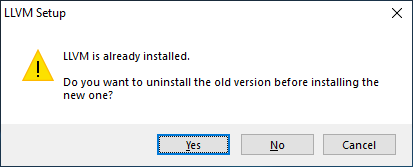
Interestingly, trying to install LLVM-15.0.0-win32.exe before uninstalling LLVM-15.0.0-win64.exe gives this dialog and clicking Yes uninstalls before the actual installation of the 32-bit build starts!
LLVM is already installed.
I assumed that would happen at this stage:
All the same, these dialogs have strings that can lead us to the sources that create the installer! The installer looks very similar to the one from Building the Elmer Install Folder so searching the llvm codebase for “ncis ” gives only a handful of hits leading to the key discovery of build_llvm_release.bat! (later learn that this needs to be executed in a (2019) developer command prompt so that the ninja command can be found). That script requires 7zip though. The script fails on my machine because it can’t find 7zip. Failure seems to be coming from the for-statement (see for | Microsoft Learn for usage). The for command uses the escape character (^) as explained at set | Microsoft Learn.
C:\dev\repos\llvm-project\llvm\utils\release> build_llvm_release.bat 15.0.0
Check 7-zip version and/or administrator permissions.
'7z.exe' is not recognized as an internal or external command,
operable program or batch file.
You need to modify the paths below:
Revision: llvmorg-15.0.0
Package version: 15.0.0
Build dir: C:\dev\repos\llvm-project\llvm\utils\release\llvm_package_15.0.0

Press any key to continue . . .
-- Looking for CrashReporterClient.h
-- Looking for CrashReporterClient.h - not found
-- Looking for pfm_initialize in pfm
-- Looking for pfm_initialize in pfm - not found
-- Could NOT find ZLIB (missing: ZLIB_LIBRARY ZLIB_INCLUDE_DIR)
CMake Error at C:/Program Files/Microsoft Visual Studio/2022/Preview/Common7/IDE/CommonExtensions/Microsoft/CMake/CMake/share/cmake-3.24/Modules/FindPackageHandleStandardArgs.cmake:230 (message):
  Could NOT find LibXml2 (missing: LIBXML2_INCLUDE_DIR)
Call Stack (most recent call first):
  C:/Program Files/Microsoft Visual Studio/2022/Preview/Common7/IDE/CommonExtensions/Microsoft/CMake/CMake/share/cmake-3.24/Modules/FindPackageHandleStandardArgs.cmake:594 (_FPHSA_FAILURE_MESSAGE)
  C:/Program Files/Microsoft Visual Studio/2022/Preview/Common7/IDE/CommonExtensions/Microsoft/CMake/CMake/share/cmake-3.24/Modules/FindLibXml2.cmake:108 (FIND_PACKAGE_HANDLE_STANDARD_ARGS)
  cmake/config-ix.cmake:156 (find_package)
  CMakeLists.txt:774 (include)


-- Configuring incomplete, errors occurred!
See also "C:/dev/repos/llvm-project/llvm/utils/release/llvm_package_15.0.0/build32_stage0/CMakeFiles/CMakeOutput.log".
See also "C:/dev/repos/llvm-project/llvm/utils/release/llvm_package_15.0.0/build32_stage0/CMakeFiles/CMakeError.log".
Looking through FindPackageHandleStandardArgs.cmake leads me to the simple realization that the wrong define is being used on the command line. Could this be because I’m using a newer CMake? I’ve been using the VS 2022 Preview Developer Command Prompt thus far. My VS 2019 (16.11.19) installation uses CMake 3.20. Both FindLibXml2.cmake in 3.20 and FindLibXml2.cmake in 3.24 require the LIBXML2_INCLUDE_DIR variable. However, they also claim (at the top) to set these variables.
in my build folder (build_llvm), there is a CPackConfig.cmake file that sets variables like CPACK_PACKAGE_FILE_NAME and CPACK_NSIS_DISPLAY_NAME. Since it is NSIS Wiki (sourceforge.io) in use, I wonder about running the package target myself in a manner similar to that used to create my local build. I switch back to a previous build directory (created without the build_llvm_release.bat) and run:
cmake --build . --config Release --target package
The resulting failure below indicates that NSIS is required.
MSBuild version 17.4.0-preview-22466-03+48ab5664b for .NET Framework
  PipSqueak.vcxproj -> C:\dev\repos\llvm-project\build_llvm\unittests\Support\DynamicLibrary\Release\PipSqueak.dll
  SecondLib.vcxproj -> C:\dev\repos\llvm-project\build_llvm\unittests\Support\DynamicLibrary\Release\SecondLib.dll
  obj.llvm-tblgen.vcxproj -> C:\dev\repos\llvm-project\build_llvm\utils\TableGen\obj.llvm-tblgen.dir\Release\obj.llvm-tblgen.lib
  LLVMDemangle.vcxproj -> C:\dev\repos\llvm-project\build_llvm\Release\lib\LLVMDemangle.lib
...
  verify-uselistorder.vcxproj -> C:\dev\repos\llvm-project\build_llvm\Release\bin\verify-uselistorder.exe
  yaml-bench.vcxproj -> C:\dev\repos\llvm-project\build_llvm\Release\bin\yaml-bench.exe
  yaml2obj.vcxproj -> C:\dev\repos\llvm-project\build_llvm\Release\bin\yaml2obj.exe
EXEC : CPack error : Cannot find NSIS compiler makensis: likely it is not installed, or not in your PATH [C:\dev\repos\llvm-project\build_llvm\package.vcxproj]
EXEC : CPack error : Could not read NSIS registry value. This is usually caused by NSIS not being installed. Please install NSIS from http://nsis.sourceforge.net [C:\dev\repos\llvm-proje
ct\build_llvm\package.vcxproj]
EXEC : CPack error : Cannot initialize the generator NSIS [C:\dev\repos\llvm-project\build_llvm\package.vcxproj]
After installing NSIS, the previous command successfully creates an LLVM for Windows installer.
...
  verify-uselistorder.vcxproj -> C:\dev\repos\llvm-project\build_llvm\Release\bin\verify-uselistorder.exe
  yaml-bench.vcxproj -> C:\dev\repos\llvm-project\build_llvm\Release\bin\yaml-bench.exe
  yaml2obj.vcxproj -> C:\dev\repos\llvm-project\build_llvm\Release\bin\yaml2obj.exe
  CPack: Create package using NSIS
  CPack: Install projects
  CPack: - Install project: LLVM [Release]
  CMake Warning (dev) at C:/Program Files/Microsoft Visual Studio/2022/Preview/Common7/IDE/CommonExtensions/Microsoft/CMake/CMake/share/cmake-3.24/Modules/GNUInstallDirs.cmake:243 (messa
  ge):
    Unable to determine default CMAKE_INSTALL_LIBDIR directory because no
    target architecture is known.  Please enable at least one language before
    including GNUInstallDirs.
  Call Stack (most recent call first):
    C:/dev/repos/llvm-project/llvm/cmake/modules/LLVMInstallSymlink.cmake:5 (include)
    C:/dev/repos/llvm-project/build_llvm/tools/llvm-ar/cmake_install.cmake:48 (include)
    C:/dev/repos/llvm-project/build_llvm/tools/cmake_install.cmake:39 (include)
    C:/dev/repos/llvm-project/build_llvm/cmake_install.cmake:71 (include)
  This warning is for project developers.  Use -Wno-dev to suppress it.

  CPack: Create package
  CPack: - package: C:/dev/repos/llvm-project/build_llvm/LLVM-16.0.0git-win64.exe generated.
This installer generates the LLVM includes on disk as expected. The issue must therefore be confined to the installer generated by the script.
Reviewing Ninja NSIS Packaging
At this point, I ran build_llvm_release.bat to create an installer. Once packaging is complete, the install_manifest.txt file can be used to determine which files are in the installer. The batch file also runs lots of tests and this was annoying when trying to generate installers. Once the tests failed on the build I was creating and I had CTRL+C’d a couple of times, I ran ninja package myself (taken from the batch file)
C:\dev\repos\llvm-project\llvm\utils\release\llvm_package_15.0.0\build32_stage0>ninja package
[0/1] Run CPack packaging tool...CPack: Create package using NSIS
CPack: Install projects
CPack: - Install project: LLVM []
CMake Warning (dev) at C:/Program Files/Microsoft Visual Studio/2022/Preview/Common7/IDE/CommonExtensions/Microsoft/CMake/CMake/share/cmake-3.24/Modules/GNUInstallDirs.cmake:243 (message):
  Unable to determine default CMAKE_INSTALL_LIBDIR directory because no
  target architecture is known.  Please enable at least one language before
  including GNUInstallDirs.
Call Stack (most recent call first):
  C:/dev/repos/llvm-project/llvm/utils/release/llvm_package_15.0.0/llvm-project/llvm/cmake/modules/LLVMInstallSymlink.cmake:5 (include)
  C:/dev/repos/llvm-project/llvm/utils/release/llvm_package_15.0.0/build32_stage0/tools/llvm-ar/cmake_install.cmake:40 (include)
  C:/dev/repos/llvm-project/llvm/utils/release/llvm_package_15.0.0/build32_stage0/tools/cmake_install.cmake:39 (include)
  C:/dev/repos/llvm-project/llvm/utils/release/llvm_package_15.0.0/build32_stage0/cmake_install.cmake:114 (include)
This warning is for project developers.  Use -Wno-dev to suppress it.

CPack: Create package
CPack: - package: C:/dev/repos/llvm-project/llvm/utils/release/llvm_package_15.0.0/build32_stage0/LLVM-15.0.0-win32.exe generated.
I then try to find a package target in build.ninja. Search for CMakeFiles\package.util.+ include since we’re interested in include files. There are some interesting differences in the include directories of the build created manually from the local install and the one created by the script, e.g.
Try searching in build.ninja for the 2 header files the installer creates in the (broken) shipping LLVM for Windows build. Nothing there but searching the file system for remarks.h gives interesting results, e.g. the existence of an NSIS project file: project.nsi. Looks like there are some tutorials showing how to create .nsi files at Invoking NSIS run-time commands on compile-time – NSIS (sourceforge.io). The way NSIS is used with CPack when building is documented at Packaging With CPack — Mastering CMake
… but I completely missed the fact that the 2nd didn’t have these lines from the first.
if(CMAKE_INSTALL_COMPONENT STREQUAL "llvm-headers" OR NOT CMAKE_INSTALL_COMPONENT)
  file(INSTALL DESTINATION "${CMAKE_INSTALL_PREFIX}/include" TYPE DIRECTORY FILES
    "C:/dev/repos/llvm-project/llvm/include/llvm"
    "C:/dev/repos/llvm-project/llvm/include/llvm-c"
    FILES_MATCHING REGEX "/[^/]*\\.def$" REGEX "/[^/]*\\.h$" REGEX "/[^/]*\\.td$" REGEX "/[^/]*\\.inc$" REGEX "/license\\.txt$")
endif()

if(CMAKE_INSTALL_COMPONENT STREQUAL "llvm-headers" OR NOT CMAKE_INSTALL_COMPONENT)
  file(INSTALL DESTINATION "${CMAKE_INSTALL_PREFIX}/include" TYPE DIRECTORY FILES
    "C:/dev/repos/llvm-project/build_llvm/include/llvm"
    "C:/dev/repos/llvm-project/build_llvm/include/llvm-c"
    FILES_MATCHING REGEX "/[^/]*\\.def$" REGEX "/[^/]*\\.h$" REGEX "/[^/]*\\.gen$" REGEX "/[^/]*\\.inc$" REGEX "/cmakefiles$" EXCLUDE REGEX "/config\\.h$" EXCLUDE)
endif()
Search the codebase for “llvm-headers” and find the llvm-header component definition. That whole code block is gated by the LLVM_INSTALL_TOOLCHAIN_ONLY variable! This is explicitly turned off in build_llvm_release.bat! I rerun the batch file and see tests failing after the build succeeds. CTRL+C to kill the processes so that I can get to the root issue: does turning off that flag fix the includes? makensis fails, probably because I killed the build and some things might still have been in use?
C:\dev\repos\llvm-project\llvm\utils\release\llvm_package_15.0.0\build32_stage0>ninja package
[0/1] Run CPack packaging tool...CPack: Create package using NSIS
CPack: Install projects
CPack: - Install project: LLVM []
CMake Warning (dev) at C:/Program Files/Microsoft Visual Studio/2022/Preview/Common7/IDE/CommonExtensions/Microsoft/CMake/CMake/share/cmake-3.24/Modules/GNUInstallDirs.cmake:243 (message):
  Unable to determine default CMAKE_INSTALL_LIBDIR directory because no
  target architecture is known.  Please enable at least one language before
  including GNUInstallDirs.
Call Stack (most recent call first):
  C:/dev/repos/llvm-project/llvm/utils/release/llvm_package_15.0.0/llvm-project/llvm/cmake/modules/LLVMInstallSymlink.cmake:5 (include)
  C:/dev/repos/llvm-project/llvm/utils/release/llvm_package_15.0.0/build32_stage0/tools/llvm-ar/cmake_install.cmake:40 (include)
  C:/dev/repos/llvm-project/llvm/utils/release/llvm_package_15.0.0/build32_stage0/tools/cmake_install.cmake:39 (include)
  C:/dev/repos/llvm-project/llvm/utils/release/llvm_package_15.0.0/build32_stage0/cmake_install.cmake:128 (include)
This warning is for project developers.  Use -Wno-dev to suppress it.

CPack: Create package
CPack Error: Problem running NSIS command: "C:/Program Files (x86)/NSIS/makensis.exe" "C:/dev/repos/llvm-project/llvm/utils/release/llvm_package_15.0.0/build32_stage0/_CPack_Packages/win32/NSIS/project.nsi"
Please check C:/dev/repos/llvm-project/llvm/utils/release/llvm_package_15.0.0/build32_stage0/_CPack_Packages/win32/NSIS/NSISOutput.log for errors
CPack Error: Problem compressing the directory
CPack Error: Error when generating package: LLVM

FAILED: CMakeFiles/package.util
cmd.exe /C "cd /D C:\dev\repos\llvm-project\llvm\utils\release\llvm_package_15.0.0\build32_stage0 && "C:\Program Files\Microsoft Visual Studio\2022\Preview\Common7\IDE\CommonExtensions\Microsoft\CMake\CMake\bin\cpack.exe" --config ./CPackConfig.cmake"
ninja: build stopped: subcommand failed.
NSISOutput.log failed due to an “Internal compiler error #12345: error mmapping datablock to 17235001.” However, the include files are now present in the source directory being packaged by NSIS.
Turning Off Tests
There are many tests that the build script runs and some of them are failing. Testing is not on my critical path since all I need is to generate installers so I modify the scripts to enable me to package the build without running all the tests. I then start my build without tests and go to bed only to wake up the next morning to find that I need to rerun it because there are no running programs when I log in. Event Viewer doesn’t show any reboot-related events and sure enough, Task Manager shows over 9 days of uptime still. Turns out the Desktop Window Manager crashed (C:\WINDOWS\system32\dwm.exe)! Curse you dwmcore.dll. Well, time to install those updates I’ve been putting off and reboot before jumping back in. Now on the new Windows 10.0.22621.521. The build still fails:
-- LLVM host triple: i686-pc-windows-msvc
-- LLVM default target triple: i686-pc-windows-msvc
-- Using Release VC++ CRT: MD
-- Looking for os_signpost_interval_begin
-- Looking for os_signpost_interval_begin - not found
CMake Error at C:/Program Files (x86)/Microsoft Visual Studio/2019/Enterprise/Common7/IDE/CommonExtensions/Microsoft/CMake/CMake/share/cmake-3.20/Modules/FindPackageHandleStandardArgs.cmake:230 (message):
  Could NOT find Python3 (missing: Python3_EXECUTABLE Interpreter) (Required
  is at least version "3.6")

      Reason given by package:
          Interpreter: Cannot use the interpreter "C:/Python310/python.exe"

Call Stack (most recent call first):
  C:/Program Files (x86)/Microsoft Visual Studio/2019/Enterprise/Common7/IDE/CommonExtensions/Microsoft/CMake/CMake/share/cmake-3.20/Modules/FindPackageHandleStandardArgs.cmake:594 (_FPHSA_FAILURE_MESSAGE)
  C:/Program Files (x86)/Microsoft Visual Studio/2019/Enterprise/Common7/IDE/CommonExtensions/Microsoft/CMake/CMake/share/cmake-3.20/Modules/FindPython/Support.cmake:3165 (find_package_handle_standard_args)
  C:/Program Files (x86)/Microsoft Visual Studio/2019/Enterprise/Common7/IDE/CommonExtensions/Microsoft/CMake/CMake/share/cmake-3.20/Modules/FindPython3.cmake:485 (include)
  CMakeLists.txt:817 (find_package)


-- Configuring incomplete, errors occurred!
See also "C:/dev/repos/llvm-project/llvm/utils/release/llvm_package_15.0.0/build32_stage0/CMakeFiles/CMakeOutput.log".
See also "C:/dev/repos/llvm-project/llvm/utils/release/llvm_package_15.0.0/build32_stage0/CMakeFiles/CMakeError.log".
When I interrupted the tests before modifying the batch file to skip them, I noticed that they were being run by %LOCALAPPDATA%\Microsoft\WindowsApps\python3.9.exe. This is still present on my machine. Ah, turns out I’m now using the 2019 developer command prompt (and therefore an older CMake). The only difference between CMake 3.20 FindPython3.cmake and CMake 3.24 FindPython3.cmake is a comment about static libraries, so this failure is a mystery.
Diagnosing Build Failures
Since this issue also bit me when I moved to my Surface Book, it is worth understanding why it happens.
Missing CMake in Visual Studio 17.3.4 Developer Command Prompt
Here is the VS 2022 Preview vs VS 2022 Enterprise path to CMake:
C:\Program Files (x86)\Microsoft Visual Studio\Installer> where cmake
C:\Program Files\Microsoft Visual Studio\2022\Preview\Common7\IDE\CommonExtensions\Microsoft\CMake\CMake\bin\cmake.exe

C:\dev\repos\llvm-project\llvm\utils\release> where cmake
INFO: Could not find files for the given pattern(s).
The View Logs link opens the Documents folder under This PC – not particularly useful. Interestingly though, clicking on the Modify button shows a Total space required 1.63 GB. How is there space required before I’ve selected anything? Something similar happens with 16.11.19 though. Without making any individual component selections, I start the install process. CMake gets (re-?)installed as shown below. This fixes the setup warnings as well and cmake is now usable in the VS2022 command prompt.
Missing Python3 in VS 17.3.4 Developer Command Prompt
This is the error I got when trying to build LLVM on my Surface Book 2 in the VS 2022 developer command prompt:
CMake Error at C:/Program Files/CMake/share/cmake-3.17/Modules/FindPackageHandleStandardArgs.cmake:164 (message):
  Could NOT find Python3 (missing: Python3_EXECUTABLE Interpreter) (Required
  is at least version "3.6")

      Reason given by package:
          Interpreter: Cannot use the interpreter "C:/Python310/python.exe"

Call Stack (most recent call first):
  C:/Program Files/CMake/share/cmake-3.17/Modules/FindPackageHandleStandardArgs.cmake:445 (_FPHSA_FAILURE_MESSAGE)
  C:/Program Files/CMake/share/cmake-3.17/Modules/FindPython/Support.cmake:2437 (find_package_handle_standard_args)
  C:/Program Files/CMake/share/cmake-3.17/Modules/FindPython3.cmake:309 (include)
  CMakeLists.txt:817 (find_package)
Uninstalling CMake enables the command line to pick up the CMake distributed with Visual Studio. Python3 is now found successfully in the path below (I’ve shortened it using %LOCALAPPDATA%).
-- Found Python3: %LOCALAPPDATA%/Microsoft/WindowsApps/python3.8.exe (found suitable version "3.8.10", minimum required is "3.6") found components: Interpreter
Missing Python3 in VS 16.11.19 Developer Command Prompt
Interestingly, I still get the same error in VS 2019 despite uninstalling CMake 3.17. My earlier hypothesis is therefore invalid.
CMake Error at C:/Program Files (x86)/Microsoft Visual Studio/2019/Enterprise/Common7/IDE/CommonExtensions/Microsoft/CMake/CMake/share/cmake-3.20/Modules/FindPackageHandleStandardArgs.cmake:230 (message):
  Could NOT find Python3 (missing: Python3_EXECUTABLE Interpreter) (Required
  is at least version "3.6")

      Reason given by package:
          Interpreter: Cannot use the interpreter "C:/Python310/python.exe"

Call Stack (most recent call first):
  C:/Program Files (x86)/Microsoft Visual Studio/2019/Enterprise/Common7/IDE/CommonExtensions/Microsoft/CMake/CMake/share/cmake-3.20/Modules/FindPackageHandleStandardArgs.cmake:594 (_FPHSA_FAILURE_MESSAGE)
  C:/Program Files (x86)/Microsoft Visual Studio/2019/Enterprise/Common7/IDE/CommonExtensions/Microsoft/CMake/CMake/share/cmake-3.20/Modules/FindPython/Support.cmake:3165 (find_package_handle_standard_args)
  C:/Program Files (x86)/Microsoft Visual Studio/2019/Enterprise/Common7/IDE/CommonExtensions/Microsoft/CMake/CMake/share/cmake-3.20/Modules/FindPython3.cmake:485 (include)
  CMakeLists.txt:817 (find_package)
C:/Python310/python.exe -c "import sys; sys.stdout.write('.'.join([str(x) for x in sys.version_info[:3]]))"
I comment out the ERROR_QUIET line to reveal the stdout and stderr output from python since the return code from the python process is causing the CMake error to be raised. Running with --trace-expand --trace-redirect=cmake_trace.txt now reveals the root cause (paths below cleaned up using %LOCALAPPDATA%):
Python path configuration:
  PYTHONHOME = '%LOCALAPPDATA%\Programs\Python\Python310-32'
  PYTHONPATH = (not set)
  program name = 'C:/Python310/python.exe'
  isolated = 0
  environment = 1
  user site = 1
  import site = 1
  sys._base_executable = 'C:\\Python310\\python.exe'
  sys.base_prefix = '%LOCALAPPDATA%\\Programs\\Python\\Python310-32'
  sys.base_exec_prefix = '%LOCALAPPDATA%\\Programs\\Python\\Python310-32'
  sys.platlibdir = 'lib'
  sys.executable = 'C:\\Python310\\python.exe'
  sys.prefix = '%LOCALAPPDATA%\\Programs\\Python\\Python310-32'
  sys.exec_prefix = '%LOCALAPPDATA%\\Programs\\Python\\Python310-32'
  sys.path = [
    'C:\\Python310\\python310.zip',
    '%LOCALAPPDATA%\\Programs\\Python\\Python310-32\\DLLs',
    '%LOCALAPPDATA%\\Programs\\Python\\Python310-32\\lib',
    'C:\\Python310',
  ]
Fatal Python error: init_fs_encoding: failed to get the Python codec of the filesystem encoding
Python runtime state: core initialized
ModuleNotFoundError: No module named 'encodings'

Current thread 0x00003174 (most recent call first):
  <no Python frame>
django – init_fs_encoding: failed to get the Python codec of the filesystem encoding – Stack Overflow is a hint that the PYTHONHOME is wrong. Sure enough, I didn’t change it in build_llvm_release.bat so the paths in the configuration above do not exist! This now raises another question: how on earth does this work in VS 2022? I notice on my desktop that python.exe does not even appear in the CMake tracing output! The difference in behavior stems from the fact that the find_program command in Modules/FindPython/Support.cmake · v3.20.0 finds python 3.10 first in the VS 2019 environment. This path is then assigned to _Python3_EXECUTABLE, preventing the 3.8 path from being used. One important difference between CMake 3.20 and 3.23 that I notice is FindPython: fix typo error (fff8d5b2) · Commits · CMake / CMake · GitLab (kitware.com). Since the fix for the build_llvm_release.bat script is straightforward and it is clear that there are some CMake implementation differences at work, we no longer need to dig into why this behavior could be happening.
Python Hangs
One of my build attempts successfully completes stage0 but hangs when CMake tries to detect the python version. Manually running the same command (copied from Process Explorer) also hangs. Even %LOCALAPPDATA%/Microsoft/WindowsApps/python3.9.exe --version hangs. Inspecting the full dump created by Task Manager reveals that python3.9.exe made a call to get (what looks like) the Package.InstalledLocation Property (Windows.ApplicationModel) – Windows UWP applications | Microsoft Learn
...
-- Looking for os_signpost_interval_begin
-- Looking for os_signpost_interval_begin - not found
Windows becomes pretty unusable as I investigate this behavior (mouse doesn’t work, changes program in focus but can’t click on anything). A reboot fixes these issues (e.g. version now works). Can’t believe we have to deal with this in 2022???
7z x clang+llvm-15.0.1-aarch64-linux-gnu.tar.xz
7z x clang+llvm-15.0.1-arm64-apple-darwin21.0.tar.xz
7z x clang+llvm-15.0.1-x86_64-apple-darwin.tar.xz

tar xf clang+llvm-15.0.1-aarch64-linux-gnu.tar
tar xf clang+llvm-15.0.1-arm64-apple-darwin21.0.tar
tar xf clang+llvm-15.0.1-x86_64-apple-darwin.tar
Here are the directories in the include folder before the installer is created. There are also 28 include files in the include/llvm-c/ directory as desired.
Directory of llvm\utils\release\llvm_package_15.0.0\build32_stage0\_CPack_Packages\win64\NSIS\LLVM-15.0.0-win64\include
 clang
 clang-c
 clang-tidy
 lld
 lldb
 llvm
 llvm-c
Outstanding Questions
Why does the NSIS project fail to build? Why are there test failures and build errors?
Why does the Linux build have ompt-multiplex.h and the aarch64-unknown-linux-gnu directory?
How is the Windows ARM64 installer generated?
Why doesn’t the Windows build have c++, flang, mlir, mlir-c, and polly?
How do we get symbols to the Python app in the Microsoft Store?
In the last post, I described how to build the Info-ZIP sources. When using the resulting zip binaries in Cygwin, some important path handling issues come up. The paths passed to the zip binary when building the OpenJDK in Cygwin use forward slashes. The Cygwin User’s Guide has a section on File Access that outlines the support for POSIX and Win32-style file paths.
The Windows file system APIs support forward slashes in file paths. The zip source code uses the fopen CRT function, which eventually ends up calling CreateFileW. The CreateFileW docs state that you may use either forward slashes (/) or backslashes (\) in the lpFileName parameter. The translation of paths from Win32 to NT happens in a function called RtlDosPathNameToRelativeNtPathName_U as discussed in the Definitive Guide on Win32 to NT Path Conversion. Since this is a built-in Windows function, it does not support the /cygdrive/ style prefixes. Running the simple test program argtofile in Cygwin easily demonstrates this.
The /cygdrive/ prefixes will therefore not work for programs compiled for Windows (such as the zip binary directly compiled using Visual C++). Therefore, the cygpath command is necessary to translate these paths to Win32-style file paths. To peek into how cygpath works, we can take advantage of the fact that the source code for the cygpath utility is available online. I found it easier to browse the sources after cloning the repo:
The scenario of interest is what happens when cygpath -u ~ is invoked. In this case, we want to see how the “/cygdrive/” string is prefixed to the computed path.
normalizes the path by calling normalize_win32_path
before finally iterating through the mount items to find the path’s prefix in the mount table.
Also searching for the cygpath \s*( regex leads to the vcygpath function in winsup/utils/path.cc. That appears to be more directly related to the cygpath command (how?). Searching for the \"cygdrive\" regex also reveals that this is a magic string used in many places in the codebase.
All this shows that there is indeed some complexity behind maintaining the POSIX/Win32-style file path mapping in Cygwin but it should be possible to add some basic logic to the Windows Info-ZIP build to handle /cygdrive/ prefixes in its file arguments. The question I have at this point is how does compiling the zip binaries for the Cygwin environment (the shipping configuration) result in proper handling of POSIX-style filenames?
For the past month or so, I have been unable to update my 7.5 year-old machine from Windows 10 Build 14393 because “we couldn’t connect to the update service”! Some folks online suggested trying the “Fix problems with Windows Update” wizard. Unfortunately (or fortunately), this Wizard identified a Potential Windows Update Database Error – but it couldn’t fix it!
The next idea was trying the system file checker as mentioned here. This tool did not find any issues on my filesystem. The DISM.exe commands seemed irrelevant so I took a quick peek at the Event Viewer. Lo and behold, a long list of WindowsUpdateFailure3 events. The supposed cure? These commands suggested in this thread (found by Googling “WindowsUpdateFailure3”).
net stop wuauserv net stop cryptSvc net stop bits net stop msiserver ren C:\Windows\SoftwareDistribution SoftwareDistribution.old ren C:\Windows\System32\catroot2 Catroot2.old net start wuauserv net start cryptSvc net start bits net start msiserver
These didn’t solve the problem either. Digging around in log files led me to error code 0x80240438, but then again, no useful hints from queries on this code. The registry keys mentioned didn’t even exist on my machine. OK Google. Now there is a list of connection error codes, but of course it doesn’t include the one from the update failure log.
Desperation: what else haven’t I tried? This page with connection error codes mentions ensuring that http://*.update.microsoft.com is reachable. http://update.microsoft.com redirects to a page describing how to get the Windows 10 Creators Update now. Aha! I end up downloading and running the Windows 10 Upgrade tool. The update hangs (or appears to, after a couple of hours) at 25% so I simply hit the reset button hoping for the best. Sure enough, I end up back at build 14393 after a while. Desperation led me to try this tool again yesterday. I was encouraged to see that it actually downloaded an update to the Windows 10 Upgrade tool. When I popped in after rebooting to update, it was still at 25% but I decided to let it run overnight. Quite pleased was I this morning to come and find a Welcome screen prompting me to select my telemetry, etc, settings. I’m now finally running an up to date OS!